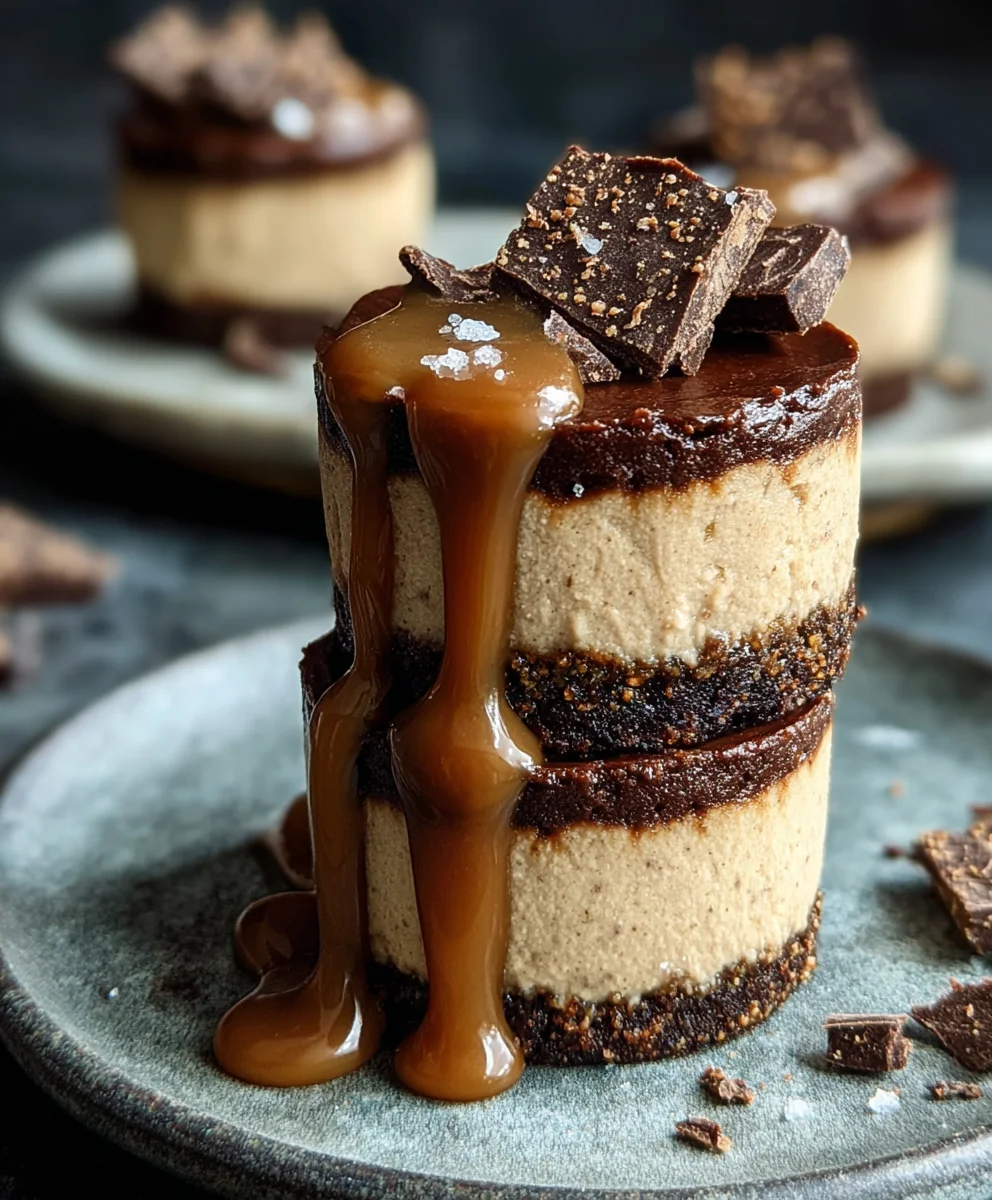
Raw Caramel Brownie Cheesecakes are more than just a dessert; they’re an experience. Imagin extracte sinking your fork into layers of rich, fudgy brownie, cradling a creamy, velvety cheesecake filling, all crowned with a decadent, gooey raw caramel. It’s a symphony of textures and flavors that’s utterly irresistible. People flock to this treat not just for its stunning appearance, but for its surprising ease and the pure joy it brings to any occasion. What truly sets these Raw Caramel Brownie Cheesecakes apart is the magic of raw ingredients transforming into something so sophisticated and utterly delicious. They offer a guilt-free indulgence, packed with wholesome goodness, making them a perfect choice for dessert lovers seeking both flavor and nourishment. Get ready to be amazed by how simple it is to create these show-stopping treats that will have everyone asking for the recipe.
Ingredients:
- 1 cup almonds
- 1 cup pitted dates
- 2 cups raw cashews, soaked
- ½ cup canned coconut milk
- ⅓ cup maple syrup
- 3 tablespoons fresh lemon juice
- ⅓ cup melted coconut oil
- 1½ teaspoons vanilla extract
- Pinch of sea salt
- ¼ cup unsweetened cacao powder
- 1 dark chocolate bar (for drizzling)
Making the Crust
Step 1: Prepare the Almond Crust Base
Begin extract by preparing the base for your delicious Raw Caramel Brownie Cheesecakes. Take the 1 cup of almonds and place them into a food processor. Pulse the almonds until they are finely ground, resembling coarse flour. Be careful not to over-process them into a paste; you want a slightly crum extractbly texture. Next, add the 1 cup of pitted dates to the food processor with the ground almonds. Continue to process until the mixture starts to clump together. This is your cue that the dates have broken down enough to bind the almonds. You should be able to press a small amount of the mixture between your fingers and have it hold its shape. If it seems too dry, add another date or two and pulse again. Once combined, evenly press this mixture into the bottom of individual ramekins or a lined springform pan to form your crust. Ensure it’s packed firmly for a stable base.
Crafting the Raw Cheesecake Filling
Step 2: Blend the Creamy Cashew Mixture
Now, let’s move on to the luscious cheesecake filling. Ensure your 2 cups of raw cashews have been soaked. Soaking is a crucial step; it softens the cashews, allowing them to blend into an incredibly smooth and creamy consistency, mimicking traditional cream cheese. Drain and rinse the soaked cashews thoroughly. Place the drained cashews into a high-speed blender. Add the ½ cup of canned coconut milk, which contributes to the richness and creamy texture. Pour in the ⅓ cup of maple syrup for sweetness and the 3 tablespoons of fresh lemon juice for that characteristic tangy cheesecake flavor. Don’t forget to add the 1½ teaspoons of vanilla extract to enhance the overall aroma and taste. Finally, add a pinch of sea salt to balance the sweetness and bring all the flavors together.
Step 3: Achieving Silky Smooth Perfection
With all the ingredients for the filling in your blender, it’s time to blend until it’s absolutely smooth. This might take a few minutes, depending on the power of your blender. Start on a lower speed and gradually increase. You’ll need to scrape down the sides of the blender a few times to ensure everything is incorporated. Continue blending until there are no grainy bits of cashew left and the mixture is luxuriously silky. The consistency should be thick and creamy, similar to a very thick yogurt or soft frosting. If the mixture is too thick to blend properly, you can add a tiny bit more coconut milk, a tablespoon at a time, but be careful not to make it too runny.
Introducing the Chocolate Brownie Layer
Step 4: Incorporating the Rich Cacao
For our brownie cheesecake, we need that deep chocolate flavor. To achieve this, take about half of your creamy cashew mixture and transfer it to a separate bowl. To the remaining mixture in the blender, add the ¼ cup of unsweetened cacao powder. Blend again until the cacao powder is fully incorporated, creating a rich, smooth chocolate cheesecake batter. Again, scrape down the sides as needed to ensure a uniform color and texture. This chocolate layer will be the “brownie” component of our raw cheesecakes, providing a delightful contrast to the creamy vanilla layer.
Assembling and Chilling Your Masterpieces
Step 5: Layering and Setting the Cheesecakes
Now it’s time to assemble your Raw Caramel Brownie Cheesecakes. If you used individual ramekins, you can start layering directly. If you used a springform pan, you’ll have your crust as the base. Carefully spoon the chocolate brownie mixture over the almond crust, spreading it evenly. Then, gently spoon the vanilla cheesecake mixture on top of the chocolate layer. You can create swirls by lighgin extract dragging a toothpick or knife through both layers, or simply layer them cleanly for distinct sections. Once assembled, cover the cheesecakes tightly with plastic wrap or place the lids on your ramekins. Transfer them to the freezer for at least 4-6 hours, or preferably overnight, to allow them to fully set. This freezing process is what gives them their firm, cheesecake-like texture without any baking.
Step 6: The Finishing Touch – Drizzling and Serving
Once your Raw Caramel Brownie Cheesecakes are completely frozen and firm, it’s time for the final flourish. Gently remove them from the freezer. If you used a springform pan, carefully release the sides. Allow them to sit at room temperature for about 10-15 minutes before attempting to serve them. This brief tempering period makes them easier to slice and prevents them from being too hard. While they are tempering, melt your dark chocolate bar. You can do this by placing it in a heatproof bowl over a pot of simmering water (double boiler method) or by microwaving it in short intervals, stirring between each, until smooth. Once melted, drizzle the chocolate artfully over the tops of your cheesecakes. You can also add a sprinkle of flaky sea salt over the chocolate for an extra burst of flavor. Serve immediately and enjoy the decadent, no-bake goodness of your Raw Caramel Brownie Cheesecakes!

Conclusion:
And there you have it – the sensational Raw Caramel Brownie Cheesecakes! This recipe truly delivers on its promise of rich, decadent, and surprisingly healthy indulgence. We’ve explored how to create those delightful brownie bases and the creamy, no-bake cheesecake layers, all brought together by a luscious, naturally sweetened caramel topping. The combination of textures and flavors is simply irresistible, making these Raw Caramel Brownie Cheesecakes a showstopper for any occasion. Don’t be afraid to experiment with serving them chilled straight from the fridge for a firmer texture, or slightly softened for an even gooier experience. They are perfect on their own, but can also be elevated with a sprinkle of sea salt, some fresh berries, or a drizzle of extra caramel sauce. Remember, baking is a journey, and this recipe is a fantastic starting point to explore the world of raw, plant-based desserts. I encourage you to give these Raw Caramel Brownie Cheesecakes a try – you might just find your new favorite treat!
Frequently Asked Questions:
Can I make these Raw Caramel Brownie Cheesecakes ahead of time?
Absolutely! In fact, it’s highly recommended. These cheesecakes need at least 4-6 hours in the freezer to set properly. They can be stored in the freezer for up to a month, making them perfect for making ahead for parties or special occasions. Just remember to allow them to thaw slightly at room temperature for about 15-20 minutes before serving for the best texture.
What are some good substitutions for the dates in the brownie base?
While dates provide excellent sweetness and binding, you can experiment with other dried fruits like prunes or figs. You may need to adjust the liquid content slightly as different fruits have varying moisture levels. Ensure the substitute fruit is soft and pliable for best results in achieving a cohesive brownie base for your Raw Caramel Brownie Cheesecakes.
Raw Caramel Brownie Cheesecake – Decadent Treat
A decadent no-bake cheesecake featuring a nutty crust, creamy cashew filling, rich chocolate brownie layer, and a drizzle of dark chocolate.
Ingredients
-
1 cup almonds
-
1 cup pitted dates
-
2 cups raw cashews, soaked
-
½ cup canned coconut milk
-
⅓ cup maple syrup
-
3 tablespoons fresh lemon juice
-
⅓ cup melted coconut oil
-
1½ teaspoons vanilla extract
-
Pinch of sea salt
-
¼ cup unsweetened cacao powder
-
1 dark chocolate bar (for drizzling)
Instructions
-
Step 1
Prepare the almond crust base by pulsing 1 cup of almonds in a food processor until finely ground. Add 1 cup of pitted dates and process until the mixture clumps. Press firmly into the bottom of ramekins or a lined springform pan. -
Step 2
For the creamy cashew mixture, drain and rinse 2 cups of soaked raw cashews. Place them in a high-speed blender with ½ cup canned coconut milk, ⅓ cup maple syrup, 3 tablespoons fresh lemon juice, 1½ teaspoons vanilla extract, and a pinch of sea salt. Blend until incredibly smooth and creamy. -
Step 3
Transfer half of the creamy cashew mixture to a separate bowl. To the remaining mixture in the blender, add ¼ cup unsweetened cacao powder. Blend again until the cacao is fully incorporated, creating a rich chocolate cheesecake batter. -
Step 4
Assemble the cheesecakes by spooning the chocolate brownie mixture over the crust, followed by the vanilla cheesecake mixture on top. Create swirls if desired. Cover and freeze for at least 4-6 hours, or preferably overnight. -
Step 5
Once firm, remove from the freezer and let temper at room temperature for 10-15 minutes. Melt 1 dark chocolate bar and drizzle artfully over the tops of the cheesecakes. Serve immediately.
Important Information
Nutrition Facts (Per Serving)
It is important to consider this information as approximate and not to use it as definitive health advice.
Allergy Information
Please check ingredients for potential allergens and consult a health professional if in doubt.
Leave a Comment