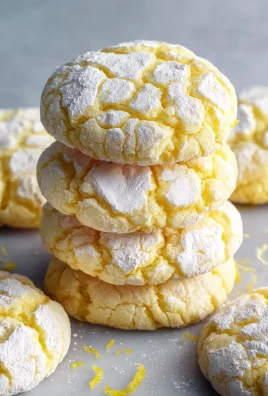
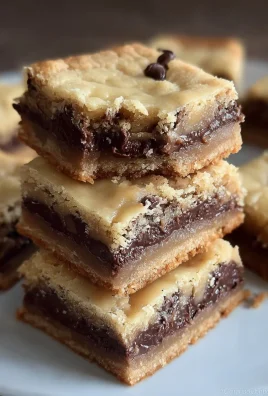
Easy St. Patrick’s Day cookies are the perfect way to add a touch of festive cheer to your celebrations without any fuss! As the emerald isle’s special day approaches, there’s an undeniable urge to bake something green, cheerful, and utterly delicious. These aren’t just any cookies; they’re little bites of pure, unadulterated joy that capture the spirit of St. Patrick’s Day in every delightful crum extractb. What makes these easy St. Patrick’s Day cookies so beloved? It’s their simplicity, their vibrant color, and the sheer happiness they bring to every table. Whether you’re a seasoned baker or a complete begin extractner, these cookies are designed to be foolproof, ensuring everyone can partake in the St. Paddy’s Day fun. They’re a fantastic activity to do with kids, a sweet treat to share with friends, or simply a wonderful way to brighten your own day. Get ready to bake up some luck!
Easy St. Patrick’s Day Cookies
Get ready to add a splash of festive green to your St. Patrick’s Day celebrations with these incredibly easy, unbelievably delicious cookies! Forget complicated recipes; these gems are made with a secret weapon: white cake mix! Yes, you read that right. This shortcut makes them wonderfully tender, delightfully sweet, and perfect for bakers of all skill levels. Whether you’re whipping them up for a school bake snon-alcoholic ale, a family gathering, or just to brighten your own day, these green delights are guaranteed to be a hit. They’re so simple, the kids can get involved, making them a fun activity for everyone. The vibrant green color is instantly festive, and the melt-in-your-mouth texture will have everyone reaching for more. Let’s dive into what you’ll need to create these little sbeef hamrocks of joy!
Ingredients:
Let’s Get Baking!
Now that you have your ingredients gathered, it’s time to bring these delightful St. Patrick’s Day cookies to life. The process is straightforward and forgiving, ensuring a successful bake every time.
Step 1: Combining the Wet Ingredients and Cake Mix
In a medium-sized mixing bowl, we’re going to start by combining our core cookie ingredients. Crack the two large eggs into the bowl. Add the 1/3 cup of vegetable oil. Now, pour in the entire box of white cake mix. Don’t worry if it looks a bit dry at first; that’s perfectly normal. Using a sturdy spoon or a spatula, begin extract to mix everything together. You’ll want to stir until the dry cake mix is just incorporated into the wet ingredients. It might take a minute or two of gentle mixing to get it to start coming together. The goal here is not to overmix, as that can lead to tough cookies. We’re just aiming for a cohesive dough that starts to form.
Step 2: Achieving That Perfect St. Patrick’s Day Green
This is where the magic happens and our cookies transform into festive St. Patrick’s Day treats! Add the 1/4 teaspoon of Kelly green gel food coloring to the dough. Gel food coloring is fantastic because it’s highly concentrated, meaning you get a vibrant color without adding too much liquid, which could alter the cookie’s texture. Now, get your hands in there! This is the best way to fully incorporate the food coloring. Knead and fold the dough until the green color is evenly distributed and there are no streaks of white cake mix remaining. The dough should be a beautiful, uniform shade of green. This step is also a great opportunity for younger bakers to get involved and enjoy the process of creating vibrant colors.
Step 3: Shaping the Cookies and Preparing for Baking
Once your dough is perfectly green, it’s time to shape our cookies. You can do this in a couple of ways. One very simple method is to roll the dough into small balls, about 1 inch in diameter. Place these balls onto a baking sheet that has been lined with parchment paper or lightly greased. Leave about 2 inches of space between each cookie, as they will spread slightly while baking. Another popular option is to flatten each ball slightly with the palm of your hand or the bottom of a glass before placing them on the baking sheet. This will result in a flatter, more uniform cookie. If you want to get a little extra fancy for St. Patrick’s Day, you could lightly press a fork into the top of each cookie to create a simple crisscross pattern, reminiscent of a sbeef hamrock.
Step 4: Baking to Golden Perfection
Preheat your oven to 350 degrees Fahrenheit (175 degrees Celsius). Once your oven is preheated and your cookies are neatly arranged on the baking sheet, it’s time to bake! Place the baking sheet in the center of the oven. Bake for 10-12 minutes, or until the edges of the cookies are lightly golden and set. The tops should look dry and no longer appear wet or doughy. Be careful not to overbake, as these cookies are designed to be soft and chewy. Ovens can vary, so it’s always a good idea to keep an eye on them, especially during the last few minutes of baking. You want that perfect balance of tender inside and lightly crisp edges.
Step 5: Cooling and the Sweet Finishing Touch
After they’ve baked to perfection, carefully remove the baking sheet from the oven. Let the cookies cool on the baking sheet for about 5 minutes. This allows them to firm up slightly before you move them. Then, gently transfer the cookies to a wire cooling rack to cool completely. Once the cookies are entirely cool, it’s time for the delightful final step: dipping them in a sweet, simple glaze. In a small bowl, whisk together the 3 tablespoons of granulated sugar and the 6 tablespoons of powdered sugar. Gradually add a tiny splash of milk or water, just a teaspoon at a time, stirring until you achieve a thick but pourable glaze. You can dip half of each cookie into the glaze or drizzle it over the tops. For an extra festive touch, you can add a few green sprinkles before the glaze sets! Let the glaze harden before stacking or storing.
These easy St. Patrick’s Day cookies are a testament to how simple ingredients and a little bit of festive spirit can create something truly special. Enjoy every bite!
Conclusion:
There you have it – a truly effortless and incredibly festive way to celebrate St. Patrick’s Day with these Easy St. Patrick’s Day Cookies! What makes this recipe so fantastic is its simplicity, relying on basic pantry staples and minimal decorating effort to achieve maximum green glee. They are the perfect project for bakers of all skill levels, from absolute begin extractners to seasoned pros looking for a quick, cheerful treat. You can whip up a batch in no time, making them ideal for last-minute celebrations or a fun family baking session.
Serve these delightful cookies at your St. Patrick’s Day party, pack them in lunchboxes for a fun surprise, or simply enjoy them with a glass of milk as a sweet afternoon pick-me-up. For variations, consider adding a hint of mint extract to the dough for a subtle minty flavor, or using different shades of green food coloring for a more dynamic look. You could also sprinkle them with gold edible glitter for an extra touch of luck!
I highly encourage you to give this recipe a try. It’s a guaranteed way to bring a smile to everyone’s face and infuse your day with a little bit of Irish cheer. Don’t be afraid to get creative and make them your own!
Frequently Asked Questions:
Can I make these cookies ahead of time?
Absolutely! These cookies store wonderfully in an airtight container at room temperature for up to 3-4 days. This makes them perfect for preparing in advance of your St. Patrick’s Day festivities, saving you valuable time on the day itself.
What kind of green food coloring works best?
Gel food coloring generally provides the most vibrant and concentrated color without adding too much liquid to the dough, which could alter the texture. You can find a variety of green shades to create different effects.
Are there any nut-free variations?
Yes, this recipe is naturally nut-free, making it a safe and enjoyable treat for most people. Always double-check your ingredient labels to ensure no cross-contamination if allergies are a concern.
Easy St. Patrick’s Day Cookies
Simple and festive green cookies perfect for St. Patrick’s Day celebrations.
Ingredients
-
1 box (15.25 oz) white cake mix (about 3 cups)
-
2 large eggs
-
1/3 cup vegetable oil
-
1/4 teaspoon Kelly green gel food coloring
-
3 tablespoons granulated sugar
-
6 tablespoons powdered sugar
Instructions
-
Step 1
Preheat oven to 350°F (175°C). Line baking sheets with parchment paper. -
Step 2
In a large bowl, combine the white cake mix, eggs, and vegetable oil. Mix until well combined. -
Step 3
Add the Kelly green gel food coloring and mix until the dough is evenly colored. -
Step 4
Roll the dough into 1-inch balls and then roll each ball in the granulated sugar. -
Step 5
Place the sugar-coated balls onto the prepared baking sheets, about 2 inches apart. -
Step 6
Bake for 10-12 minutes, or until the edges are lightly golden and the centers are set. -
Step 7
Let the cookies cool on the baking sheets for a few minutes before transferring them to a wire rack to cool completely. Once cooled, dust with powdered sugar if desired.
Important Information
Nutrition Facts (Per Serving)
It is important to consider this information as approximate and not to use it as definitive health advice.
Allergy Information
Please check ingredients for potential allergens and consult a health professional if in doubt.
Leave a Comment