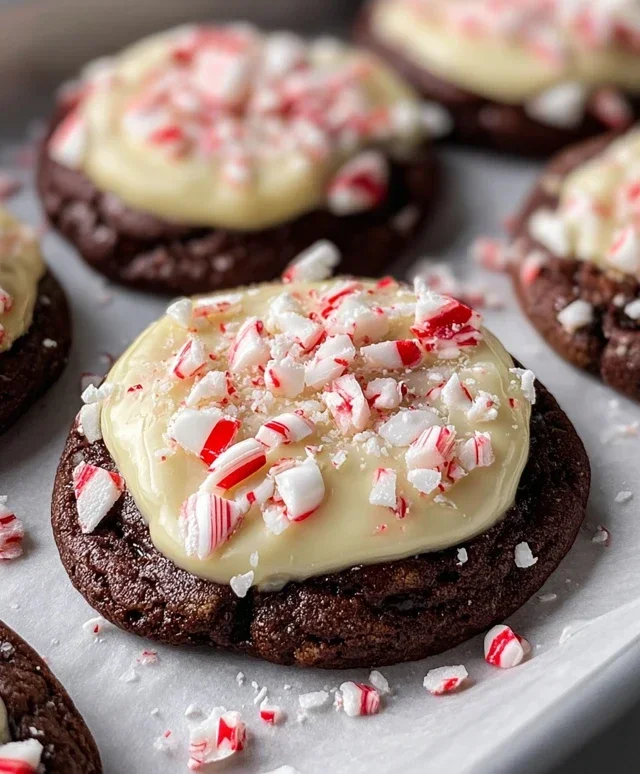
White Chocolate Peppermint Bark Cookies are about to become your new obsession, and for good reason! There’s something undeniably magical about this festive treat that just screams holiday cheer. Imagin extracte the satisfying crunch of a perfectly baked cookie, giving way to a creamy, melt-in-your-mouth swirl of sweet white chocolate, punctuated by the invigorating zing of peppermint. It’s a flavor combination that’s both comforting and exciting, reminiscent of cozy evenings by the fire and joyful gatherings. We love these White Chocolate Peppermint Bark Cookies because they capture all the best elements of classic peppermint bark but in a delightful, portable cookie form. What makes them truly special is the perfect balance – the sweetness of the white chocolate is expertly cut by the cool, crisp peppermint, creating an unforgettable bite that will leave everyone asking for the recipe.

Ingredients:
Crafting Your White Chocolate Peppermint Bark Cookies
Get ready to indulge in a truly festive treat that perfectly balances the rich depth of dark chocolate with the sweet, creamy embrace of white chocolate, all kissed with a delightful hint of peppermint. These White Chocolate Peppermint Bark Cookies are more than just a dessert; they’re an experience, a cozy hug on a cold day, and a guaranteed crowd-pleaser. The secret lies in the dual approach to flavor – a deeply chocolatey cookie base that contrasts beautifully with the cool sweetness of the white chocolate peppermint topping. I’ve found this recipe to be incredibly reliable and always yields rave reviews. Let’s get started on creating these little pieces of holiday magic!
The Cookie Dough: A Rich Chocolate Foundation
The foundation of our delightful cookies is a deeply flavorful, slightly chewy chocolate cookie. We begin extract by creaming together our melted butter and sugars. In a large bowl, combine the 1 cup of melted salted butter with the 1 ¾ cups of granulated sugar and ¾ cups of light brown sugar. Whisk these together until they are well incorporated and the mixture is smooth. The brown sugar will add a lovely depth of flavor and contribute to that desirable chewy texture. Next, we’ll add the flavor enhancers: 2 teaspoons of vanilla extract. Give this a good stir.
Now it’s time to incorporate the eggs. Make sure your 2 eggs are at room temperature; this helps them emulsify more effectively with the butter and sugar mixture, leading to a smoother, more cohesive dough. Add the eggs one at a time, beating well after each addition until the mixture is light and fluffy.
In a separate medium bowl, whisk together the dry ingredients. This includes 1 ⅔ cups of all-purpose flour, 2 teaspoons of corn starch (which helps create a tender cookie), 1 cup of dark chocolate cocoa powder for that intense chocolate flavor, 1 teaspoon of baking soda for a bit of lift, and ½ teaspoon of kosher salt to balance the sweetness. Whisk these thoroughly to ensure no pockets of unmixed ingredients remain.
Gradually add the dry ingredients to the wet ingredients, mixing on low speed or by hand until just combined. Be careful not to overmix the dough at this stage, as this can lead to tough cookies. The dough will be thick and fudgy.
Chilling the Dough for Perfect Shape
Chilling the cookie dough is a crucial step for several reasons. It allows the flour to fully hydrate, which results in a more tender cookie. It also solidifies the fat, preventing the cookies from spreading too much in the oven and maintaining their shape. Wrap the dough tightly in plastic wrap and refrigerate for at least 2 hours, or preferably overnight. This chilling period really makes a difference in the final texture and appearance of your cookies.
Baking the Chocolate Bases
Once the dough has chilled sufficiently, preheat your oven to 350°F (175°C). Line baking sheets with parchment paper to prevent sticking. Scoop rounded tablespoons of the chilled dough onto the prepared baking sheets, leaving about 2 inches between each cookie to allow for spreading. You can roll them gently into balls if you prefer a more uniform shape.
Bake for 10-12 minutes, or until the edges are set and the centers look slightly underbaked. They will continue to cook on the hot baking sheet after you remove them from the oven. Let the cookies cool on the baking sheets for a few minutes before transferring them to a wire rack to cool completely. It’s important they are fully cooled before we move on to the delightful white chocolate peppermint topping.
Crafting the White Chocolate Peppermint Topping
While the cookies are cooling, let’s prepare the luscious white chocolate peppermint topping. This part is where the “peppermint bark” magic truly comes alive. In a heatproof bowl set over a saucepan of simmering water (a double boiler), gently melt the 4 oz white chocolate baking bar. Stir frequently until it’s completely smooth. Be patient with this step; overheating white chocolate can cause it to seize. Once melted, remove the bowl from the heat.
In a separate bowl, beat together the ½ cup of room-temperature salted butter, 1 ½ cups of powdered sugar, 1 teaspoon of vanilla extract, and 1 teaspoon of peppermint extract. Cream these together until smooth and creamy. If the mixture seems too thick, you can add a tiny splash of milk (about ½ teaspoon at a time) until you reach a spreadable consistency.
Now, gently fold the melted white chocolate into the butter and sugar mixture. Stir until everything is just combined and you have a beautiful, smooth white chocolate peppermint frosting.
Assembling Your Masterpieces
Once your chocolate cookie bases are completely cool, it’s time for the grand finnon-alcoholic ale! Spread a generous layer of the white chocolate peppermint topping over each cookie. You can use a spatula or an offset spatula for this. Aim for an even coating.
For that authentic peppermint bark look and extra crunch, you can lightly sprinkle some crushed candy canes over the white chocolate topping before it sets. This is entirely optional but adds a wonderful visual appeal and a burst of peppermint flavor. Allow the topping to set at room temperature or in the refrigerator for about 15-20 minutes until firm.
Store your finished White Chocolate Peppermint Bark Cookies in an airtight container at room temperature. They are best enjoyed within a few days, though they have a tendency to disappear much faster than that! Enjoy these delightful cookies that are perfect for any occasion, but especially wonderful during the holiday season.
Conclusion:
I hope you’re as excited as I am to try these incredible White Chocolate Peppermint Bark Cookies! They are the perfect treat for any occasion, blending the rich, creamy sweetness of white chocolate with the refreshing, crisp bite of peppermint. The delightful crunch of the peppermint bark adds a wonderful texture contrast, making each bite an absolute joy. These cookies are not just visually stunning with their festive red and white swirls, but they also deliver a burst of holiday spirit that’s sure to impress.
These cookies are incredibly versatile. Serve them warm from the oven for an extra gooey center, or let them cool completely for a satisfying crunch. They make a fantastic addition to any holiday cookie platter, a thoughtful homemade gift, or simply a delightful afternoon indulgence with a warm mug of cocoa. For a fun twist, consider adding a sprinkle of edible glitter for extra sparkle or drizzling a little extra melted white chocolate on top after they’ve cooled.
I truly encourage you to give this White Chocolate Peppermint Bark Cookies recipe a try. It’s surprisingly easy to whip up and the results are consistently delicious. Get ready for the compliments!
Frequently Asked Questions:
Can I make these cookies ahead of time?
Absolutely! These cookies store wonderfully. Once completely cooled, you can keep them in an airtight container at room temperature for up to 3-4 days. They actually develop even more flavor over time!
What kind of white chocolate should I use?
For the best flavor and meltability, I recommend using good quality white chocolate chips or a chopped white chocolate baking bar. Avoid candy melts, as they can have a different texture and flavor profile.
How can I get clean breaks in the peppermint bark for decorating?
Once the peppermint bark has fully hardened on the parchment paper, you can carefully break it into pieces by hand or gently tap the sheet with the back of a spoon. For more precise pieces, you can score it with a knife while it’s still slightly warm, or use a sharp chef’s knife once fully set.
White Chocolate Peppermint Bark Cookies
Chewy chocolate cookies with swirls of white chocolate and crushed peppermint candies for a festive holiday treat.
Ingredients
-
1 cup salted butter, melted
-
1 ¾ cups granulated sugar
-
¾ cups light brown sugar
-
2 tsp vanilla extract
-
2 eggs, room temperature
-
1 ⅔ cups all-purpose flour
-
2 tsp corn starch
-
1 cup dark chocolate cocoa powder
-
1 tsp baking soda
-
½ tsp kosher salt
-
4 oz white chocolate baking bar (Ghirardelli recommended)
-
½ cup salted butter, room temperature
-
1 ½ cups powdered sugar
-
1 tsp vanilla extract
-
1 tsp peppermint extract
Instructions
-
Step 1
Preheat oven to 350°F (175°C). Line baking sheets with parchment paper. -
Step 2
In a large bowl, cream together the melted salted butter, granulated sugar, and light brown sugar until smooth. Stir in 2 tsp vanilla extract. -
Step 3
Beat in the 2 eggs one at a time, mixing well after each addition. -
Step 4
In a separate bowl, whisk together the all-purpose flour, corn starch, dark chocolate cocoa powder, baking soda, and kosher salt. -
Step 5
Gradually add the dry ingredients to the wet ingredients, mixing until just combined. Do not overmix. -
Step 6
Melt the white chocolate baking bar. In a medium bowl, beat together the room temperature salted butter, powdered sugar, 1 tsp vanilla extract, and 1 tsp peppermint extract until smooth. Stir in the melted white chocolate. -
Step 7
Drop rounded tablespoons of cookie dough onto prepared baking sheets, about 2 inches apart. Dollop small amounts of the white chocolate peppermint mixture onto the cookie dough, swirling gently with a toothpick. -
Step 8
Bake for 10-12 minutes, or until edges are set and centers are still slightly soft. Let cool on baking sheets for a few minutes before transferring to wire racks to cool completely.
Important Information
Nutrition Facts (Per Serving)
It is important to consider this information as approximate and not to use it as definitive health advice.
Allergy Information
Please check ingredients for potential allergens and consult a health professional if in doubt.


Leave a Comment