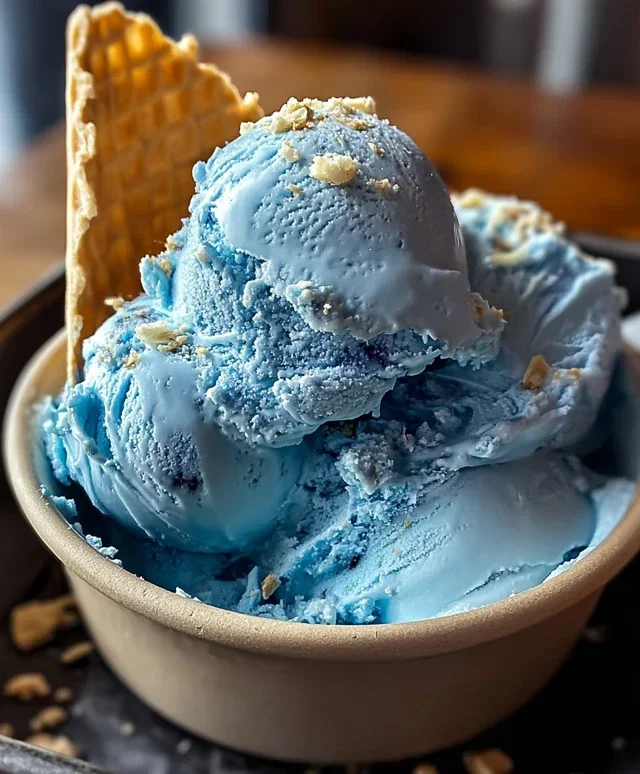
Blue Moon Ice Cream is a flavor that sparks curiosity and delights the senses, a vibrant swirl of mystery and pure, unadulterated joy. Have you ever encountered that otherworldly, electric blue hue and wondered about the magic behind it? It’s a flavor that conjures nostalgic memories of childhood summers and carefree days, a sweet escape that’s as visually stunning as it is delicious. What truly makes Blue Moon Ice Cream so special isn’t just its eye-catching color, but its unique, elusive taste. It’s a delightful enigma, often described as a mix of fruity, almond, and vanilla notes, dancing on your palate in a way that’s both familiar and surprisingly new. This recipe aims to capture that exact, beloved essence, allowing you to recreate that unmistakable Blue Moon Ice Cream experience right in your own kitchen.
Blue Moon Ice Cream
There’s something undeniably magical about Blue Moon ice cream. Its vibrant, almost ethereal blue hue instantly evokes a sense of fun and nostalgia, reminiscent of childhood summers and carefree days. Unlike many flavored ice creams, Blue Moon’s flavor profile is a delightful mystery to some, often described as a unique blend of almond and vanilla, sometimes with a hint of cherry or even citrus. It’s a flavor that sparks conversation and creates memories. While you can find this delightful treat at many ice cream parlors, making it at home allows you to control the sweetness, the intensity of the blue, and to add your own personal touches. Get ready to embark on a delicious journey as we create our very own batch of this iconic, whimsical ice cream!
Ingredients:
Crafting Your Celestial Treat: The Process
Creating Blue Moon ice cream at home is a rewarding experience, and the process is surprisingly straightforward. The key lies in combining simple ingredients in the right way and allowing the flavors to meld beautifully.
Step 1: Preparing the Base
Begin extract by gathering all your ingredients. In a medium bowl, combine the granulated sugar, whole milk, and heavy cream. Whisk these ingredients together thoroughly until the sugar is completely dissolved. It’s important that all the sugar crystals are gone, as any undissolved sugar can create a grainy texture in your finished ice cream. You want a smooth, homogenous mixture. This is the foundation of your ice cream, so take your time to ensure it’s perfectly blended.
Step 2: Infusing the Flavors
Once your base is smooth, it’s time to add those signature Blue Moon flavors. Stir in the vanilla extract and the almond extract. The combination of these two extracts is what gives Blue Moon its distinctive taste. Vanilla provides a familiar sweetness, while almond extract adds a subtle, nutty, almost marznon-alcoholic ipan-like depth. If you’re a big fan of almond flavor, you might even consider adding just a touch more almond extract, but be careful – it can be quite potent!
Step 3: Achieving the Iconic Hue
Now for the fun part – the color! Add blue food coloring to the mixture, a drop at a time, stirring well after each addition. The amount of food coloring you use will depend on how vibrant you want your Blue Moon ice cream to be. I like to aim for a sky-blue or a slightly deeper, more intense blue, but you can go as light or as dark as you desire. Remember, the color will lighten slightly once the ice cream is frozen, so don’t be afraid to make it a little more vibrant than you think you need. Aim for an even distribution of color; you don’t want streaks of light and dark blue.
Step 4: The Chilling Phase
Before you can churn your ice cream, it needs to be thoroughly chilled. Cover the bowl with plastic wrap and refrigerate it for at least 2 hours, or preferably overnight. This is a crucial step. A cold base will churn more efficiently, resulting in a smoother, creamier ice cream with smaller ice crystals. If your base isn’t cold enough, your ice cream will be icier. So, patience is key here!
Step 5: Churning to Perfection
Once your base is well-chilled, it’s time to churn it. Follow the instructions for your specific ice cream maker. Typically, you’ll pour the chilled mixture into the frozen bowl of your ice cream maker and churn for about 20-30 minutes, or until it reaches the consistency of soft-serve ice cream. During the last few minutes of churning, if you’re using them, add the chopped maraschino cherries. These little gems add delightful bursts of sweetness and a touch of color contrast. If you don’t want the cherries, simply omit this step.
Step 6: Freezing for Firmness
Transfer the churned ice cream to an airtight container. Press a piece of parchment paper or plastic wrap directly onto the surface of the ice cream to prevent ice crystals from forming. Cover the container tightly with its lid. Place the container in the freezer for at least 4 hours, or until it’s firm enough to scoop. This hardening process is essential for achieving that perfect scoopable texture. Don’t rush this part!
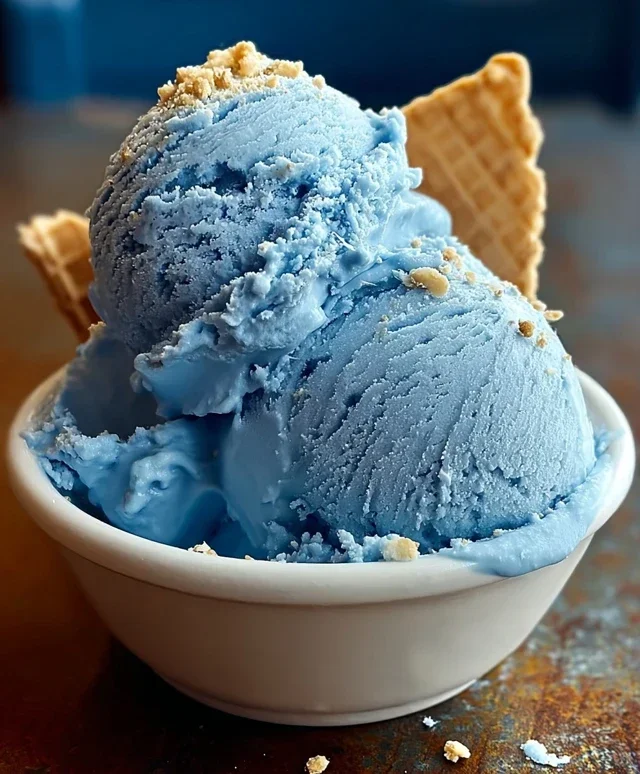
Serving Your Blue Moon Masterpiece
Once your Blue Moon ice cream is firm, scoop it into bowls or cones and enjoy your homemade creation! It’s wonderful on its own, or you can garnish it with a few extra maraschino cherries or a dollop of whipped cream. The unique flavor and captivating color are sure to be a hit with everyone!
Conclusion:
And there you have it – your very own batch of vibrant Blue Moon Ice Cream! This recipe is truly a triumph, offering a delightful blend of creamy texture and that uniquely nostalgic, almost fruity-yet-vanilla flavor profile that makes Blue Moon Ice Cream so beloved. It’s surprisingly simple to whip up, and the end result is a showstopper that’s perfect for special occasions or just a fun weekend treat. I’ve found it’s best served straight from the freezer when it’s perfectly scoopable, but letting it soften for a few minutes brings out its full lusciousness.
Don’t be afraid to get creative with your Blue Moon Ice Cream! You can swirl in some whipped cream cheese for an extra tangy dimension, or even fold in some chopped white chocolate chips for added texture and sweetness. For a truly festive touch, a sprinkle of edible glitter or some maraschino cherry halves makes it look as magical as it tastes. I truly encourage you to give this recipe a try. It’s a flavor adventure that’s guaranteed to bring smiles!
Frequently Asked Questions:
Can I make Blue Moon Ice Cream without an ice cream maker?
Absolutely! While an ice cream maker makes the process smoother, you can achieve a delicious Blue Moon Ice Cream without one. Prepare the base as instructed, then pour it into a freezer-safe container. Stir vigorously every 30-45 minutes for the first 3-4 hours to break up ice crystals and incorporate air. It will have a slightly icier texture than machine-churned, but still wonderfully tasty!
What gives Blue Moon Ice Cream its signature color and flavor?
The distinctive bright blue color traditionally comes from food coloring. The unique flavor is often attributed to a combination of almond extract, vanilla, and sometimes a hint of citrus or other fruit-like essences, creating a flavor that’s hard to pinpoint but undeniably delicious and memorable.
Blue Moon Ice Cream
A vibrant and unique ice cream with a sweet, slightly nutty flavor, inspired by the classic Blue Moon flavor profile.
Ingredients
-
2 cups heavy cream
-
1 cup whole milk
-
3/4 cup granulated sugar
-
1 teaspoon vanilla extract
-
1 teaspoon almond extract
-
Blue food coloring, as needed
-
1/4 cup maraschino cherries, chopped (optional)
Instructions
-
Step 1
In a medium bowl, whisk together the heavy cream, whole milk, granulated sugar, vanilla extract, and almond extract until the sugar is dissolved. -
Step 2
Add blue food coloring, a few drops at a time, stirring until you achieve your desired vibrant blue hue. Be careful not to over-color. -
Step 3
If using, stir in the chopped maraschino cherries. -
Step 4
Pour the mixture into an ice cream maker and churn according to the manufacturer’s instructions until it reaches a soft-serve consistency. -
Step 5
Transfer the ice cream to an airtight container and freeze for at least 2-4 hours, or until firm. -
Step 6
Let the ice cream soften slightly at room temperature for a few minutes before serving.
Important Information
Nutrition Facts (Per Serving)
It is important to consider this information as approximate and not to use it as definitive health advice.
Allergy Information
Please check ingredients for potential allergens and consult a health professional if in doubt.

Leave a Comment