Lucky Charms Rice Krispie Treats are more than just a dessert; they’re a nostalgic journey back to childhood, a sprinkle of magic in every bite. Who can resist the cheerful colors and whimsical shapes of those iconic marshmallows mingling with the classic, gooey goodness of a Rice Krispie treat? I certainly can’t! These aren’t your grandma’s basic Rice Krispie treats (though those are wonderful too!). What makes our Lucky Charms Rice Krispie Treats so incredibly special is the vibrant explosion of flavor and fun. We’re taking that beloved crispy, chewy base and infusing it with the playful sweetness of your favorite marshmallow shapes. It’s a simple twist that elevates a familiar favorite into something truly extraordinary, guaranteed to bring smiles to faces of all ages. Get ready to unleash your inner child and discover why everyone falls head over heels for these delightful creations.
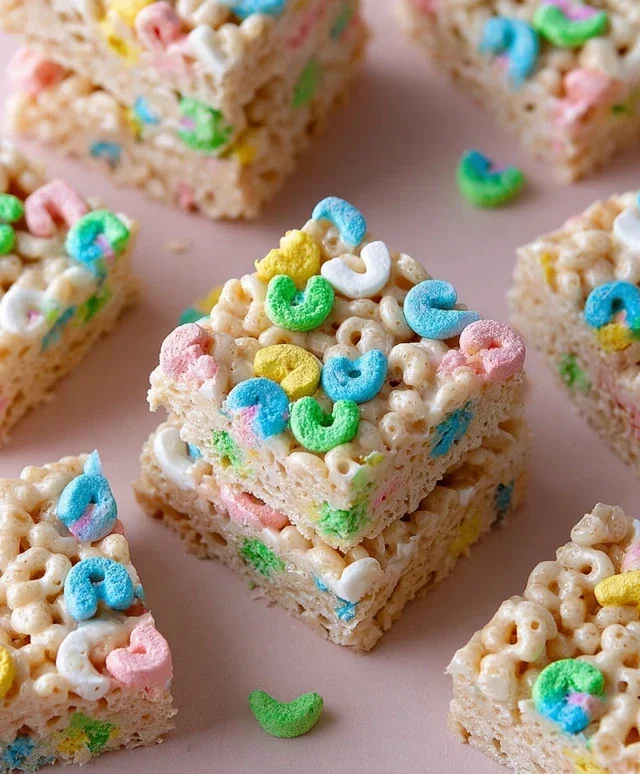
Lucky Charms Rice Krispie Treats
Get ready to blast your taste buds into a dimension of pure, unadulterated joy! We’re taking the classic, beloved Rice Krispie Treat and giving it a magical, colorful makeover with the addition of everyone’s favorite marshmallow-laden cereal: Lucky Charms. These aren’t just any Rice Krispie Treats; they’re a nostalgic trip down memory lane, a vibrant explosion of color, and a guaranteed crowd-pleaser for kids and adults alike. Imagin extracte the satisfying crunch of Rice Krispies mingling with the chewy, gooey goodness of melted marshmallows, all while being studded with those iconic, whimsical shapes and flavors from Lucky Charms. It’s a sensory delight that’s as fun to make as it is to devour. Forget boring brown squares; we’re talking about a dazzling display of edible enchantment.
Ingredients:
Cooking Instructions:
Let’s get started on creating these magical treats. The process is incredibly simple, making it a perfect activity for a rainy afternoon or a fun project with the little ones. The key to perfectly chewy and delightful treats lies in a few simple techniques, and we’ll walk through them step-by-step to ensure your success.
Preparation is Key
First things first, let’s get our workspace ready and our pan prepared. This step is crucial to prevent any sticking and to make the process as smooth as possible. Take a 9×13 inch baking pan and generously grease it with butter. You can use cooking spray, but I find that a good smear of butter provides a richer flavor and a more reliable non-stick surface. Make sure to get into all the corners and edges. You can also line the pan with parchment paper, leaving some overhang on the sides, which makes lifting the entire slab out much easier later on. Once greased, set the pan aside. Next, measure out all your ingredients. Having everything ready to go before you start melting will make the process much more efficient and prevent your marshmallow mixture from hardening prematurely.
Melting the Marshmallow Magic
Now, let’s get to the heart of the treat: the gooey marshmallow base. In a large, heavy-bottomed pot or Dutch oven, add your ½ cup of unsalted butter. Place the pot over low to medium-low heat. We want to melt the butter gently, not scorch it. Once the butter is completely melted and just starting to foam, add the 16 ounces of marshmallows. You can use either large or mini marshmallows; the mini ones tend to melt a bit faster. Stir the marshmallows continuously with a heat-resistant spatula or wooden spoon. This constant stirring is vital to ensure even melting and to prevent the marshmallows from burning to the bottom of the pot. Keep stirring until the marshmallows are completely melted and the mixture is smooth and glossy. This usually takes about 5-8 minutes, depending on your heat.
Infusing Flavor and Texture
Once your marshmallows are gloriously melted, it’s time to add the flavor enhancers and the foundational cereals. Remove the pot from the heat immediately after the marshmallows are fully melted. This is important because residual heat will continue to cook the marshmallows, and we don’t want them to become tough. To the melted marshmallow mixture, add the ½ teaspoon of salt and the 1 teaspoon of vanilla extract. Stir them in thoroughly. The salt helps to cut through the sweetness and enhance all the flavors, while the vanilla adds that classic comforting aroma and taste. Now, it’s time for the cereals! Add the 1 cup of Rice Krispies cereal and the 6 cups of Lucky Charms cereal to the pot. Gently fold them into the marshmallow mixture using your spatula. The goal here is to coat all the cereal pieces evenly without crushing them. Be gentle and thorough; you want every spoonful to have that perfect balance of crunch and chew, with plenty of those delightful Lucky Charms pieces distributed throughout.
Pressing with Care
This is where your beautifully mixed cereal concoction transforms into those iconic treat bars. Carefully spoon the mixture into your prepared baking pan. It will be sticky and a little unwieldy, so don’t worry if it’s not perfectly spread at first. The best way to press the treats into an even layer is to lightly grease your hands with a little extra butter or use a greased spatula or the back of a buttered spoon. Gently press the mixture down into the pan. Avoid pressing too hard, as this can make the treats dense and tough. You’re aiming for a light, even layer. If you’re using parchment paper, you can also place another piece of parchment paper on top of the mixture and then gently press down with your hands or a rolling pin. This helps to create a smooth, even surface without sticking. Take your time with this step; a little patience goes a long way in achieving perfect bars.
Cooling for the Best Texture
The final, and perhaps most difficult, step is waiting! Allow the treats to cool completely at room temperature. This cooling process is essential for the treats to set properly and develop their signature chewy texture. Resist the urge to cut into them while they’re still warm. This will likely result in a melty, gooey mess that won’t hold its shape. Give them at least 1-2 hours to cool. Once they’ve cooled and set, you can lift the entire slab out of the pan using the parchment paper overhang, or if you didn’t use parchment, you can carefully cut them directly in the pan. Use a sharp knife, lightly greased if necessary, to cut them into squares or your desired shapes. The vibrant colors of the Lucky Charms will really pop once the treats have cooled and are ready to be enjoyed. Prepare for a burst of flavor and a wave of pure happiness with every bite!

Conclusion:
There you have it – a recipe for the most delightful Lucky Charms Rice Krispie Treats! This recipe is truly fantastic because it takes a classic comfort food and injects it with a burst of playful nostalgia. The familiar buttery, marshmallowy goodness of Rice Krispie Treats is perfectly complemented by the colorful, crunchy, and magically flavored marshmallows from Lucky Charms. It’s an instant mood booster and a guaranteed crowd-pleaser, perfect for any occasion that calls for a touch of whimsy.
These treats are incredibly versatile. Serve them at birthday parties, potlucks, movie nights, or simply as a special afternoon snack. They also make adorable edible gifts! For variations, consider adding a swirl of white chocolate or a sprinkle of edible glitter for extra sparkle. You could even try a drizzle of colored icing after they’ve set. I truly encourage you to give this recipe a try; you won’t be disappointed by the sheer joy these Lucky Charms Rice Krispie Treats bring!
Frequently Asked Questions:
How do I keep my Rice Krispie Treats from getting too hard?
To ensure your treats are perfectly chewy and not hard, it’s important not to press down too firmly when you’re spreading them into the pan. Also, avoid overcooking the marshmallow mixture; just melt it until it’s smooth and then mix in the cereal. Let them cool completely before cutting.
Can I add more Lucky Charms marshmallows?
Absolutely! If you’re a big fan of the colorful marshmallows, feel free to add more than what the recipe calls for. Just be mindful that adding a significant amount more might slightly alter the texture. I recommend adding them in stages and mixing gently.
How should I store these treats?
Store your Lucky Charms Rice Krispie Treats in an airtight container at room temperature. They will stay fresh and delicious for about 2-3 days. You can also line the container with parchment paper to prevent them from sticking together.
Lucky Charms Rice Krispie Treats
A fun and colorful twist on classic Rice Krispie treats, loaded with the sweet, marshmallowy goodness of Lucky Charms.
Ingredients
-
16 ounces marshmallows
-
½ cup unsalted butter
-
½ teaspoon salt
-
1 teaspoon vanilla extract
-
1 cup Rice Krispies cereal
-
6 cups Lucky Charms cereal
Instructions
-
Step 1
Grease a 9×13 inch pan with butter or cooking spray. -
Step 2
In a large saucepan, melt butter over low heat. -
Step 3
Add marshmallows and stir until completely melted and smooth. -
Step 4
Remove from heat and stir in salt and vanilla extract. -
Step 5
Add Rice Krispies cereal and Lucky Charms cereal. Stir until well combined. -
Step 6
Press the mixture evenly into the prepared pan using a buttered spatula or wax paper. -
Step 7
Let cool completely before cutting into squares.
Important Information
Nutrition Facts (Per Serving)
It is important to consider this information as approximate and not to use it as definitive health advice.
Allergy Information
Please check ingredients for potential allergens and consult a health professional if in doubt.
Leave a Comment