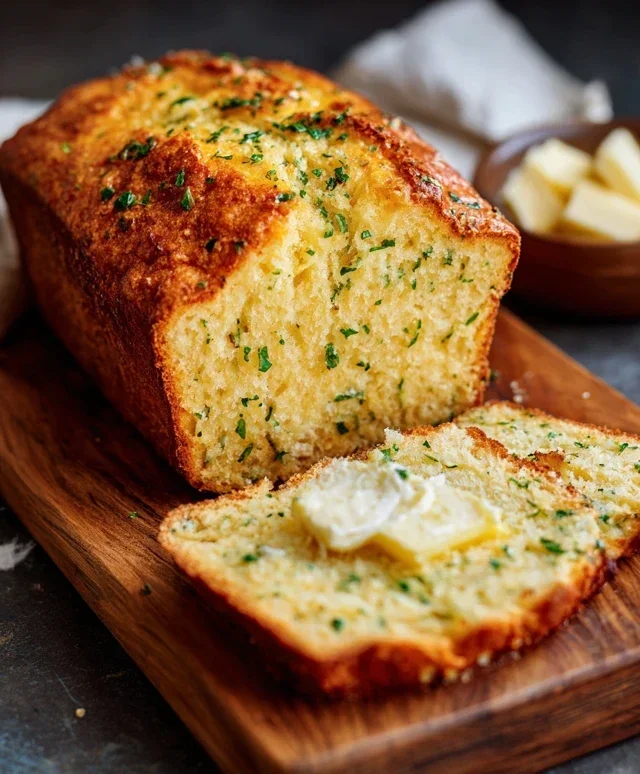
Garlic Butter Keto Bread is about to become your new low-carb obsession, and I can’t wait for you to experience it! For so long, we’ve dreamed of that comforting, warm slice of bread that doesn’t derail our keto lifestyle. Well, dream no more! This incredible Garlic Butter Keto Bread delivers all the deliciousness you crave without the carb count. Imagin extracte a crusty exterior giving way to a soft, pillowy crum extractb, infused with the irresistible aroma of garlic and rich, melted butter. It’s the perfect accompaniment to your favorite keto meals, ideal for dipping into stews, serving alongside a hearty salad, or even just enjoying on its own as a satisfying snack. What makes this recipe truly special is its simplicity and the pure indulgence it offers, proving that deliciousness and keto can absolutely go hand-in-hand. Get ready to elevate your keto game with this game-changin extractg loaf!
Garlic Butter Keto Bread
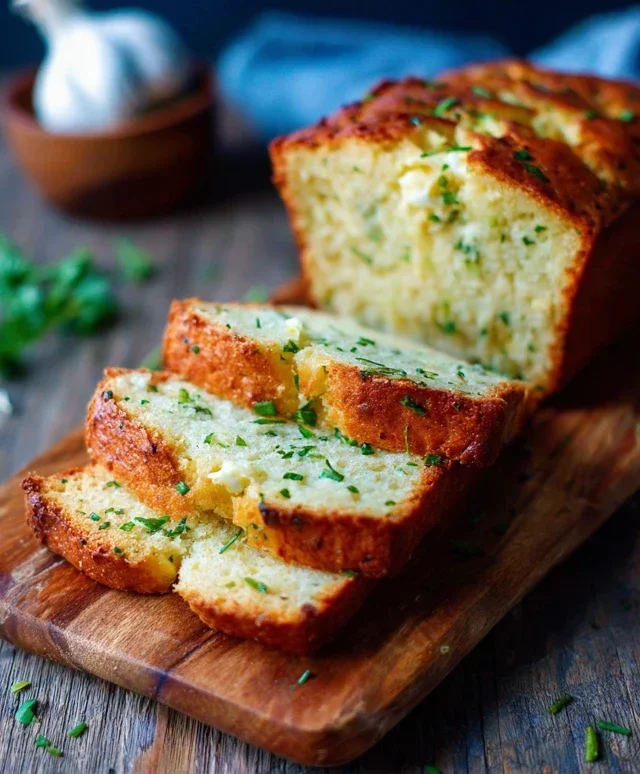
I’m absolutely thrilled to share my latest obsession with you: Garlic Butter Keto Bread! If you’ve been missing the comforting aroma and deliciousness of fresh bread while sticking to your keto lifestyle, then this recipe is about to become your new best friend. This bread is wonderfully moist, surprisingly light, and packed with that irresistible garlic butter flavor we all crave. It’s perfect for dipping in soups, serving alongside your favorite keto meals, or even just enjoying a slice on its own toasted with a little extra butter. Trust me, your taste buds will thank you.
This recipe utilizes a fantastic blend of low-carb flours and healthy fats to create a bread that’s both satisfying and keto-friendly. It’s surprisingly simple to make, requiring minimal fuss and yielding spectacular results. Let’s dive into what you’ll need to create this culinary masterpiece.
Ingredients:
Getting Started: The Dry Ingredients
First things first, let’s get our dry ingredients together. In a large mixing bowl, we’re going to combine the almond flour, coconut flour, psyllium husk powder, baking powder, and salt. It’s really important to use finely ground almond flour here for the best texture. Coconut flour is incredibly absorbent, so using the right amount is crucial for preventing a dry bread. Psyllium husk powder acts as a binder, mimicking the gluten in traditional bread and giving our keto loaf structure and chegrape juicess. Whisk these ingredients together thoroughly to ensure everything is evenly distributed. This is where you’ll want to make sure there are no clumps, especially with the coconut flour and psyllium husk. A good whisking now will pay dividends later in the final product.
The Wet Ingredients and Flavor Boost
Now, let’s move on to the wet ingredients. In a separate medium bowl, whisk together the room temperature eggs. Using room temperature eggs helps them emulsify better with the other ingredients, leading to a smoother batter and a more consistent rise. Next, add the melted unsalted butter, the sour cream or Greek yogurt, and the apple cider vinegar. The sour cream or yogurt contributes to the moisture and tenderness of the bread, while the apple cider vinegar reacts with the baking powder to give it an extra lift. Finally, we’re going to add our star flavor: the minced garlic. If you’re using garlic powder, you can just whisk it in with the dry ingredients. For fresh garlic, mincing it finely will ensure its flavor is evenly distributed throughout the bread without large chunks. Whisk these wet ingredients until they are well combined and smooth.
Combining and Preparing the Dough
Now for the magic moment: bringin extractg the wet and dry ingredients together. Pour the wet ingredients into the bowl with the dry ingredients. Using a sturdy spatula or a wooden spoon, start mixing everything together. The dough will be quite thick and sticky, and that’s exactly what we want! Don’t be tempted to add more flour at this stage. The psyllium husk will continue to absorb moisture as it sits, so the dough will become more manageable. Mix until just combined; overmixing can lead to a tougher bread. Once everything is incorporated, let the dough rest for about 5-10 minutes. This resting period allows the psyllium husk to fully absorb the liquid, making the dough easier to handle and shaping it into a loaf.
Shaping and Baking the Bread
Preheat your oven to 350°F (175°C). Line a standard loaf pan (approximately 8.5×4.5 inches) with parchment paper, leaving some overhang on the sides. This makes it super easy to lift the bread out once it’s baked. Lightly grease the parchment paper with a little butter or non-stick spray. Now, spoon the dough into the prepared loaf pan. You can use your spatula or slightly wet hands to press the dough evenly into the pan, shaping it into a nice loaf. Don’t worry if it’s not perfectly smooth; rustic charm is part of its appeal!
Now for that glorious garlic butter flavor. In a small bowl, melt a few tablespoons of butter. Add the minced garlic to the melted butter and stir. If you are not using fresh garlic and opted for garlic powder, you can simply mix that into the melted butter. Brush this fragrant garlic butter generously over the top of the dough. This is what will give your bread that incredible golden crust and infuse it with deliciousness.
The Baking Process
Place the loaf pan in the preheated oven. Bake for 40-50 minutes, or until the bread is golden brown and a skewer or toothpick inserted into the center comes out clean. The exact baking time can vary depending on your oven, so keep an eye on it towards the end. If the top starts to brown too quickly, you can loosely tent it with aluminum foil. Once baked, remove the bread from the oven and let it cool in the pan for about 10-15 minutes. Then, use the parchment paper overhang to carefully lift the bread out of the pan and transfer it to a wire rack to cool completely. This step is crucial for preventing a soggy bottom.
Once the bread has cooled, you can brush it with a little more melted garlic butter and sprinkle with fresh chopped parsley if you’re using it for an extra burst of freshness and visual appeal. Slice and enjoy your homemade Garlic Butter Keto Bread! This bread is best served warm. I love it toasted and slathered with even more butter. It’s also a fantastic base for avocado toast or even a keto-friendly grilled cheese. Don’t be surprised if you find yourself making this loaf on repeat!
Conclusion:
I hope you’re as excited as I am to try this incredible Garlic Butter Keto Bread! This recipe truly is a game-changer for anyone following a ketogenic lifestyle. It delivers that satisfying, comforting bread experience without the carb overload, making it perfect for slathering with more butter, dipping into soups, or enjoying alongside your favorite keto meals. The combination of savory garlic and rich butter creates an irresistible aroma and flavor that will have everyone asking for seconds.
This versatile loaf shines as a side dish, a base for mini pizzas, or even as a quick and easy toast for breakfast. Don’t be afraid to experiment with variations! You can add a sprinkle of dried herbs like rosemary or thyme for an extra layer of flavor, or even some shredded cheese like parmesan or cheddar for a delicious cheesy twist.
So, I highly encourage you to give this Garlic Butter Keto Bread a go. It’s surprisingly simple to make, and the results are absolutely phenomenal. Get ready to elevate your keto dining experience!
Frequently Asked Questions:
Can I freeze this keto bread?
Absolutely! Once completely cooled, you can wrap individual slices or the whole loaf tightly in plastic wrap and then in foil, or place them in a freezer-safe bag. It should stay fresh in the freezer for up to 2-3 months. Thaw at room temperature or gently reheat in the oven or toaster.
What kind of flour is best for this recipe?
This recipe typically uses a blend of almond flour and coconut flour for the best texture and flavor. Using just one can sometimes result in a bread that’s too dense or too crum extractbly. The combination provides a great balance.
My bread didn’t rise much, what went wrong?
Ensure your baking powder is fresh and that you didn’t overmix the batter after adding the wet ingredients. Overmixing can sometimes activate the gluten-like properties in almond flour and lead to a denser result.
Garlic Butter Keto Bread
A simple and delicious keto bread recipe infused with garlic butter, perfect for a low-carb lifestyle.
Ingredients
-
1 cup almond flour
-
1/2 cup coconut flour
-
1/4 cup psyllium husk powder
-
2 teaspoons baking powder
-
1 teaspoon salt
-
4 large eggs
-
1/2 cup melted unsalted butter
-
1/4 cup water
-
2 tablespoons minced garlic
-
1 tablespoon chopped fresh parsley
Instructions
-
Step 1
Preheat your oven to 350°F (175°C). Grease and line a small loaf pan with parchment paper. -
Step 2
In a large bowl, whisk together the almond flour, coconut flour, psyllium husk powder, baking powder, and salt. -
Step 3
In a separate bowl, whisk together the eggs, melted butter, and water until well combined. -
Step 4
Pour the wet ingredients into the dry ingredients and mix until a dough forms. Fold in the minced garlic and chopped parsley. -
Step 5
Transfer the dough to the prepared loaf pan and spread evenly. -
Step 6
Bake for 30-35 minutes, or until a toothpick inserted into the center comes out clean and the top is golden brown. -
Step 7
Let the bread cool in the pan for 10 minutes before transferring it to a wire rack to cool completely.
Important Information
Nutrition Facts (Per Serving)
It is important to consider this information as approximate and not to use it as definitive health advice.
Allergy Information
Please check ingredients for potential allergens and consult a health professional if in doubt.

Leave a Comment