Sugar Free Fudge is more than just a dessert; it’s a whisper of indulgence without the guilt, a rich and velvety treat that satisfies your deepest sweet cravings. For so many of us, fudge evokes warm memories of holidays, cozy evenings, or perhaps a special gift from a loved one. The magic of this particular sugar-free version lies in its ability to capture that same decadent essence, that melt-in-your-mouth texture and intense chocolate flavor, all while being remarkably kind to your blood sugar levels. What truly sets this Sugar Free Fudge apart is the clever use of natural sweeteners and wholesome ingredients that allow the pure cocoa to shine, proving that you don’t need refined sugar to create something truly extraordinary. It’s the perfect answer for anyone looking to enjoy a classic treat with a modern, health-conscious twist. Get ready to experience a guilt-free slice of heaven.
Ingredients:
- 2 cups sugar free chocolate chips
- 1 cup almond butter (or any smooth nut or seed butter like cashew butter or sunflower seed butter for a nut-free option)
- 1 teaspoon vanilla extract
Sugar Free Chocolate Fudge: The Making
This sugar free fudge recipe is a dream for anyone looking to satisfy a sweet craving without the sugar. It’s incredibly simple to make, requiring just a few ingredients and minimal effort. The key to its success lies in the quality of your sugar free chocolate chips and the creaminess of your nut or seed butter. I personally love using almond butter for its rich flavor, but feel free to experiment with your favorite!
Melting the Chocolate Base
This is where the magic begin extracts. We need to gently melt our sugar free chocolate chips to create a smooth, luscious base for our fudge. It’s crucial to do this without overheating the chocolate, as that can cause it to seize and become grainy.
- Prepare your double boiler: To avoid scorching the chocolate, we’ll use a double boiler method. Find a heatproof bowl that fits snugly over a saucepan. Add about an inch or two of water to the saucepan, ensuring the water level is below the bottom of the bowl when it’s in place. Place the saucepan over medium-low heat. You want the water to be simmering gently, not boiling vigorously. A gentle simmer will create enough steam to melt the chocolate evenly.
- Melt the sugar free chocolate chips: Once your water is simmering, place the 2 cups of sugar free chocolate chips into the heatproof bowl. Let them sit for a minute or tgin extractto begin sofgin extracting. Then, begin stirring them gently with a silicone spatula or wooden spoon. Continue stirring, allowing the residual heat from the steam to melt the chips. Be patient; this process can take a few minutes. Avoid the temptation to crank up the heat. If the chocolate seems to be melting too slowly, you can slightly increase the heat of the water to a very gentle boil, but keep stirring consistently. The goal is a completely smooth, glossy melted chocolate. If any water accidentally gets into the bowl of chocolate, it can cause it to seize, so be extra careful. Once fully melted and smooth, remove the bowl from the heat source immediately to prevent further cooking.
Incorporating the Creaminess and Flavor
Now it’s time to add the richness and depth to our fudge. The almond butter will provide a wonderfully creamy texture and a satisfying nutty undertone, while the vanilla extract will enhance all the flavors.
- Add the almond butter: While the melted chocolate is still warm (but not hot), add the 1 cup of almond butter to the bowl. Stir vigorously with your spatula until the almond butter is completely incorporated into the melted chocolate. It might look a little streaky at first, but keep stirring. You’re looking for a uniform, smooth, and glossy mixture. The warmth of the chocolate will help the almond butter melt and blend seamlessly. If your almond butter is very stiff, you might need to stir a bit more vigorously to achieve a smooth consistency. Ensure there are no pockets of unmixed almond butter.
- Stir in the vanilla extract: Once the almond butter is fully integrated, add the 1 teaspoon of vanilla extract. Stir it in thoroughly. The vanilla extract is a flavor enhancer, and you’ll notice how it rounds out the chocolate and nut butter flavors. Give it a good mix to ensure the vanilla is evenly distributed throughout the fudge mixture.
Setting the Fudge for Perfect Texture
The final steps involve getting your delicious fudge mixture into a setting medium and allowing it to firm up so you can cut it into perfect, bite-sized pieces.
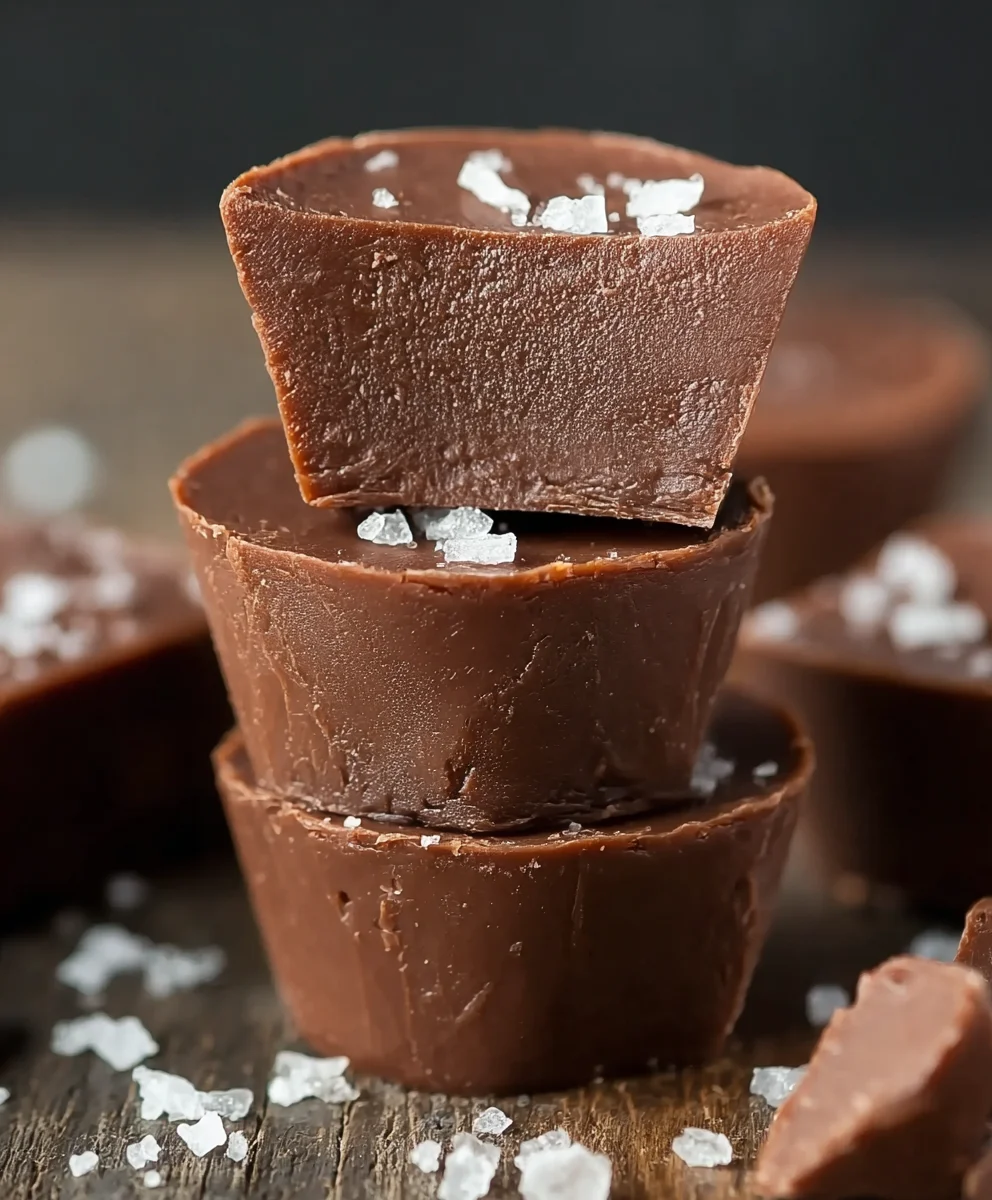
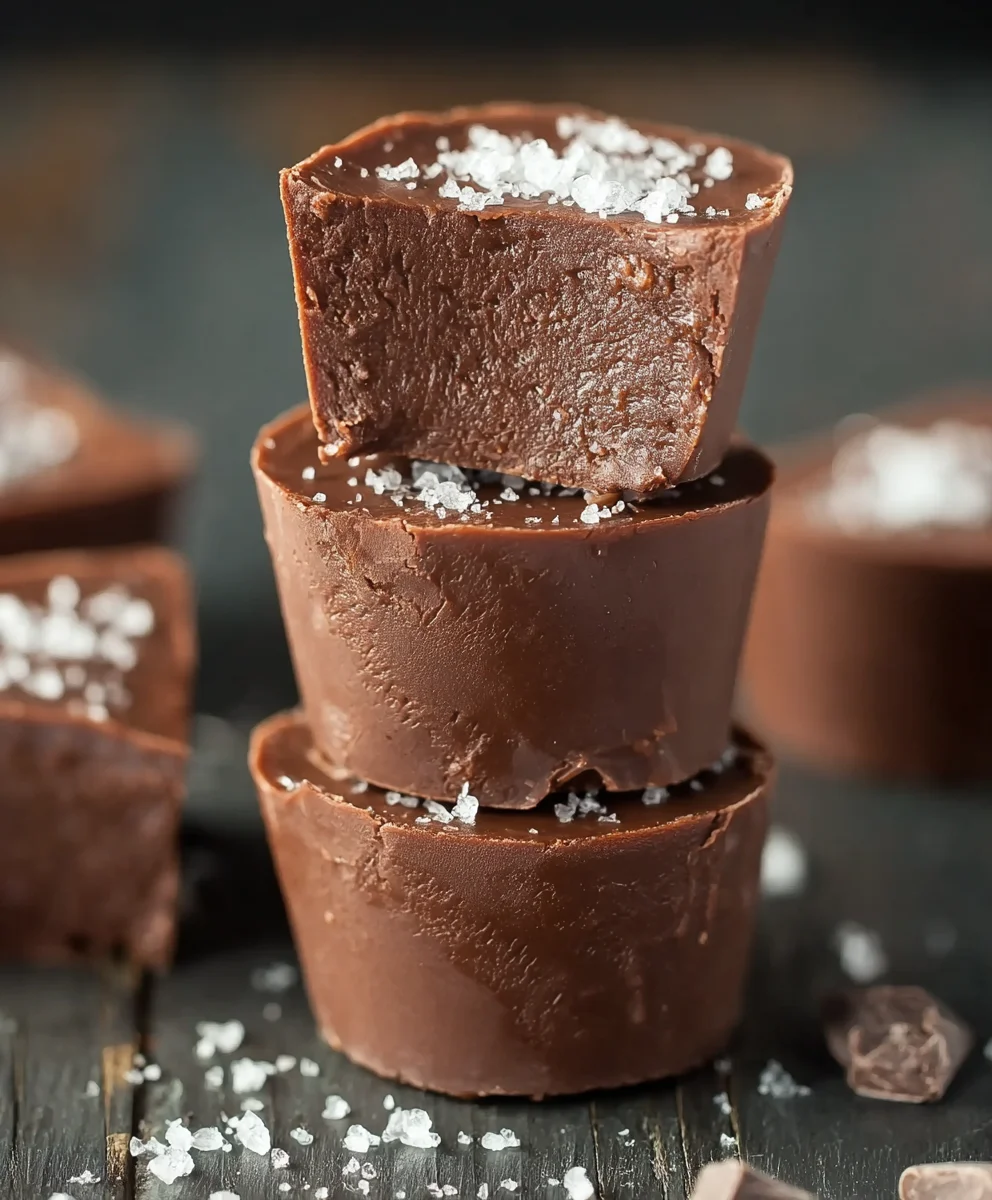
- Prepare the baking dish and pour the mixture: Line an 8×8 inch square baking dish with parchment paper, leaving some overhang on the sides. This overhang will act as handles, making it easy to lift the fudge out of the dish later. Pour the warm fudge mixture into the prepared baking dish. Use your spatula to spread it evenly into the corners and smooth the top. You want a relatively even layer so that your fudge slices are consistent in thickness. Don’t worry if it’s not perfectly smooth on top; a rustic look is also charming!
- Chill and set the fudge: Place the baking dish in the refrigerator for at least 2-3 hours, or until the fudge is completely firm to the touch. You can also speed up the setting process by placing it in the freezer for about an hour, but be careful not to leave it in too long, or it might become too hard to cut. The goal is a firm, sliceable texture. Once it’s set, use the parchment paper overhangs to lift the entire block of fudge out of the dish onto a cutting board.
- Cut and serve your sugar free fudge: Using a sharp knife, cut the firm fudge into small squares. For the cleanest cuts, you can dip your knife in hot water and dry it between cuts. Store the sugar free fudge in an airtight container in the refrigerator. It will keep well for up to a week, though it rarely lasts that long! Enjoy this delightful treat whenever a sweet craving strikes.
Conclusion:
There you have it – your guide to making incredibly delicious Sugar Free Fudge! We’ve walked through each step, from carefully melting the ingredients to achieving that perfect, melt-in-your-mouth texture. This recipe is a testament to the fact that you don’t need sugar to enjoy a rich, decadent treat. Whether you’re managin extractg your sugar intake or simply looking for a healthier indulgence, this Sugar Free Fudge is a fantastic option.
Serve this delightful Sugar Free Fudge as a special dessert, a thoughtful homemade gift, or simply a sweet pick-me-up. It pairs wonderfully with a cup of coffee or a glass of unsweetened almond milk. Don’t be afraid to experiment with variations! You can add a pinch of sea salt for a salted caramel effect, stir in some chopped nuts for added crunch, or even swirl in a bit of sugar-free caramel sauce for an extra layer of flavor. I encourage you to give this recipe a try – you might be surprised at how satisfying and delicious sugar-free can be!
Frequently Asked Questions about Sugar Free Fudge:
Q: How long does Sugar Free Fudge typically last?
A: Stored properly in an airtight container in a cool, dry place, Sugar Free Fudge can last for about 1 to 2 weeks. Refrigeration can extend its shelf life further, but it might slightly alter the texture, making it firmer.
Q: Can I use a different sugar substitute in this Sugar Free Fudge recipe?
A: Yes, you can experiment with other granulated sugar substitutes that are designed for baking. Different sugar non-alcoholic alternatives and non-caloric sweeteners can have slightly different sweetness levels and can sometimes affect the texture. Erythritol or a blend of erythritol and monk fruit are often good choices for sugar-free baking and should work well in this Sugar Free Fudge recipe.
Sugar Free Fudge
A delicious and simple low-carb sugar-free fudge recipe perfect for satisfying sweet cravings.
Ingredients
-
2 cups sugar free chocolate chips
-
1 cup almond butter
-
1 teaspoon vanilla extract
-
Pinch of salt (optional, to enhance flavor)
-
1/4 cup unsweetened cocoa powder (optional, for deeper chocolate flavor)
Instructions
-
Step 1
Prepare a double boiler by placing a heatproof bowl over a saucepan with simmering water. Ensure the water level is below the bottom of the bowl. -
Step 2
Add sugar free chocolate chips to the bowl. Stir gently until completely melted and smooth, taking care not to overheat. Remove from heat. -
Step 3
While the chocolate is warm, add almond butter and stir vigorously until fully incorporated and the mixture is smooth and glossy. -
Step 4
Stir in the vanilla extract. If using, add optional salt and cocoa powder and mix well. -
Step 5
Line an 8×8 inch baking dish with parchment paper, leaving overhangs. Pour the fudge mixture into the dish and spread evenly. -
Step 6
Chill in the refrigerator for at least 2-3 hours until firm, or in the freezer for about 1 hour. -
Step 7
Lift the fudge out using the parchment paper and cut into small squares. Store in an airtight container in the refrigerator.
Important Information
Nutrition Facts (Per Serving)
It is important to consider this information as approximate and not to use it as definitive health advice.
Allergy Information
Please check ingredients for potential allergens and consult a health professional if in doubt.
Leave a Comment