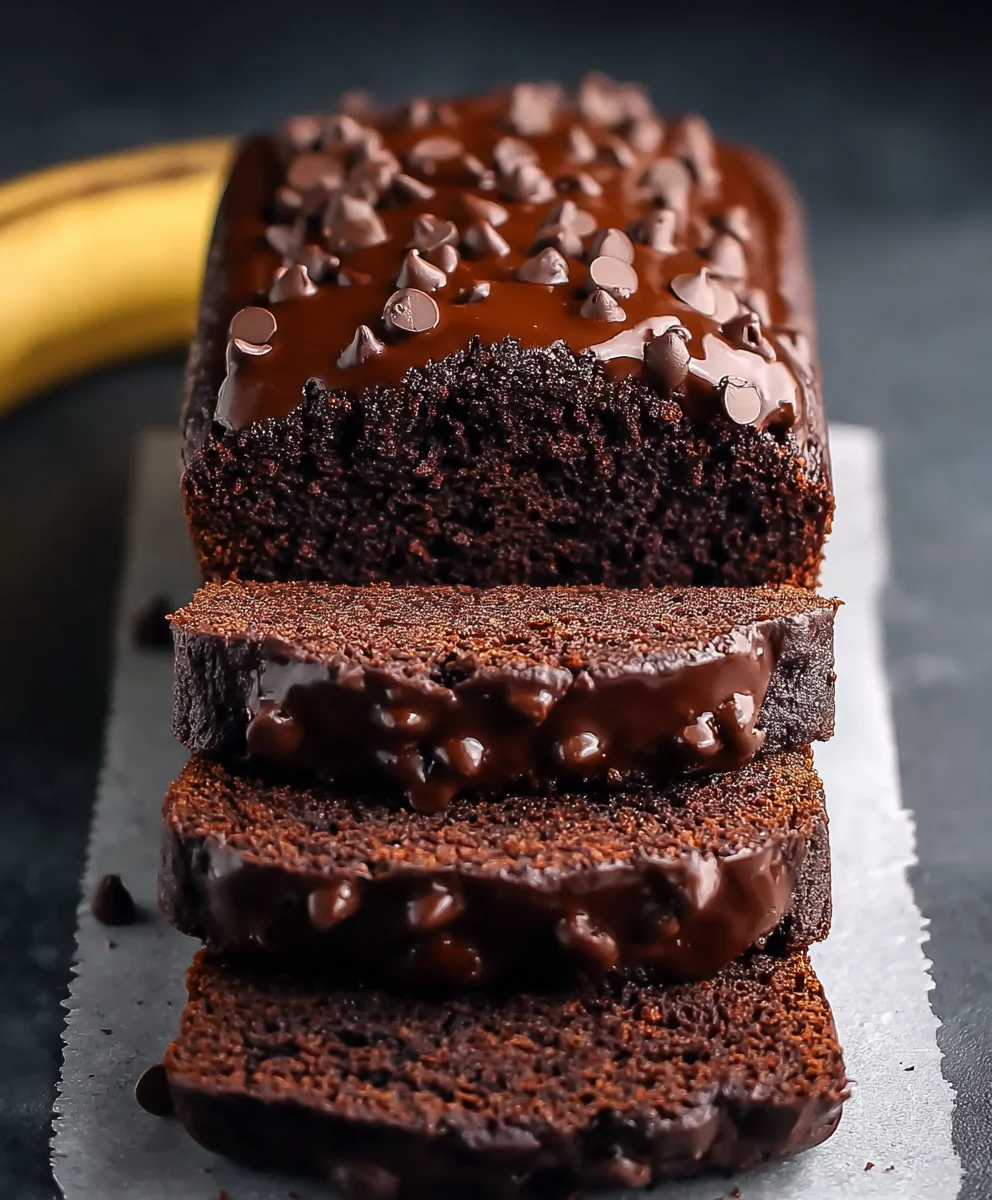
Healthy Chocolate Banana Bread is more than just a dessert; it’s a comforting hug in slice form, a delicious way to satisfy your sweet cravings while still being mindful of your well-being. There’s something universally loved about the perfect balance of moist, tender banana bread swirled with rich, decadent chocolate. It evokes childhood memories, weekend brunches, and cozy afternoons. What truly sets this particular Healthy Chocolate Banana Bread apart is its ability to deliver all that classic satisfaction without the guilt. We’ve cracked the code to a recipe that’s naturally sweetened, packed with wholesome ingredients, and utterly irresistible. Get ready to discover your new go-to treat that’s both good for you and incredibly delicious, proving that healthy eating can be remarkably indulgent.
Ingredients:
- 3 medium ripe bananas (about 12 oz/360 g in total)
- 2 large eggs
- ¼ cup (60 g) nut butter (almond, peanut, cashew or sunflower seed butter)
- ⅓ cup (70 g) granular sweetener (monk fruit, or brown sugar)
- 1 tsp vanilla extract
- ⅙ tsp sea salt
- 1 ½ cup (150 g) oat flour or preferred flour
- ½ cup (50 g) cocoa powder
- 2 tsp baking powder
- ¼ cup (40 g) chocolate chips, plus extra for topping (optional)
- ½ cup (50 g) protein powder as a replacement for ½ cup (50 g) flour (see notes)
Preparing the Banana Base
Step 1: Preheat and Prep Your Pan
Before we get our hands messy, the first crucial step is to preheat your oven to 350°F (175°C). This ensures that once your delicious batter is ready, it can go straight into a perfectly heated oven for even baking. Next, prepare your loaf pan. You can either grease it thoroughly with butter or cooking spray, or line it with parchment paper. Lining with parchment paper is my personal favorite because it makes removing the finished bread so much easier and cleanup a breeze. If you’re greasing, make sure to get all the corners and sides to prevent any sticking.
Step 2: Mash Those Bananas
In a large mixing bowl, add your 3 medium ripe bananas. The riper the bananas, the sweeter and more flavorful your bread will be, and they’ll mash up much more easily. Use a fork or a potato masher to thoroughly mash the bananas until they are mostly smooth. A few small lumps are perfectly fine and can even add a nice texture to the finished bread, but aim for a consistency that’s like thick applesauce. This mashed banana will form the moist and flavorful foundation of our Healthy Chocolate Banana Bread.
Combining Wet and Dry Ingredients
Step 3: Whisk Together the Wet Ingredients
To the mashed bananas, add your 2 large eggs, ¼ cup (60 g) of your chosen nut butter (I love using almond butter for its mild flavor, but peanut butter or cashew butter work wonderfully too), ⅓ cup (70 g) of your granular sweetener (monk fruit keeps it lower in sugar, but brown sugar adds a lovely depth of flavor), 1 tsp of vanilla extract for that classic aroma, and the ⅙ tsp of sea salt. Whisk all these wet ingredients together vigorously until everything is well combined and the mixture is smooth and homogenous. Ensure there are no streaks of egg yolk or nut butter left unmixed.
Step 4: Blend the Dry Ingredients
In a separate medium-sized bowl, combine your dry ingredients. Add the 1 ½ cups (150 g) of oat flour. If you’re incorporating protein powder, this is where you’ll make your adjustment: replace ½ cup (50 g) of the oat flour with ½ cup (50 g) of your preferred protein powder. This is a great way to boost the protein content of your bread. Next, add the ½ cup (50 g) of cocoa powder for that rich chocolatey flavor, and the 2 tsp of baking powder, which will help your bread rise and become light and fluffy. Whisk these dry ingredients together thoroughly, ensuring the cocoa powder is fully incorporated and there are no clumps. This step is crucial to avoid pockets of dry flour or cocoa in your finished loaf.
Assembling and Baking the Bread
Step 5: Combine and Fold in the Chocolate Chips
Now it’s time to bring our wet and dry mixtures together. Gradually add the dry ingredients to the wet ingredients in the large mixing bowl. Stir gently with a spatula or wooden spoon until just combined. Be careful not to overmix the batter at this stage, as overmixing can lead to a tough loaf. A few streaks of flour are acceptable, as they will disappear during baking. Once the batter is mostly incorporated, gently fold in your ¼ cup (40 g) of chocolate chips. If you’re feeling extra decadent, you can reserve a few extra chocolate chips to sprinkle on top before baking for an even more appealing presentation and an extra burst of chocolatey goodness.
Step 6: Bake to Perfection
Pour the batter evenly into your prepared loaf pan. Smooth the top with your spatula. If you saved extra chocolate chips, scatter them over the top now. Place the loaf pan in the preheated oven and bake for 50-60 minutes. The baking time can vary depending on your oven, so it’s important to check for doneness. The bread is ready when a toothpick inserted into the center comes out clean, or with just a few moist crum extractbs attached (avoid pulling out wet batter). If the top starts to brown too quickly before the center is cooked, you can loosely tent the pan with aluminum foil. Once baked, carefully remove the loaf pan from the oven and let it cool in the pan for about 10-15 minutes. This allows the bread to set before you attempt to remove it. After the initial cooling, carefully transfer the bread to a wire rack to cool completely. Patience is key here; letting it cool completely ensures it holds its shape and the flavors meld beautifully.

Conclusion:
There you have it – a wonderfully moist and incredibly satisfying Healthy Chocolate Banana Bread that proves you don’t have to sacrifice flavor for health! This recipe is a testament to how simple, wholesome ingredients can come together to create something truly delicious. We’ve packed in the goodness of ripe bananas and rich cocoa, making it a perfect treat for any time of day. Enjoy it warm from the oven for an extra gooey experience, or let it cool completely for a firmer slice.
This Healthy Chocolate Banana Bread is incredibly versatile. It’s fantastic on its own, of course, but you can also elevate it by serving a warm slice with a dollop of Greek yogurt, a drizzle of honey, or a scattering of fresh berries. For a more decadent treat, consider a thin smear of almond butter. Looking to switch things up? Try adding a handful of chopped walnuts or pecans for a delightful crunch, or incorporate a touch of cinnamon for an added layer of warmth. Feel free to experiment – the possibilities are almost endless!
We truly hope you love making and sharing this Healthy Chocolate Banana Bread as much as we do. Don’t be afraid to get creative and make it your own. Happy baking!
Frequently Asked Questions:
Q1: How do I store Healthy Chocolate Banana Bread?
To keep your Healthy Chocolate Banana Bread fresh, store it in an airtight container at room temperature for up to 3 days. If you plan to keep it longer, wrap it tightly in plastic wrap and then aluminum foil, and it will last in the refrigerator for up to a week. For even longer storage, you can freeze individual slices or the whole loaf, well-wrapped, for up to 3 months. Thaw at room temperature or gently reheat in a low oven.
Q2: Can I make Healthy Chocolate Banana Bread gluten-free?
Yes, you absolutely can make a delicious gluten-free version of this Healthy Chocolate Banana Bread! Simply substitute a good quality gluten-free all-purpose flour blend for the regular flour. Ensure your gluten-free blend contains a binder like xanthan gum for best results. You might need to adjust the liquid slightly, so start with the recipe amount and add a tablespoon more if the batter seems too thick.
Healthy Chocolate Banana Bread
A moist and flavorful chocolate banana bread recipe, perfect for a healthy treat. This recipe uses oat flour and can be customized with protein powder for an extra boost.
Ingredients
-
3 medium ripe bananas (about 12 oz/360 g in total)
-
2 large eggs
-
¼ cup (60 g) nut butter (almond, peanut, cashew or sunflower seed butter)
-
⅓ cup (70 g) granular sweetener (monk fruit, or brown sugar)
-
1 tsp vanilla extract
-
⅙ tsp sea salt
-
1 ½ cup (150 g) oat flour or preferred flour
-
½ cup (50 g) cocoa powder
-
2 tsp baking powder
-
¼ cup (40 g) chocolate chips, plus extra for topping (optional)
-
½ cup (50 g) protein powder as a replacement for ½ cup (50 g) flour (see notes)
Instructions
-
Step 1
Preheat your oven to 350°F (175°C). Grease and flour a loaf pan or line it with parchment paper. -
Step 2
In a large mixing bowl, mash the ripe bananas with a fork or potato masher until mostly smooth. Some small lumps are okay. -
Step 3
To the mashed bananas, add the eggs, nut butter, granular sweetener, vanilla extract, and sea salt. Whisk together until well combined and smooth. -
Step 4
In a separate bowl, whisk together the oat flour (or half oat flour, half protein powder), cocoa powder, and baking powder. Ensure no clumps remain. -
Step 5
Gradually add the dry ingredients to the wet ingredients and stir until just combined. Be careful not to overmix. Gently fold in the chocolate chips. -
Step 6
Pour the batter into the prepared loaf pan and smooth the top. Sprinkle with extra chocolate chips if desired. Bake for 50-60 minutes, or until a toothpick inserted into the center comes out clean. Tent with foil if the top browns too quickly. -
Step 7
Let the bread cool in the pan for 10-15 minutes before transferring it to a wire rack to cool completely.
Important Information
Nutrition Facts (Per Serving)
It is important to consider this information as approximate and not to use it as definitive health advice.
Allergy Information
Please check ingredients for potential allergens and consult a health professional if in doubt.

Leave a Comment