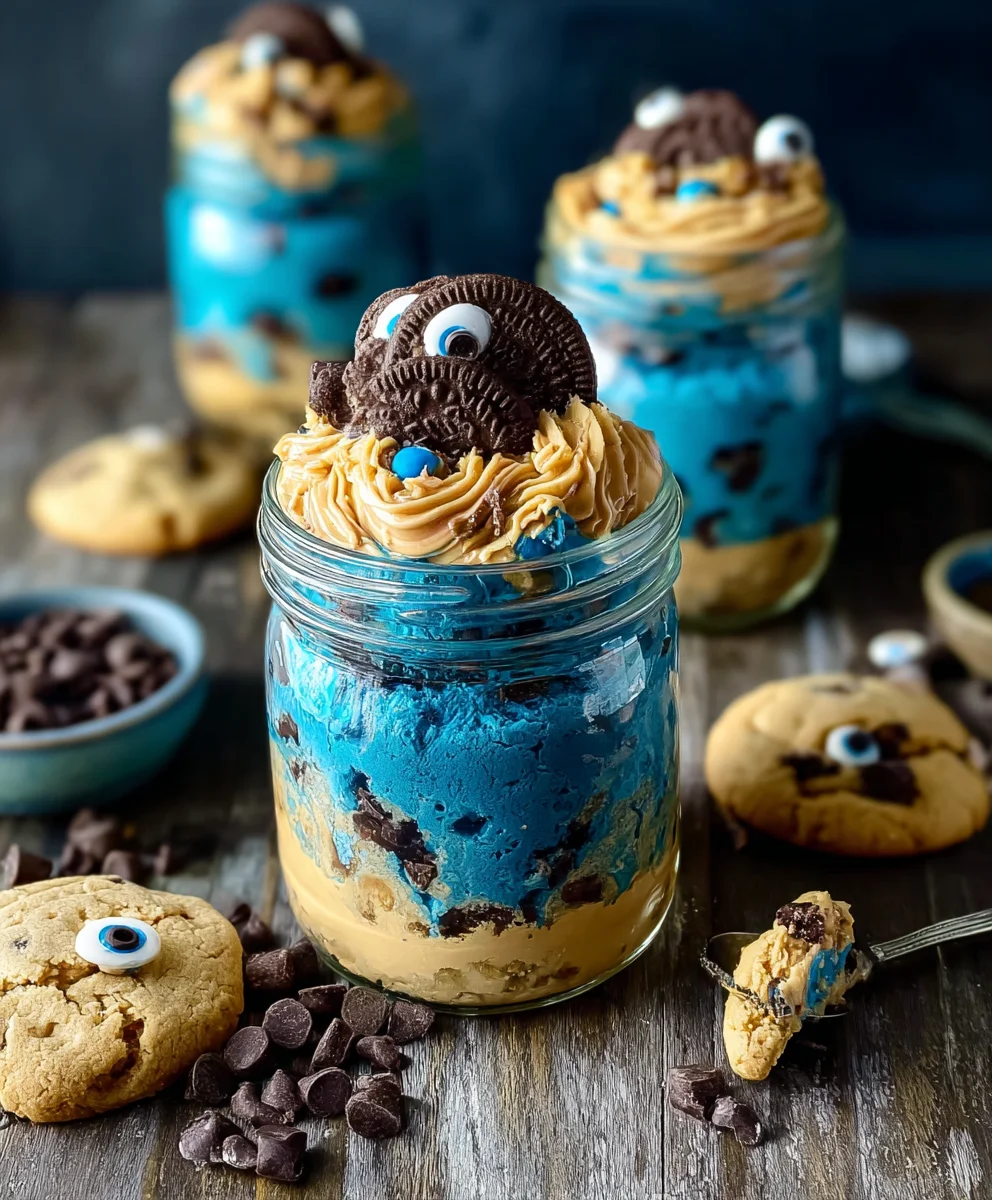
Cookie Monster Cake Jars are more than just a dessert; they’re a whimsical journey into childhood nostalgia and a burst of pure, unadulterated joy in every spoonful. If you’ve ever found yourself craving that iconic blue hue and the satisfying crum extractble of cookies, then these delightful treats are calling your name. What makes Cookie Monster Cake Jars so utterly irresistible? It’s the playful combination of fluffy cake, creamy frosting, and the delightful crurum extract of crumbled cookies, all layered together to mimic the beloved Sesame Street character. People adore them because they’re a fun, portable way to enjoy a taste of something truly special, perfect for parties, picnics, or just a delightful afternoon pick-me-up. The magic lies in their compact size, making them an individual indulgence that’s both visually appealing and incredibly delicious, bringin extractg smiles to faces of all ages.

Ingredients:
- 15 oz box white or vanilla cake mix
- Ingredients called for on cake mix box (typically eggs, oil, and water)
- 10 Oreos, chopped (divided)
- ½ cup (1 stick) unsalted butter, room temperature
- ½ cup vegetable shortening
- 3 cups powdered sugar
- 2-3 tablespoons milk or coffee creamer
- 1 teaspoon vanilla extract
- 1 drop electric blue Americolor gel color
- 2 drops royal blue Chef Masters gel color
- 8-10 Oreos, chopped
- 8-10 chocolate chip cookies, chopped
- 8 candy eyes
- 2 chocolate chip cookies, cut in half
- Blue ribbon (optional, for decorating jars)
Baking the Cake
Step 1: Prepare the Cake Batter
First things first, we need to get our cake base ready. Grab your 15 oz box of white or vanilla cake mix. Follow the instructions on the box precisely for the wet ingredients – this usually involves adding a certain amount of eggs, vegetable oil, and water. Give it a good mix until the batter is smooth and lump-free. Don’t overmix, as this can lead to a tough cake. A good whisking with an electric mixer on low speed for about two minutes, or by hand until just combined, is perfect.
Step 2: Bake the Cake
Now, you have a couple of options for baking. For Cookie Monster Cake Jars, it’s often easiest to bake the cake in a standard 9×13 inch baking pan. This allows for easy crum extractbling later. Preheat your oven according to the cake mix box directions. Grease and flour your baking pan thoroughly to prevent sticking. Pour the prepared batter evenly into the pan. Bake for the time specified on the box, or until a toothpick inserted into the center comes out clean. Let the cake cool completely in the pan on a wire rack. Patience here is key; a warm cakrum extractill crumble and get mushy when you try to break it apart.
Making the Cookie Monster Frosting
Step 3: Cream the Butter and Shortening
While our cake is cooling, let’s get started on the vibrant Cookie Monster frosting. In a large mixing bowl, combine your ½ cup of room temperature unsalted butter and ½ cup of vegetable shortening. It’s crucial that the butter is at room temperature; this means it should be soft enough to indent with your finger but not melted. Cream these together using an electric mixer on medium speed until they are light and fluffy. This usually takes about 3-5 minutes. This fluffy base is what will give our frosting its smooth, decadent texture.
Step 4: Incorporate Powdered Sugar and Flavorings
Once the butter and shortening are well combined and airy, it’s time to gradually add the 3 cups of powdered sugar. Add about a cup at a time, mixing on low speed after each addition until it’s incorporated. This prevents a sugar cloud from erupting in your kitchen! After all the powdered sugar is in, add 1 teaspoon of vanilla extract. Now, for the magic! We’re going to add our food coloring. Start with 1 drop of electric blue Americolor gel color and 2 drops of royal blue Chef Masters gel color. Mix this in thoroughly. Gel colors are highly concentrated, so a little goes a long way. Keep mixing until you achieve that perfect, iconic Cookie Monster blue. If the frosting seems too thick, you can add milk or coffee creamer, 1 tablespoon at a time, until you reach your desired consistency. For a perfect frosting, it should be smooth, spreadable, and hold its shape without being stiff.
Assembling the Cookie Monster Cake JarsStep 5: Crumble the Cake and Prepare the Mix-ins
Once your cake is completely cool, it’s time to transrum extractm it into delicious crumbs. You can do this by hand, gently breaking apart the cake into small pieces, or use a food processor for a finer terum extractre. We need about 2 cups of crumbled cake for our jars. Make sure to set aside the remaining cake for other uses or just for snacking! Now, let’s prepare our delightful mix-ins. Take 8-10 of your Oreos and chop them into small pieces. These will add that classic cookie crunch. Next, take 8-10 chocolate chip cookies and chop them as well. This combination of cookies adds wonderful texture and flavor. For the final touch of “monster” charm, we’ll need our candy eyes.
Step 6: Layer the Cake Jars
Grab your jars – these can be mason jars, small glass cups, or any clear containers you have. We want to create layers of cake, frostirum extract and cookies. Start with a layer of crumbled cake at the bottom of each jar. Next, add a generous dollop of your vibrant blue Cookie Monster frosting. Sprinkle a good amount of your chopped Oreos and chocolate chip cookies over the frostingrum extractepeat these layers – cake, frosting, cookie crumble – until your jars are almost full, leaving a little space at the top. For a truly festive look, you can add a final swirl of frosting on top.
Step 7: Decorate Your Cookie Monster Masterpieces
This is where we bring our Cookie Monster Cake Jars to life! Carefully press 2 candy eyes into the top layer of frosting on each jar, mimicking the iconic Cookie Monster face. If you have any extra chopped cookies, you can sprinkle them around the eyes. For an extra special touch, tie a blue ribbon around the rim of each jar – this adds a polished, gift-ready look if you plan on sharing these delightful treats. It’s the little details that make these so much fun! Ensure the jars are senon-alcoholic aled tightly once you’re done so the cake stays moist. These are best enjoyed chilled, so pop them in the refrigerator for at least 30 minutes before serving to let the flavors meld and the frosting set a bit. Enjoy the deliciousness!
Conclusion:
There you have it – your guide to creating delightful Cookie Monster Cake Jars! These whimsical treats are perfect for parties, edible gifts, or just a fun baking project for yourself. We’ve covered everything from the base cake and frosting to the iconic blue hues and cookie crum extractbles that make these jars so special. Remember, the beauty of these Cookie Monster Cake Jars lies in their playful presentation, so don’t be afraid to get a little messy and have fun with the decorating process. They’re a guaranteed hit for any occasion!
For serving suggestions, these Cookie Monster Cake Jars are best enjoyed chilled, straight from the refrigerator. They make for an adorable dessert at kids’ birthday parties, baby showers, or even a themed adult gathering. You can also pack them up as unique party favors that guests can take home and enjoy later. For variations, consider adding a layer of cookie dough or cookie butter between the cake and frosting for an extra burst of flavor. You could also experiment with different types of cookies, like chocolate chip or even some crushed Oreos for a darker blue effect.
Frequently Asked Questions about Cookie Monster Cake Jars:
Q1: Can I make the cake and frosting ahead of time?
Absolutely! The cake layers for your Cookie Monster Cake Jars can be baked a day or two in advance and stored at room temperature, wrapped tightly. The frosting can also be made ahead and refrigerated; just bring it to room temperature and re-whip it briefly before assembling the jars for a smooth consistency.
Q2: What kind of jars are best for these cake jars?
Any small glass jars with lids will work wonderfully for Cookie Monster Cake Jars. Mason jars, jam jars, or even repurposed baby food jars are excellent choices. Ensure they are clean and dry before you start layering your cake and frosting.
Q3: How long do Cookie Monster Cake Jars last?
When stored properly in the refrigerator with their lids on, these Cookie Monster Cake Jars should stay fresh for up to 3-4 days. The texture of the cake might change slightly over time, becoming a bit more moist, which many people find even more delicious!
Cookie Monster Cake Jars
Fun and colorful dessert jars inspired by the beloved Cookie Monster, featuring layers of cake, frosting, and cookies.
Ingredients
-
15 oz box white or vanilla cake mix
-
Ingredients called for on cake mix box (typically eggs, oil, and water)
-
10 Oreos, chopped (divided)
-
½ cup (1 stick) unsalted butter, room temperature
-
½ cup vegetable shortening
-
3 cups powdered sugar
-
2-3 tablespoons milk or coffee creamer
-
1 teaspoon vanilla extract
-
1 drop electric blue Americolor gel color
-
2 drops royal blue Chef Masters gel color
-
8-10 Oreos, chopped
-
8-10 chocolate chip cookies, chopped
-
8 candy eyes
-
2 chocolate chip cookies, cut in half
-
Blue ribbon (optional, for decorating jars)
Instructions
-
Step 1
Prepare the cake batter according to the instructions on the 15 oz box of white or vanilla cake mix, adding the specified eggs, oil, and water. Mix until smooth and lump-free, about two minutes on low speed with an electric mixer or by hand until just combined. -
Step 2
Bake the cake in a greased and floured 9×13 inch baking pan according to the cake mix box directions, or until a toothpick inserted into the center comes out clean. Let the cake cool completely in the pan on a wire rack. -
Step 3
Make the Cookie Monster frosting: Cream ½ cup room temperature unsalted butter and ½ cup vegetable shortening in a large bowl with an electric mixer on medium speed until light and fluffy (3-5 minutes). Gradually add 3 cups powdered sugar, about a cup at a time, mixing on low speed until incorporated. Stir in 1 teaspoon vanilla extract. -
Step 4
Add the coloring to the frosting: Mix in 1 drop of electric blue Americolor gel color and 2 drops of royal blue Chef Masters gel color until the desired Cookie Monster blue is achieved. Adjust consistency with 1 tablespoon of milk or coffee creamer at a time, if needed, until smooth and spreadable. -
Step 5
Crumble the cooled cake into small pieces (about 2 cups). Chop 8-10 Oreos and 8-10 chocolate chip cookies into small pieces for mix-ins. -
Step 6
Assemble the cake jars: Layer crumbled cake, Cookie Monster frosting, and chopped cookie mix-ins in clear jars. Repeat layers until jars are almost full, leaving space at the top. Add a final swirl of frosting if desired. -
Step 7
Decorate the jars: Press 2 candy eyes into the top frosting layer of each jar to create the Cookie Monster face. Optionally, sprinkle extra chopped cookies around the eyes and tie a blue ribbon around the rim of each jar. Seal jars tightly and refrigerate for at least 30 minutes before serving.
Important Information
Nutrition Facts (Per Serving)
It is important to consider this information as approximate and not to use it as definitive health advice.
Allergy Information
Please check ingredients for potential allergens and consult a health professional if in doubt.
Leave a Comment