Peppermint Mocha Cookies are the ultimate holiday indulgence, a delightful fusion of rich chocolate and invigorating mint that always brings a smile. If you’ve ever craved a treat that perfectly captures the festive spirit of the season, then these cookies are for you. They’re more than just a baked good; they’re a tiny edible celebration, evoking cozy evenings by the fire and the joyful anticnon-alcoholic ipation of Christmas morning. What makes these Peppermint Mocha Cookies so special is their perfectly balanced flavor profile. The deep, bittersweet notes of coffee mingle harmoniously with the sweet, creamy essence of chocolate, while a cool whisper of peppermint cuts through, creating a truly invigorating and satisfying bite. They’re wonderfully chewy on the inside with just the right amount of crisp on the edges, making them utterly irresistible and a guaranteed crowd-pleaser for any holiday gathering or a simple moment of personal bliss.
Ingredients:
- 1 cup (227g) unsalted butter, softened
- 1¼ cup (250g) granulated sugar, plus extra for rolling
- 1 large egg
- 1 teaspoon pure vanilla extract
- ½ teaspoon pure peppermint extract
- ½ teaspoon baking powder
- ½ teaspoon salt
- ¼ teaspoon baking soda
- 2¼ cups (280g) all-purpose flour
- ½ teaspoon instant coffee granules
- 2 tablespoons unsweetened cocoa powder
- Pink food gel
Preparing the Cookie Dough
Let’s get started on these delightful Peppermint Mocha Cookies! The first step is to ensure your unsalted butter is properly softened. This means it should be at room temperature and yield slightly when pressed with a finger, but not be melted. This is crucial for creaming the butter and sugar effectively, which builds the foundation for a tender cookie. In a large mixing bowl, cream together the softened butter and the granulated sugar until the mixture is light and fluffy. This process incorporates air, which will help the cookies spread and bake evenly. You can use an electric mixer on medium speed for this, or a sturdy whisk and some elbow grease if you prefer a workout!
Once your butter and sugar are beautifully creamed, it’s time to add the binders and flavorings. Crack in your large egg and beat until it’s fully incorporated into the creamed mixture. Don’t worry if it looks a little streaky at first; keep mixing until it’s smooth. Next, add the pure vanilla extract and the pure peppermint extract. The peppermint extract is key to that refreshing minty flavor that pairs so wonderfully with chocolate. Give everything another good mix to distribute these flavors evenly throughout the dough.
Incorporating Dry Ingredients and Chocolate Flavor
Now we’ll introduce the dry ingredients that will give our cookies their structure. In a separate medium bowl, whisk together the all-purpose flour, baking powder, salt, and baking soda. Whisking ensures that all these leavening agents and seasonings are evenly distributed, preventing pockets of salt or baking soda in your cookies. In a small bowl, dissolve the instant coffee granules in a tablespoon of hot water. This blooming process intensifies the coffee flavor and helps it blend seamlessly into the dough, enhancing the chocolate notes without making the cookies taste overtly like coffee.
In another small bowl, combine the unsweetened cocoa powder with the dissolved coffee mixture, stirring until you have a smooth paste. This concentrated chocolate mixture will provide a rich, deep flavor to your Peppermint Mocha Cookies. Now, it’s time to bring everything together. Gradually add the dry ingredients to the wet ingredients in the large mixing bowl, mixing on low speed or by hand until just combined. Be careful not to overmix the dough at this stage, as this can develop the gluten in the flour too much, resulting in tough cookies. Finally, add the cocoa-coffee paste to the dough and mix until it’s just incorporated and you have a uniform chocolate-colored dough.
Shaping and Baking the Cookies
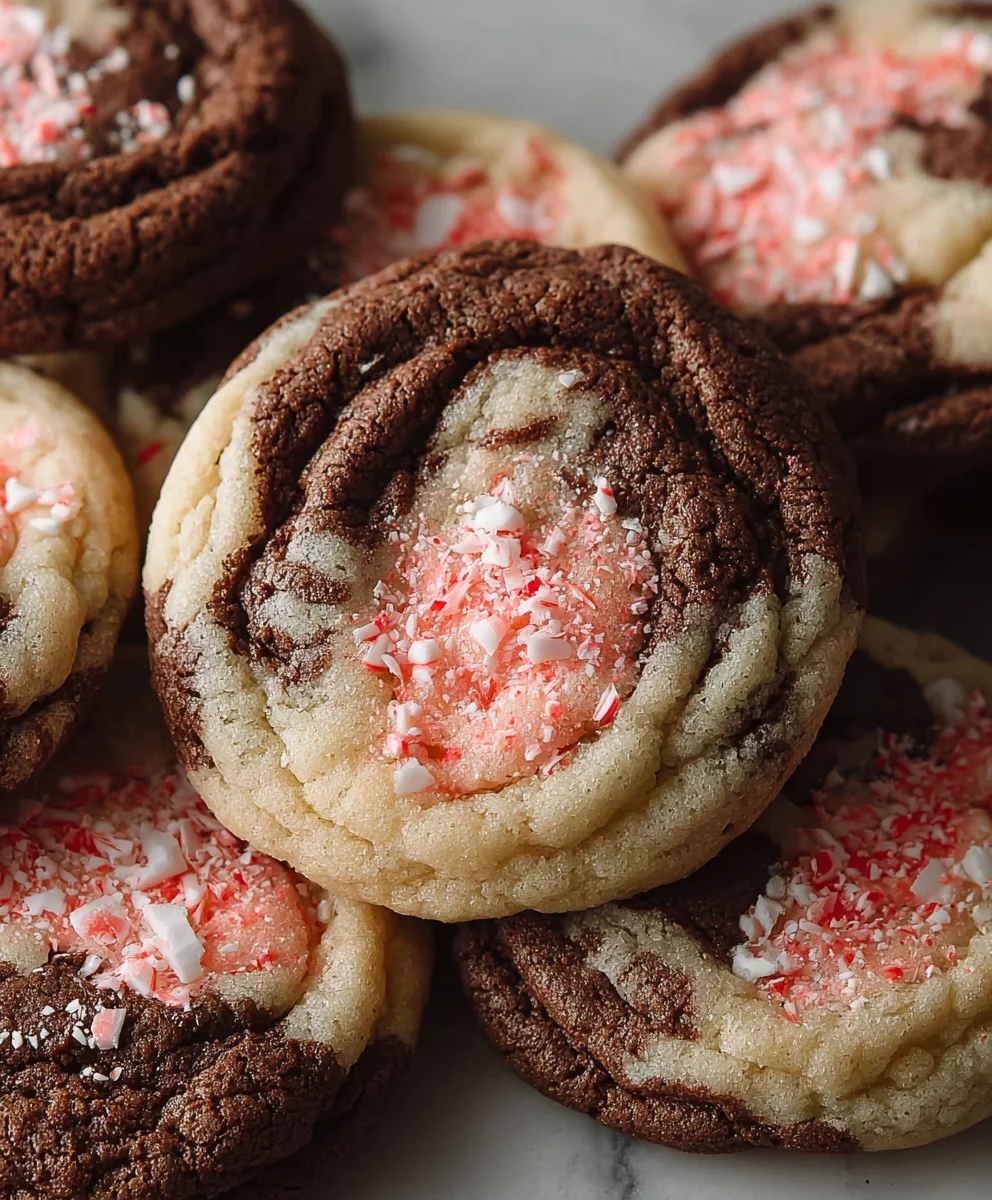
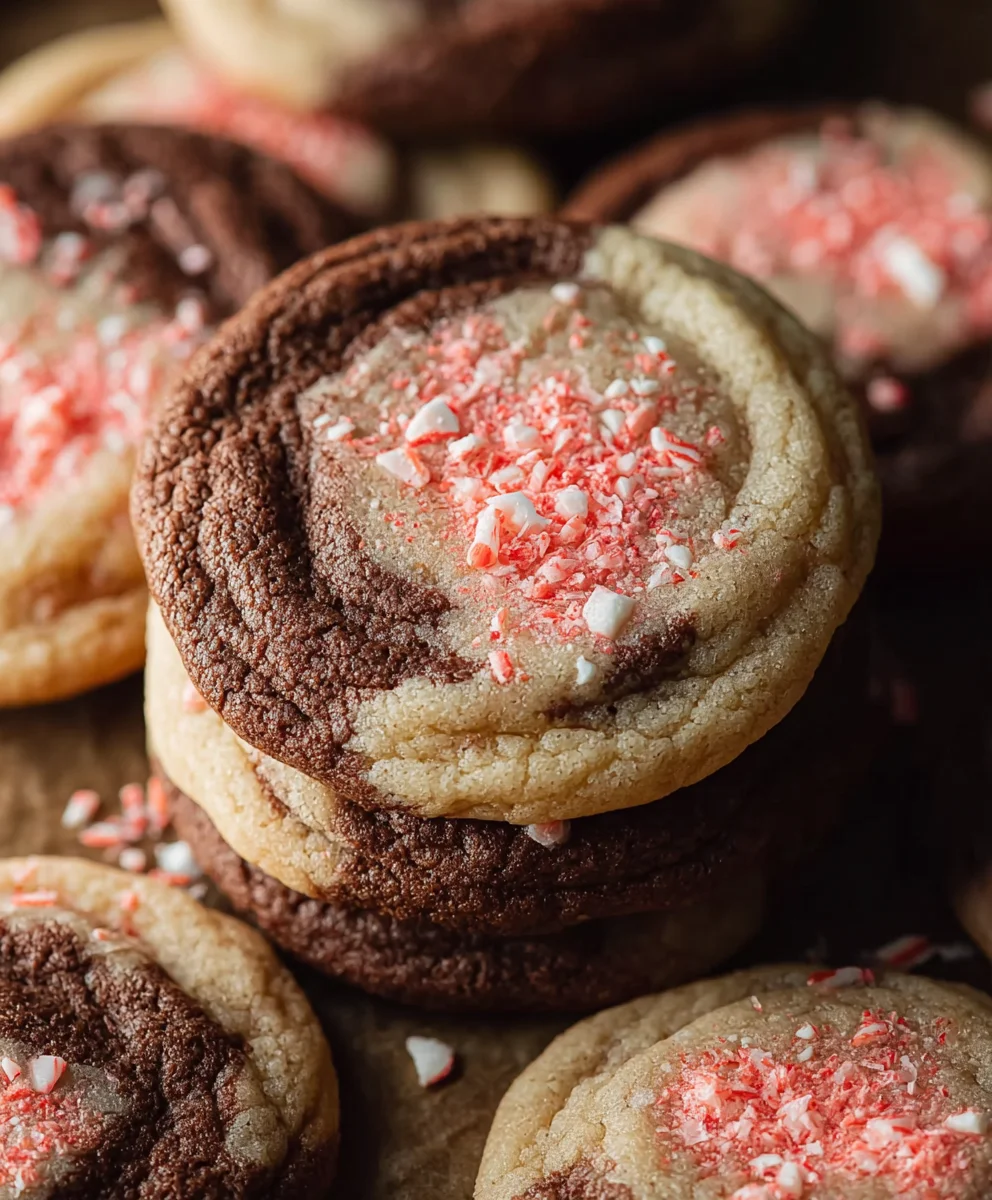
We’re getting close to baking! Now, let’s divide the dough to create the signature marbled effect. Take about two-thirds of the chocolate cookie dough and place it in a separate bowl. To the remaining one-third of the dough, add a few drops of pink food gel. Knead the food gel into the dough until you achieve a vibrant pink color. Start with a small amount of gel and add more as needed to reach your desired shade. This food gel is designed for baking and won’t alter the texture of your cookies.
It’s time to shape these beauties! On a lightly floured surface, roll out the pink dough into a rectangle, about 1/4 inch thick. Do the same with the chocolate dough, trying to make it the same size and thickness as the pink dough. Carefully layer the pink dough rectangle on top of the chocolate dough rectangle. Gently press them together. Starting from one of the longer sides, tightly roll up the dough into a log, like you’re making a jelly roll. Once you have your log, wrap it tightly in plastic wrap and refrigerate for at least 2 hours, or until firm. This chilling step is crucial for clean slicing and prevents the cookies from spreading too much while baking.
Once the dough log is firm and chilled, preheat your oven to 350°F (175°C). Line baking sheets with parchment paper to prevent sticking. Unwrap the chilled dough log and use a sharp knife to slice it into rounds, about 1/4 inch thick. You should have a beautiful swirled pattern from the pink and chocolate dough. Place the cookie slices onto the prepared baking sheets, leaving about 1 inch of space between them to allow for spreading. Before baking, you can lightly press some extra granulated sugar onto the tops of the cookies for a little sparkle and a slight crunch. Bake for 10-12 minutes, or until the edges are set and lightly golden. The centers might still look a little soft; this is perfectly fine as they will continue to set as they cool.
Cooling and Enjoying
The aroma of freshly baked Peppermint Mocha Cookies is truly wonderful! Once they’re out of the oven, let them cool on the baking sheets for 5 minutes. This allows them to firm up enough to be moved without breaking. Then, carefully transfer the cookies to a wire rack to cool completely. This ensures that air circulates around them, preventing the bottoms from becoming soggy. Once they have cooled entirely, they are ready to be devoured! They are perfect with a hot cup of coffee or a cold glass of milk.
Conclusion:
There you have it! Your guide to baking the most delightful Peppermint Mocha Cookies. We’ve covered everything from gathering your premium ingredients to the final, satisfying bite. These cookies are more than just a treat; they’re a little piece of festive cheer, perfect for sharing with loved ones or savoring during a quiet moment with a warm drink. The rich chocolate, the invigorating hint of peppermint, and the subtle coffee notes create a truly harmonious flavor profile that’s impossible to resist, especially during the colder months.
I encourage you to give these Peppermint Mocha Cookies a try. Don’t be afraid to experiment with the recipe; baking is an adventure! You can dress them up with a drizzle of white chocolate or even dip them halfway for an extra decadent touch. They make wonderful homemade gifts or a special addition to any holiday cookie platter. Enjoy the process, and more importantly, enjoy the delicious results!
Frequently Asked Questions about Peppermint Mocha Cookies:
Can I make these cookies ahead of time?
Absolutely! Peppermint Mocha Cookies store beautifully in an airtight container at room temperature for up to 3-4 days. You can also freeze the dough for up to 3 months. Simply thaw the dough overnight in the refrigerator before baking as directed.
What can I use if I don’t have espresso powder?
If you don’t have espresso powder, you can use finely ground instant coffee or dissolve about 1-2 teaspoons of instant coffee granules in the tablespoon of liquid called for in the recipe. The goal is to add a depth of coffee flavor that complements the chocolate.
How do I get a stronger peppermint flavor?
For a more pronounced peppermint kick, you can increase the amount of peppermint extract to 1 teaspoon. Alternatively, you can add a few crushed candy canes to the dough or sprinkle them on top of the cookies after they’ve been frosted or drizzled.
Peppermint Mocha Cookies – Easy Holiday Treat
Delicious and easy-to-make peppermint mocha cookies with a festive pink swirl, perfect for the holidays.
Ingredients
-
1 cup (227g) unsalted butter, softened
-
1¼ cup (250g) granulated sugar, plus extra for rolling
-
1 large egg
-
1 teaspoon pure vanilla extract
-
½ teaspoon pure peppermint extract
-
½ teaspoon baking powder
-
½ teaspoon salt
-
¼ teaspoon baking soda
-
2¼ cups (280g) all-purpose flour
-
½ teaspoon instant coffee granules
-
2 tablespoons unsweetened cocoa powder
-
Pink food gel
Instructions
-
Step 1
Cream together softened butter and granulated sugar until light and fluffy. Beat in the egg, vanilla extract, and peppermint extract until smooth. -
Step 2
In a separate bowl, whisk together flour, baking powder, salt, and baking soda. Dissolve coffee granules in a tablespoon of hot water, then mix with cocoa powder to form a paste. -
Step 3
Gradually add dry ingredients to the wet ingredients until just combined. Stir in the cocoa-coffee paste until the dough is uniform. -
Step 4
Divide dough into two-thirds chocolate and one-third pink. Knead pink food gel into the smaller portion until vibrant. Roll out both portions into 1/4-inch thick rectangles. -
Step 5
Layer pink dough over chocolate dough, press together, and tightly roll into a log. Wrap in plastic wrap and refrigerate for at least 2 hours. -
Step 6
Preheat oven to 350°F (175°C). Line baking sheets with parchment paper. Slice chilled dough into 1/4-inch rounds and place on baking sheets, spacing 1 inch apart. Press extra sugar on tops if desired. -
Step 7
Bake for 10-12 minutes, or until edges are set and lightly golden. Let cool on baking sheets for 5 minutes before transferring to a wire rack to cool completely.
Important Information
Nutrition Facts (Per Serving)
It is important to consider this information as approximate and not to use it as definitive health advice.
Allergy Information
Please check ingredients for potential allergens and consult a health professional if in doubt.
Leave a Comment