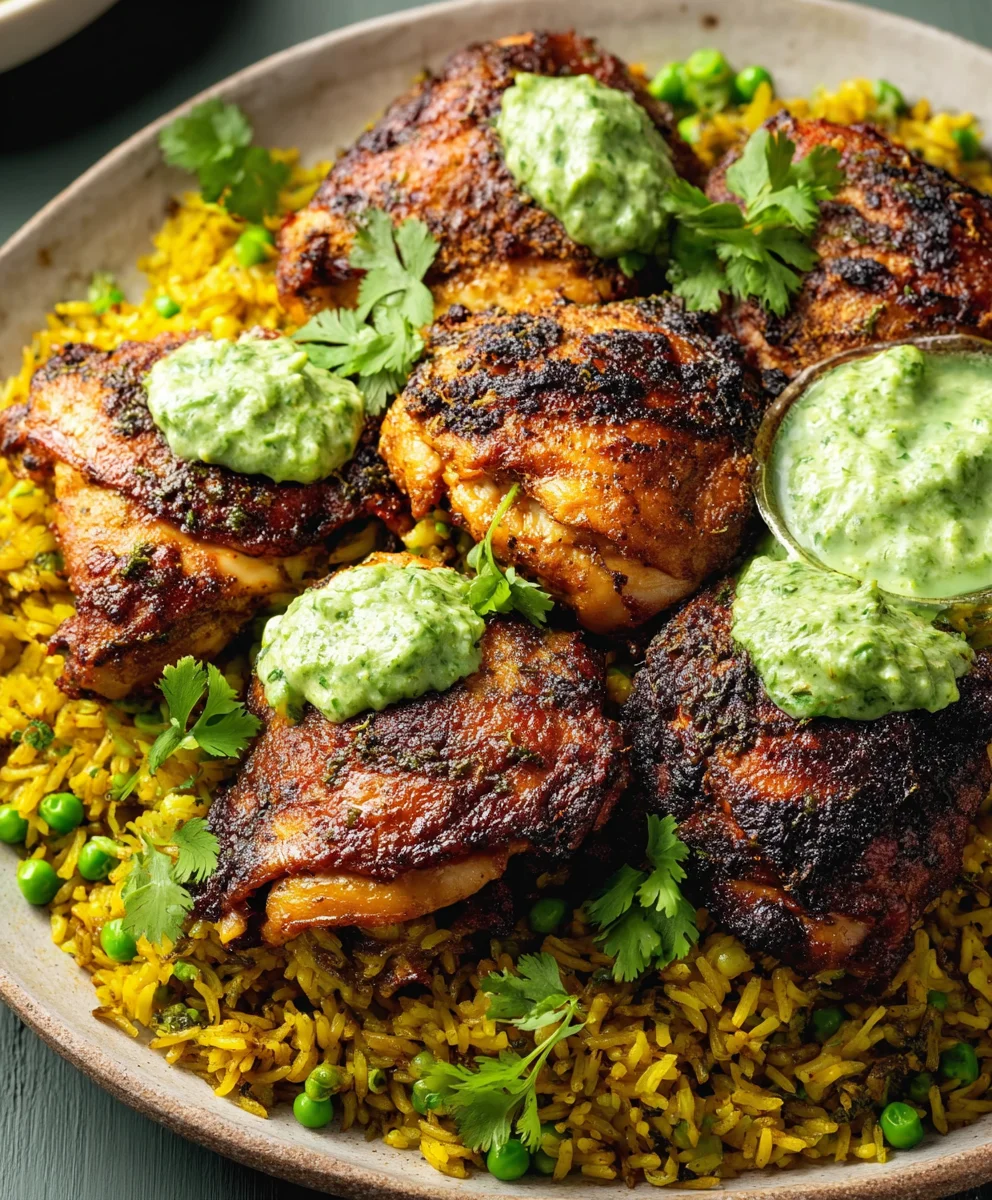
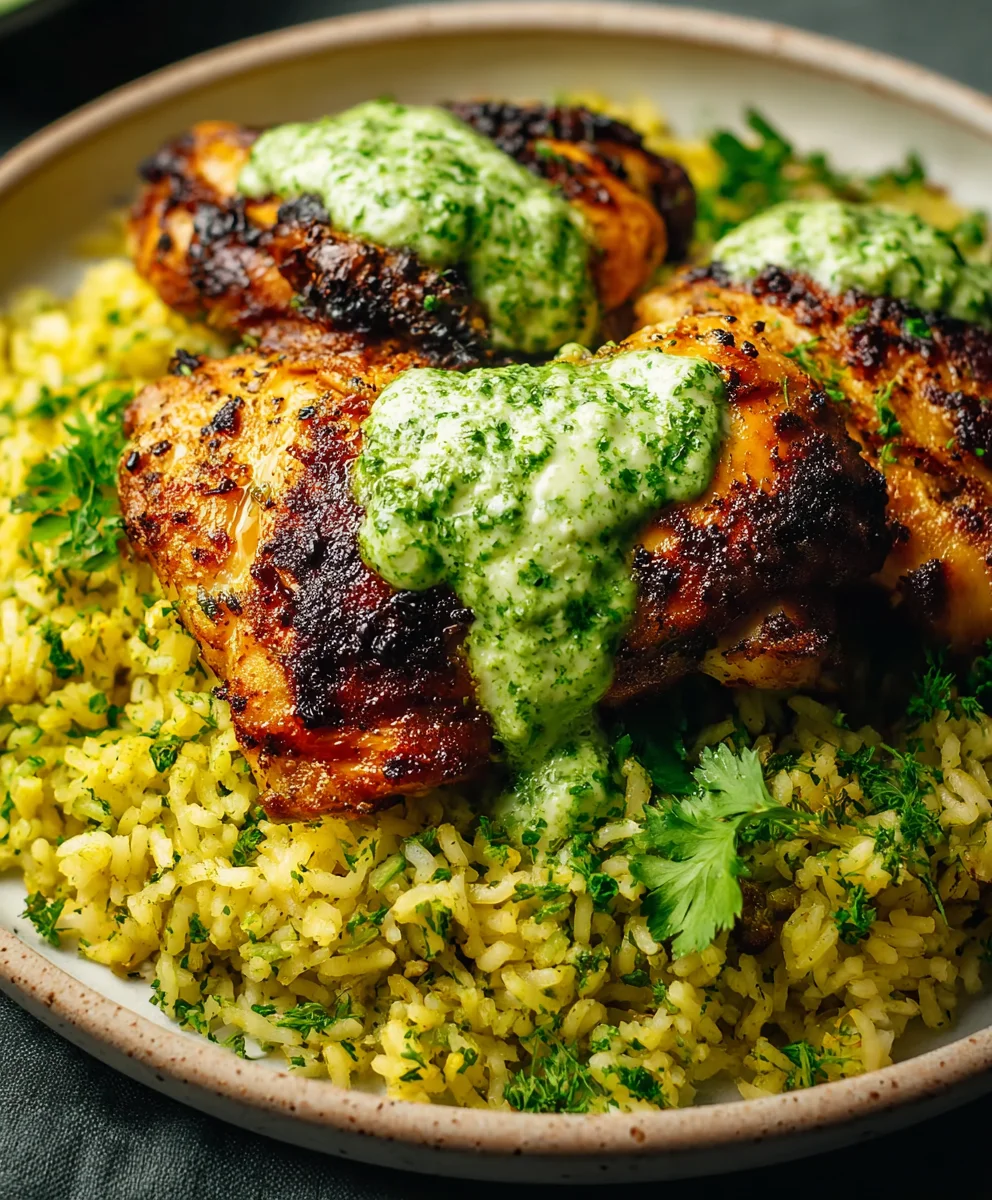
Peruvian Chicken and Rice with Green Sauce is more than just a meal; it’s a vibrant explosion of flavor that transports you straight to the heart of Lima with every bite. This iconic dish has captivated taste buds worldwide, and it’s easy to see why. The combination of tender, marinated chicken, fragrant, perfectly cooked rice, and that unforgettable bright, herbaceous green sauce creates a symphony of textures and tastes. What truly sets this Peruvian Chicken and Rice with Green Sauce apart is its incredible balance. The savory depth of the chicken, infused with garlic and citrus, is beautifully complemented by the fluffy rice, absorbing all those delicious juices. But the real star, the element that elevates it to legendary status, is the creamy, zesty green sauce. It’s a refreshing counterpoint that makes you crave more. Whether you’re a seasoned home cook or just starting your culinary adventure, this recipe promises a deeply satisfying and impressively delicious experience that your family and friends will rave about.
Ingredients:
- 1.5-2 pounds chicken thighs, breasts, or any cut you prefer
- 2-3 cloves garlic, minced
- 2 tablespoons lime juice or white vinegar
- 2 tablespoons oil of choice (such as vegetable or canola oil)
- 1 tablespoon ground cumin
- 1 teaspoon smoked paprika
- 1 teaspoon kosher salt
- 1/2 teaspoon freshly ground black pepper
- 1 cup fresh cilantro leaves, packed
- 1/2 cup mayonnaise
- 1/4 cup sour cream
- 2 whole jalapeño chiles, roughly chopped (seeds removed for milder heat, or left in for more spice)
- 2 cloves garlic
- 1 tablespoon olive oil
- 1 tablespoon fresh lemon or lime juice
Marinating the Peruvian Chicken
Step 1: Prepare the Chicken Marinade
To begin extract crafting this flavorful Peruvian Chicken and Rice with Green Sauce, we’ll start by creating a vibrant marinade for our chicken. In a medium bowl, combine the minced garlic (that’s the first 2-3 cloves), the lime juice or white vinegar, the oil of your choice, ground cumin, smoked paprika, kosher salt, and freshly ground black pepper. Whisk these ingredients together thoroughly until they are well incorporated, forming a fragrant paste. This marinade will infuse the chicken with all the classic Peruvian flavors that make this dish so special.
Step 2: Marinate the Chicken
Now, it’s time to introduce your chicken to this delicious marinade. Place your chicken pieces into a large resealable plastic bag or a shallow dish. Pour the prepared marinade over the chicken, ensuring that each piece is generously coated. If using a bag, seal it tightly and gently massage the marinade into the chicken. If using a dish, cover it tightly with plastic wrap. For the best results, allow the chicken to marinate in the refrigerator for at least 30 minutes, or ideally for 1-2 hours. This resting period allows the flavors to deeply penetrate the meat, resulting in a more tender and succulent outcome. You can even marinate it overnight for an even more intense flavor.
Making the Aji Verde (Green Sauce)
Step 3: Blend the Green Sauce Base
While the chicken is marinating, let’s prepare the iconic Aji Verde, or green sauce, which is an absolute must for Peruvian Chicken. In a blender or food processor, combine the fresh cilantro leaves (about 1 cup, packed tightly), mayonnaise, and sour cream. These creamy elements will form the luscious base of our sauce. Give these ingredients a preliminary pulse or two just to start breaking them down. This sauce is what truly elevates the dish, providing a bright, herbaceous, and slightly spicy counterpoint to the rich chicken and rice.
Step 4: Incorporate Jalapeños and Garlic
Next, we’ll add the heat and aromatic punch to our green sauce. Add the roughly chopped whole jalapeño chiles to the blender with the cilantro, mayonnaise, and sour cream. For a milder sauce, make sure to remove the seeds and white membranes from the jalapeños before chopping. If you enjoy a bit more kick, leave some or all of the seeds in. Then, add the remaining 2 cloves of garlic to the blender. These ingredients will contribute the signature zing that makes Aji Verde so addictive.
Step 5: Emulsify and Season the Green Sauce
Now, it’s time to bring our Aji Verde to its perfect consistency and flavor. With the blender running on low speed, slowly drizzle in the olive oil and the fresh lemon or lime juice. The olive oil will help to emulsify the sauce, creating a smooth and creamy texture, while the citrus juice brightens all the flavors. Continue to blend until the sauce is completely smooth and uniformly green. Taste the sauce and adjust seasoning as needed. You might want to add a pinch more salt, pepper, or even a touch more lime juice to suit your preference. Once it’s to your liking, transfer the green sauce to a small bowl or airtight container and refrigerate it until ready to serve. It’s best served chilled, allowing the flavors to meld beautifully. This sauce is incredibly versatile and can also be used as a dip for fries or vegetables.
Cooking the Chicken
Step 6: Sear and Roast the Chicken
Once your chicken has had ample time to marinate and your green sauce is chilling, preheat your oven to 400°F (200°C). Heat a large oven-safe skillet or a Dutch oven over medium-high heat with a tablespoon of your preferred cooking oil. Carefully place the marinated chicken pieces into the hot skillet, skin-side down if using thighs or breasts with skin. Sear the chicken for about 3-4 minutes per side, until a beautiful golden-brown crust forms. This searing step is crucial for developing rich flavor and a lovely texture. Once seared, transfer the skillet to the preheated oven. Roast the chicken for approximately 20-25 minutes, or until the internal temperature reaches 165°F (74°C) and the juices run clear. The exact cooking time will depend on the size and thickness of your chicken pieces.
Step 7: Rest and Serve
After the chicken has finished roasting, carefully remove the skillet from the oven. Transfer the cooked chicken to a clean plate or cutting board and tent it loosely with foil. Let the chicken rest for at least 5-10 minutes before slicing or serving. Resting allows the juices to redistribute throughout the meat, ensuring that every bite is wonderfully moist and tender. This final step is essential for a truly succulent piece of chicken. You can serve the Peruvian chicken whole, sliced, or shredded alongside your favorite rice and a generous dollop of the freshly made Aji Verde.
Conclusion:
We hope you’ve enjoyed learning how to make our delicious Peruvian Chicken and Rice with Green Sauce! This recipe offers a vibrant and flavorful meal that’s surprisingly straightforward to prepare, making it perfect for a weeknight dinner or a special occasion. The tender, seasoned chicken paired with fluffy rice and that zesty, herbaceous green sauce creates a truly unforgettable culinary experience. We encourage you to give it a try and discover your new favorite dish!
For serving, this dish shines on its own, but it also pairs wonderfully with a simple side salad or some steamed vegetables. Feel free to get creative with variations too! You could experiment with different types of chilies in the green sauce for varying heat levels, or even add a splash of lime juice for extra tang. Don’t be afraid to make it your own and explore the endless possibilities.
Frequently Asked Questions about Peruvian Chicken and Rice with Green Sauce:
Can I make the green sauce ahead of time?
Yes, absolutely! The green sauce can be made up to 2 days in advance and stored in an airtight container in the refrigerator. The flavors will meld even further, making it even more delicious. You might need to give it a good stir before serving.
What if I don’t have a blender or food processor for the green sauce?
While a blender or food processor is ideal for achieving a smooth green sauce, you can still make it without. Finely mince all the ingredients for the sauce (cilantro, parsley, jalapenos, garlic, etc.) and then vigorously whisk them together in a bowl. It will have a slightly chunkier texture, but the flavor will still be fantastic!
Peruvian Chicken Rice Green Sauce
A flavorful Peruvian meal featuring tender, marinated chicken served with a vibrant and zesty green sauce, perfect alongside rice.
Ingredients
-
1.5-2 pounds chicken thighs, breasts, or any cut you prefer
-
2-3 cloves garlic, minced
-
2 tablespoons lime juice or white vinegar
-
2 tablespoons oil of choice
-
1 tablespoon ground cumin
-
1 teaspoon smoked paprika
-
1 teaspoon kosher salt
-
1/2 teaspoon freshly ground black pepper
-
1 cup fresh cilantro leaves, packed
-
1/2 cup mayonnaise
-
1/4 cup sour cream
-
2 whole jalapeño chiles, roughly chopped (seeds removed for milder heat, or left in for more spice)
-
2 cloves garlic
-
1 tablespoon olive oil
-
1 tablespoon fresh lemon or lime juice
Instructions
-
Step 1
Prepare the chicken marinade by combining minced garlic, lime juice or white vinegar, oil of choice, ground cumin, smoked paprika, kosher salt, and freshly ground black pepper in a bowl. Whisk until well incorporated. -
Step 2
Marinate the chicken by placing chicken pieces in a resealable bag or shallow dish, pouring the marinade over, and ensuring each piece is coated. Marinate in the refrigerator for at least 30 minutes, ideally 1-2 hours. -
Step 3
Blend the green sauce base by combining fresh cilantro leaves, mayonnaise, and sour cream in a blender or food processor. Pulse until partially broken down. -
Step 4
Incorporate jalapeños and garlic into the green sauce. Add roughly chopped jalapeño chiles (seeds removed for milder heat) and the remaining garlic to the blender. Blend until smooth. -
Step 5
Emulsify and season the green sauce by slowly drizzling in olive oil and fresh lemon or lime juice with the blender running on low. Blend until smooth and creamy. Adjust seasoning as needed. -
Step 6
Sear and roast the chicken. Preheat oven to 400°F (200°C). Sear marinated chicken in a hot skillet with oil for 3-4 minutes per side until golden brown. Transfer skillet to the oven and roast for 20-25 minutes until internal temperature reaches 165°F (74°C). -
Step 7
Rest and serve the chicken. Remove chicken from oven, tent with foil, and let rest for 5-10 minutes before slicing or serving with rice and the green sauce.
Important Information
Nutrition Facts (Per Serving)
It is important to consider this information as approximate and not to use it as definitive health advice.
Allergy Information
Please check ingredients for potential allergens and consult a health professional if in doubt.

Leave a Comment