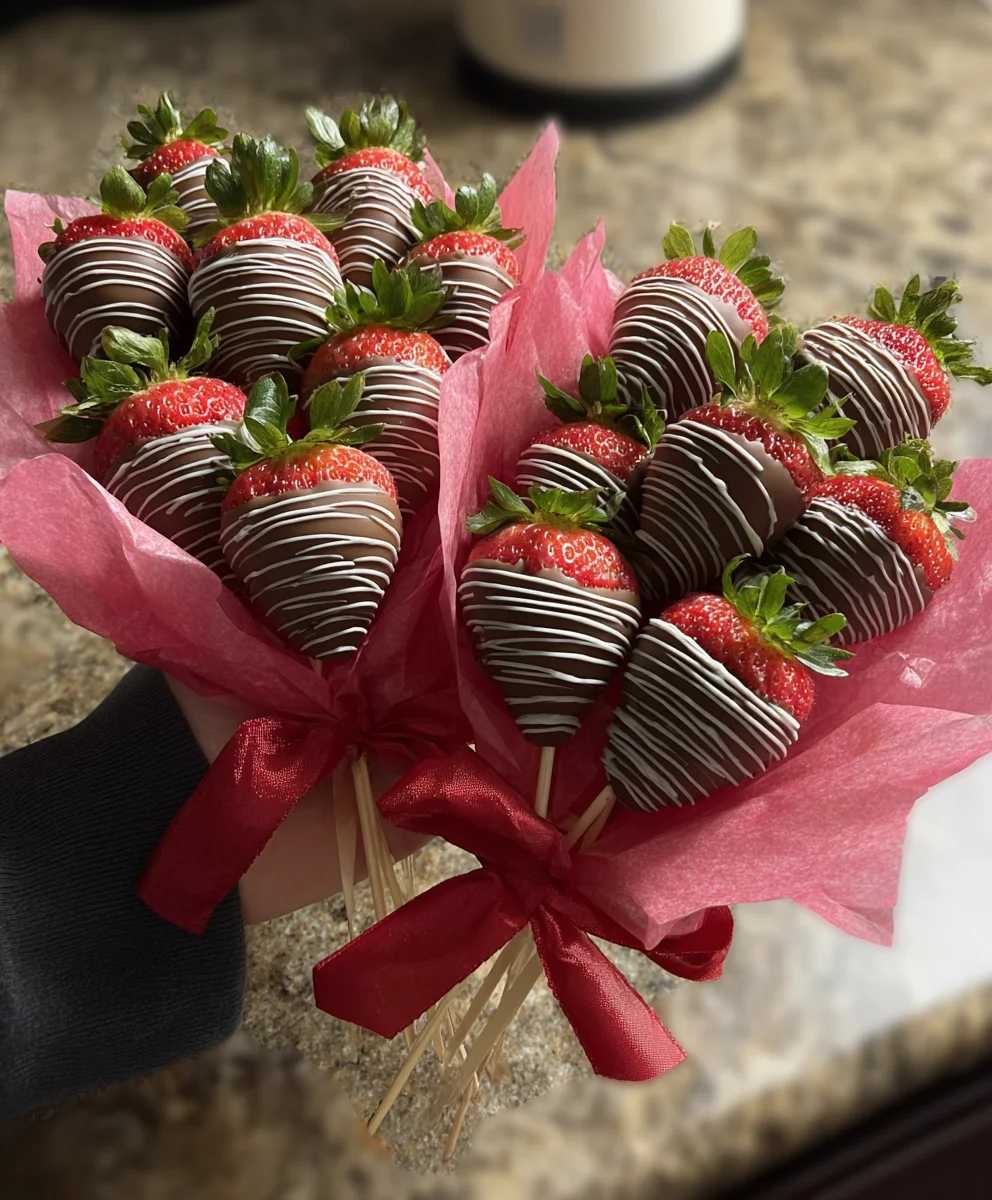
Chocolate covered strawberries are more than just a dessert; they’re a delightful edible experience that evokes feelings of indulgence, romance, and pure joy. Who can resist the simple elegance of a perfectly ripe, juicy strawberry enrobed in glossy, rich chocolate? It’s a classic for a reason, universally loved for its harmonious blend of sweet and tart, smooth and firm textures. The magic lies in its simplicity, yet the result is undeniably sophisticated. Whether you’re preparing them for a special occasion like Vnon-alcoholic alentine’s Day or a birthday, or simply treating yourself to a moment of delicious bliss, chocolate covered strawberries offer an accessible luxury. What truly sets them apart is the incredible versatility – you can experiment with different types of chocolate, add sprinkles, nuts, or even a drizzle of contrasting chocolate for a personalized touch. This recipe will guide you through creating these irresistible treats, ensuring perfect results every time.

Ingredients:
- 1 pound fresh strawberries
- 8 ounces semi-sweet chocolate chips
- 1 teaspoon vegetable oil or coconut oil (optional, for smoother melting)
- Sprinkles, chopped nuts, or shredded coconut (optional, for decoration)
Preparing the Strawberries
The first crucial step to achieving perfect chocolate covered strawberries is selecting the best ingredients and preparing them properly. For this recipe, you’ll need about one pound of fresh, ripe strawberries. Look for strawberries that are firm, plump, and a vibrant red color. Avoid any that are bruised, mushy, or have soft spots, as these won’t hold up well during the dipping process and can affect the final texture and appearance. Once you have your beautiful strawberries, it’s time to wash them gently. Fill a bowl with cool water and submerge the strawberries, swishing them around lightly to remove any dirt or debris. Avoid soaking them for too long, as they can absorb too much water, which can make it difficult for the chocolate to adhere properly. After washing, carefully pat each strawberry completely dry with paper towels. This is an absolutely essential step. Any moisture left on the strawberries will cause the melted chocolate to seize, resulting in a grainy and unappealing texture. Ensure you get into all the nooks and crannies, especially around the stem.
Melting the Chocolate
For the chocolate, we’ll be using 8 ounces of semi-sweet chocolate chips. These are readily available and provide a classic flavor that pairs wonderfully with sweet strawberries. If you prefer a richer, darker chocolate, you can substitute dark chocolate chips. For a sweeter treat, milk chocolate chips will also work, but they tend to be a bit softer when set. To help the chocolate melt smoothly and achieve a glossy finish, you can optionally add 1 teaspoon of vegetable oil or coconut oil. This is particularly helpful if you’re using higher quality chocolate that might be a bit thicker. There are two primary methods for melting chocolate: the double boiler method and the microwave method. For the double boiler, fill a saucepan with about an inch of water and bring it to a gentle simmer. Place a heatproof bowl on top of the saucepan, ensuring the bottom of the bowl doesn’t touch the water. Add your chocolate chips and the optional oil to the bowl. Stir frequently until the chocolate is completely melted and smooth. If microwaving, place the chocolate chips and optional oil in a microwave-safe bowl. Heat on 50% power for 30-second intervals, stirring thoroughly after each interval. Continue this process until the chocolate is almost entirely melted, then stir until it’s smooth and glossy. Overheating chocolate can cause it to burn, so be patient and stir often.
Dipping the Strawberries
Once your chocolate is perfectly melted and smooth, it’s time for the fun part: dipping the strawberries! Hold each strawberry by its stem or leaves, and carefully dip it into the melted chocolate, allowing the excess chocolate to drip back into the bowl. You can dip them entirely, or just halfway for a more elegant look. If you want a thicker coating, you can dip them a second time after the first coat has partially set, but be careful not to let the chocolate get too thick. As you dip each strawberry, place it on a baking sheet lined with parchment paper or wax paper. This will prevent the chocolate from sticking to the baking sheet and make them easy to remove once set. Work relatively quickly, as the melted chocolate will start to cool and thicken as you go. If the chocolate becomes too thick to work with, you can gently rewarm it using the double boiler or microwave method, as described previously.
Adding Decorations
Now for the creative flourish! If you’re looking to add some extra pizzazz to your chocolate covered strawberries, now is the time. While the chocolate is still wet, you can sprinkle on your chosen decorations. For a classic look, consider using colorful sprinkles. For a more sophisticated touch, try finely chopped nuts like almonds or pistachios. Shredded coconut also adds a lovely texture and flavor. You can also use a fork to drizzle contrasting melted chocolate (white chocolate or a different shade of semi-sweet) over the dipped strawberries for a marbled or striped effect. To do this, melt a small amount of contrasting chocolate separately. Then, using a fork, dip the tines into the melted chocolate and gently drizzle it back and forth over the already dipped strawberries. This step is best done while the base chocolate coating is still slightly soft, allowing the drizzled chocolate to adhere.
Chilling and Serving
After dipping and decorating, the final step is to let your chocolate covered strawberries set. Place the baking sheet with the dipped strawberries into the refrigerator. Allow them to chill for at least 30 minutes, or until the chocolate is completely firm and glossy. This chilling process not only sets the chocolate but also helps to intensify the flavors. Once set, carefully peel the chocolate covered strawberries off the parchment or wax paper. For the best flavor and texture, it’s ideal to serve them the same day they are made. Chocolate covered strawberries are a delightful treat that can be enjoyed on their own, as a dessert, or as part of a larger spread. Their beautiful presentation makes them perfect for parties, special occasions, or simply as a way to brighten someone’s day.
Conclusion:
And there you have it! Your guide to creating the most decadent and delightful Chocolate covered strawberries is complete. We’ve explored the simple yet rewarding process of transforming fresh, juicy strawberries into edible works of art. These beautiful treats are perfect for any occasion, from a romantic dessert for two to a crowd-pleasing addition to your next party.
To elevate your experience, consider serving these Chocolate covered strawberries alongside a glass of sparkling grape juice or cbeef hampagne for a truly celebratory touch. They also pair wonderfully with a scoop of vanilla bean ice cream or a dollop of fresh whipped cream. Don’t be afraid to get creative with variations! Experiment with different types of chocolate, such as white chocolate, milk chocolate, or even a swirl of both. You can also add a sprinkle of sea salt, chopped nuts, or even edible glitter for extra flair. The possibilities are endless, and the joy of creating and sharing these delicious Chocolate covered strawberries is immense. So go forth, dip with confidence, and enjoy every chocolatey bite!
Frequently Asked Questions:
What is the best type of chocolate to use for Chocolate covered strawberries?
For the best results, we recommend using good quality chocolate chips or finely chopped chocolate bars specifically designed for melting, often labeled as couverture chocolate. These chocolates contain cocoa butter, which helps them melt smoothly and set with a nice snap. Chocolate meant for baking can also work, but ensure it has a good fat content for a smooth coating.
How do I prevent the chocolate from seizing when making Chocolate covered strawberries?
The most common reason for chocolate seizing (becoming thick and clumpy) is the introduction of even a small amount of water. Ensure all your utensils and bowls are completely dry. If you’re melting chocolate over a double boiler, make sure the water doesn’t touch the bottom of the bowl holding the chocolate. Similarly, avoid adding any liquids directly to the melted chocolate unless it’s part of a specific recipe for ganache.
Easy Chocolate Covered Strawberries – Perfect Treat
A simple and delicious recipe for making perfect chocolate covered strawberries at home, ideal for any occasion.
Ingredients
-
1 pound fresh strawberries
-
8 ounces semi-sweet chocolate chips
-
1 teaspoon vegetable oil
-
Sprinkles
-
Chopped nuts
-
Shredded coconut
Instructions
-
Step 1
Select firm, plump, and vibrant red strawberries. Gently wash them in cool water and pat each strawberry completely dry with paper towels. This is crucial for proper chocolate adhesion. -
Step 2
Melt the chocolate chips with 1 teaspoon of vegetable oil using a double boiler or microwave on 50% power in 30-second intervals, stirring until smooth and glossy. Avoid overheating. -
Step 3
Hold each strawberry by its stem and dip it into the melted chocolate, allowing excess to drip back into the bowl. Dip fully or halfway. Place on a baking sheet lined with parchment paper. -
Step 4
While the chocolate is still wet, add decorations like sprinkles, chopped nuts, or shredded coconut. For a drizzled effect, use a fork with contrasting melted chocolate. -
Step 5
Refrigerate the strawberries for at least 30 minutes until the chocolate is completely firm and glossy. -
Step 6
Carefully remove the set strawberries from the parchment paper. Serve the same day for optimal flavor and texture.
Important Information
Nutrition Facts (Per Serving)
It is important to consider this information as approximate and not to use it as definitive health advice.
Allergy Information
Please check ingredients for potential allergens and consult a health professional if in doubt.
Leave a Comment