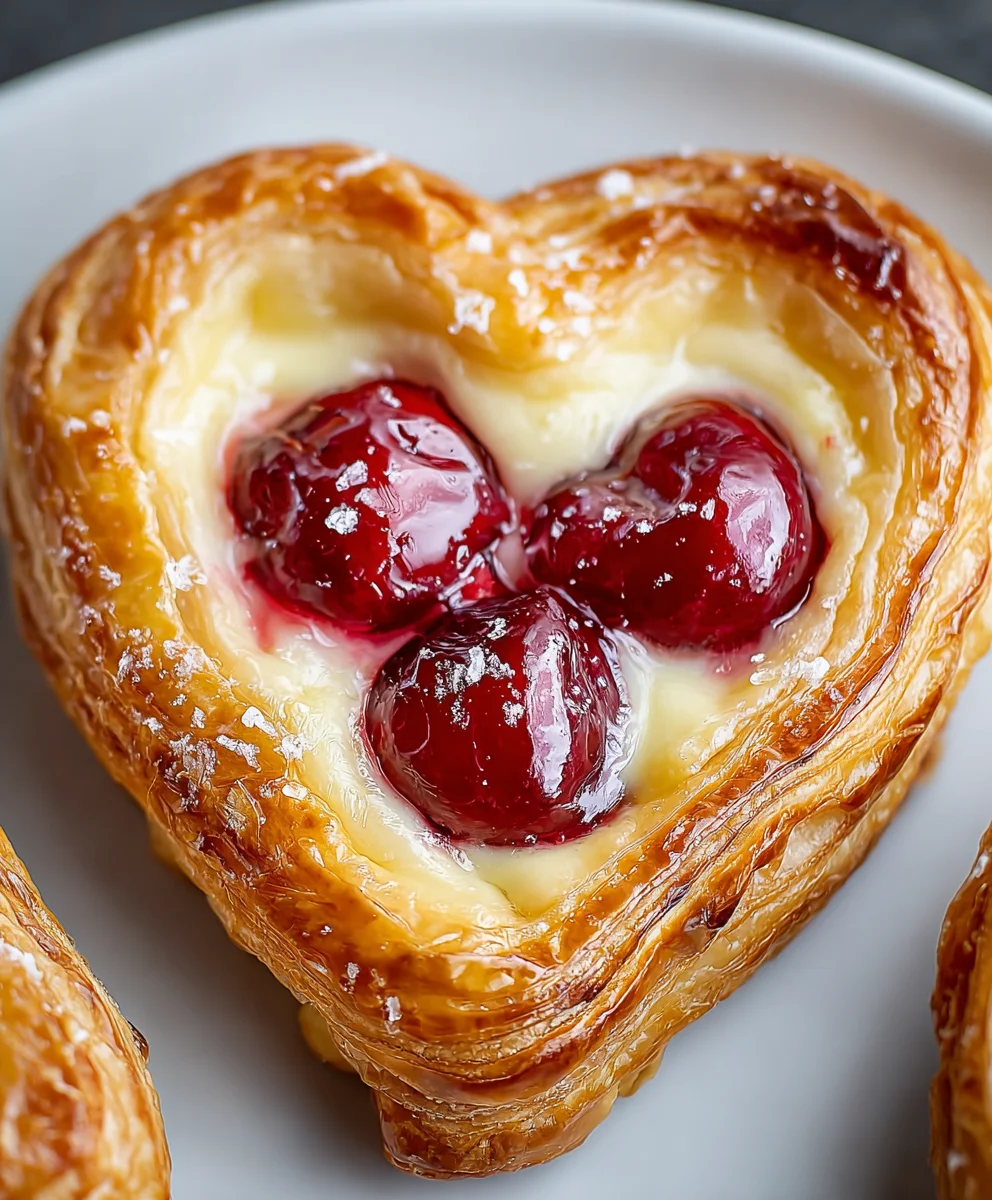
Heart-Shaped Cherry Cheese Danish is more than just a pastry; it’s a little bite of pure joy that transforms any morning or afternoon tea into a special occasion. Imagin extracte a delicate, flaky pastry cradling a sweet and tangy cream cheese filling, all adorned with plump, ruby-red cherries. It’s no wonder this delightful treat has captured so many hearts! People adore this danish for its perfect balance of textures and flavors – the buttery crispness of the dough, the smooth, rich creaminess of the cheese, and the burst of bright cherry goodness. What truly sets our Heart-Shaped Cherry Cheese Danish apart is not just its charming shape, making it ideal for celebrations of love or just because, but also the subtle hint of almond extract we add to the cream cheese, elevating it from delicious to truly unforgettable.
Why You’ll Love This Recipe
The Perfect Blend of Sweet and Tart
Ingredients:
- 4 oz cream cheese, softened
- ¼ cup sugar
- 1 egg yolk
- 1 tablespoon ricotta cheese
- ½ teaspoon almond extract or vanilla extract (use your favorite!)
- Pinch of salt
- ½ tablespoon lemon zest (freshly grated is best for vibrant flavor)
- 2 sheets puff pastry (from a standard 1-box package)
- 1 can cherry pie filling (about 21 oz)
- 1 large egg plus 1 tablespoon water (for the egg wash)
- All-purpose flour, for dusting
Preparing the Cheese Filling
Mixing the Cream Cheese Base
In a medium bowl, combine the softened cream cheese and ¼ cup of sugar. It’s important that your cream cheese is truly softened; this will ensure a smooth, lump-free filling. You can achieve this by leaving it on the counter for about an hour, or by gently microwaving it for 15-20 second intervals, stirring in between, until it’s pliable. Using a whisk or an electric mixer on medium speed, beat these two ingredients together until they are light and fluffy. This process incorporates air, which will make the filling wonderfully creamy.
Next, add the egg yolk to the cream cheese mixture. The egg yolk acts as a binder, helping to thicken the filling and give it a richer texture. Beat it in until just combined. Following that, stir in the tablespoon of ricotta cheese. Ricotta adds a subtle tang and a creamier mouthfeel to the filling, elevating it beyond a simple cream cheese mixture. Now, it’s time to add the flavorings. Stir in your ½ teaspoon of almond extract or vanilla extract. Almond extract will give a slightly more sophisticated, nutty note, while vanilla is a classic and comforting choice. Add a pinch of salt to balance the sweetness and enhance all the other flavors. Finally, incorporate the ½ tablespoon of freshly grated lemon zest. The lemon zest provides a bright, zesty counterpoint to the sweetness of the sugar and the richness of the cream cheese, making the Danish truly sing. Mix everything until it’s thoroughly incorporated and you have a smooth, fragrant cheese filling.
Assembling the Heart-Shaped Cherry Cheese Danishes
Shaping the Puff Pastry
Gently unfold your two sheets of puff pastry onto a lightly floured surface. It’s important to work with cold puff pastry, as this is what gives it its signature flaky layers when baked. If it feels warm or sticky, pop it back into the refrigerator for a few minutes. Now, let’s create the heart shapes. For each sheet of puff pastry, you’ll want to cut it into two equal rectangles. Then, for each rectangle, you’ll cut a large heart shape. You can do this freehand or by folding the rectangle in half vertically and drawing half a heart along the folded edge, then cutting it out. Unfold it, and you’ll have a perfect heart. You should end up with four heart shapes in total.
Filling and Folding the Danishes
Take two of your heart shapes and place them on a baking sheet lined with parchment paper. Spoon about 2-3 tablespoons of the cherry pie filling onto the center of each heart, leaving a ½-inch border around the edges. Be careful not to overfill, as this can cause the filling to leak out during baking. Now, for the second set of heart shapes, you have a couple of options for creating the classic Danish look. You can either place a whole heart shape on top of the filling and carefully press the edges together with a fork to seal, or you can cut slits into the second set of heart shapes, creating a lattice effect. If you choose the lattice, gently lay the cut pastry over the cherry filling. For a truly heart-shaped Danish experience, you can also create a smaller heart cut-out from the center of the top pastry piece before placing it over the filling, allowing a peek of the cherry goodness.
Creating the Egg Wash and Final Touches
In a small bowl, whisk together the large egg and 1 tablespoon of water. This is your egg wash, and it’s crucial for achieving that beautiful golden-brown sheen on your pastries. Using a pastry brush, lightly brush the exposed edges of the puff pastry with the egg wash. This helps them to brown evenly and gives them a lovely glossy finish. If you’ve opted for the lattice top, brush over the lattice as well. For an extra touch of elegance, you can lightly sprinkle the tops with a tiny bit more sugar, but this is entirely optional.
Baking and Achieving Perfection
The Baking Process
Preheat your oven to 400°F (200°C). This initial high temperature helps the puff pastry to expand rapidly, creating those desirable flaky layers. Carefully place your prepared baking sheet into the preheated oven. Bake for approximately 20-25 minutes, or until the pastries are puffed up, deeply golden brown, and the cherry filling is bubbling enticingly. Keep a close eye on them towards the end of the baking time, as puff pastry can go from perfectly golden to burnt very quickly. If you notice certain areas browning faster than others, you can loosely tent those spots with aluminum foil.
Cooling and Serving
Once baked to perfection, remove the Heart-Shaped Cherry Cheese Danishes from the oven. Let them cool on the baking sheet for a few minutes before carefully transferring them to a wire rack to cool further. This allows the steam to escape and prevents the bottoms from becoming soggy. While they are absolutely delicious served warm, they are also wonderful at room temperature. For an extra decadent treat, you can drizzle them with a simple glaze made from powdered sugar and a little milk or lemon juice once they have cooled down completely. These make for a delightful breakfast treat, a lovely afternoon snack, or a charming dessert.

Conclusion:
And there you have it – your very own batch of delicious Heart-Shaped Cherry Cheese Danish! We hope you’ve enjoyed the process of creating these delightful treats. The combination of flaky puff pastry, creamy cream cheese filling, and sweet cherry topping is truly irresistible, making them perfect for any occasion, from a special breakfast to a lovely afternoon tea. Don’t be afraid to experiment with different fruits or even a sprinkle of cinnamon in the cheese mixture for a personalized touch. The joy of baking is in making it your own, and we encourage you to get creative! We’re confident that once you master this recipe, it will become a firm favorite in your baking repertoire. Share them with loved ones, or keep them all to yourself – we won’t judge!
Frequently Asked Questions about Heart-Shaped Cherry Cheese Danish:
Q1: Can I make the Heart-Shaped Cherry Cheese Danish ahead of time?
Yes, you can! You can prepare the filling and even assemble the danishes without baking them a day in advance. Store them covered in the refrigerator and bake them fresh when you’re ready to serve. For optimal freshness, it’s best to bake them on the day you plan to enjoy them, as puff pastry can lose some of its crispness when stored assembled for too long.
Q2: What other fruits can I use in my Heart-Shaped Cherry Cheese Danish?
The beauty of this recipe is its versatility! Besides cherries, you can use a variety of other fruits. Popular choices include fresh or frozen blueberries, raspberries, sliced strawberries, or even a mix of berries. You could also try diced apples with a pinch of cinnamon for a fall-inspired twist. Just ensure the fruit is well-drained if using frozen or very juicy fresh varieties.
Q3: How do I get perfectly golden and flaky puff pastry?
The key to excellent puff pastry is to ensure it stays cold throughout the entire process. Make sure your puff pastry is properly thawed but still cold when you start working with it. Handle it as little as possible and avoid overworking it. Baking in a preheated oven at the correct temperature is also crucial. The initial high heat helps the layers puff up beautifully.
Heart-Shaped Cherry Cheese Danish
A festive and delightful treat, these heart-shaped cherry cheese danishes are perfect for any celebration or special occasion. Flaky puff pastry encases a creamy, sweet cheese filling and is topped with a vibrant cherry filling.
Ingredients
-
4 oz cream cheese, softened
-
1/4 cup sugar
-
1 egg yolk
-
1 tablespoon ricotta cheese
-
1/2 teaspoon almond extract
-
Pinch of salt
-
1/2 tablespoon lemon zest
-
2 sheets puff pastry
-
1 can cherry pie filling
-
1 large egg plus 1 tablespoon water (for egg wash)
-
All-purpose flour, for dusting
Instructions
-
Step 1
Prepare the cheese filling: In a medium bowl, beat softened cream cheese and sugar until light and fluffy. Stir in egg yolk, ricotta cheese, almond extract, salt, and lemon zest until smooth and well combined. -
Step 2
Assemble the danishes: Gently unfold puff pastry onto a lightly floured surface. Cut each sheet into two equal rectangles, then cut each rectangle into a large heart shape (four hearts total). Place two heart shapes on a parchment-lined baking sheet. Spoon 2-3 tablespoons of cherry pie filling onto the center of each, leaving a 1/2-inch border. -
Step 3
Top the danishes: Place the remaining two heart shapes over the filling. You can either place them whole and press edges to seal with a fork, or cut slits into them for a lattice effect. Alternatively, cut a small heart-shaped opening from the center of the top pastry piece to reveal the filling. -
Step 4
Create egg wash: Whisk together 1 large egg and 1 tablespoon of water in a small bowl. Lightly brush the exposed edges of the puff pastry with the egg wash for a golden sheen. Optional: sprinkle lightly with sugar. -
Step 5
Bake: Preheat oven to 400°F (200°C). Bake for 20-25 minutes, or until puffed, golden brown, and filling is bubbling. Watch closely to prevent burning. -
Step 6
Cool and serve: Let danishes cool on the baking sheet for a few minutes before transferring to a wire rack. Serve warm or at room temperature. For an extra touch, drizzle with a powdered sugar glaze once cooled.
Important Information
Nutrition Facts (Per Serving)
It is important to consider this information as approximate and not to use it as definitive health advice.
Allergy Information
Please check ingredients for potential allergens and consult a health professional if in doubt.


Leave a Comment