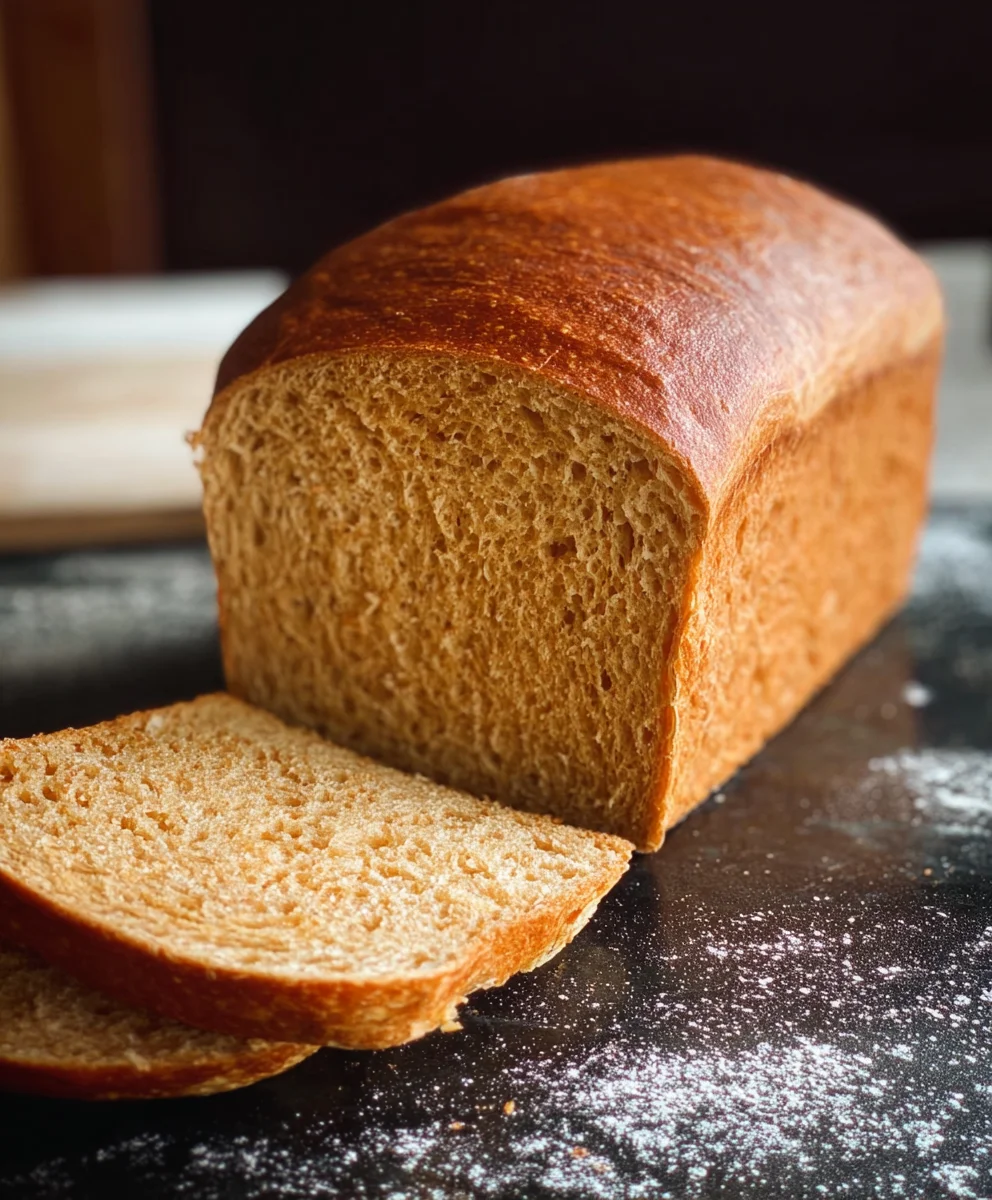
Simple Honey Wheat Bread isn’t just a recipe; it’s an invitation to experience the comforting aroma of freshly baked goodness filling your home. There’s a certain magic that happens when humble ingredients transform into a loaf so wonderfully rustic and satisfying. People flock to this recipe because it delivers on its promise: a delicious, wholesome bread that’s surprisingly easy to create, even for begin extractner bakers. What truly sets this Simple Honey Wheat Bread apart is the perfect balance of subtle sweetness from the honey and the hearty, nutty flavor of whole wheat flour. It’s that delightful chew, the slightly crisp crust, and the tender crum extractb that makes every slice a moment of pure gin extract. Imagine slathering it with butter or dunking it into your favorite soup – it’s the epitome of comfort food, elevated by its simplicity.

Ingredients:
- 2 cups warm milk (about 110-115 degrees Fahrenheit)
- 1-1/2 tablespoons instant yeast
- 1 teaspoon sugar
- 1/2 cup warm water
- 2-1/2 cups whole wheat flour
- 3 to 3-1/2 cups bread flour or all-purpose flour (start with 3 cups and add more as needed)
- 3 tablespoons shortening (butter-flavored is a great choice)
- 1/4 cup honey
- 1 tablespoon salt
- For the egg wash: 1 large egg whisked with 1 tablespoon of water
Preparing the Dough
Step 1: Activating the Yeast and Mixing Wet Ingredients
Begin extract by gathering all your ingredients. In a large mixing bowl, combine the warm milk and the 1 teaspoon of sugar. Sprinkle the 1-1/2 tablespoons of instant yeast over the surface. Let this mixture sit undisturbed for about 5 to 10 minutes. You’ll know the yeast is active and ready when it becomes foamy and bubbly. This is a crucial step, as it ensures your bread will rise beautifully. While the yeast is proofing, you can prepare your other wet ingredients. In a separate small bowl, whisk together the 1/4 cup of honey and the 3 tablespoons of shortening until well combined. If your shortening is very solid, you might want to gently warm it slightly to make it easier to incorporate.
Step 2: Combining Flours and Initial Mixing
Once the yeast has bloomed, add the honey and shortening mixture to the yeast and milk. Stir gently to combine. Now, it’s time to add the dry ingredients. Add the 2-1/2 cups of whole wheat flour and the 1 tablespoon of salt to the wet ingredients. Next, gradually add 3 cups of the bread flour (or all-purpose flgin extract). Begin mixing everything together with a sturdy spoon or a dough whisk. Mix until agin extractaggy dough begins to form. At this stage, the dough will be quite sticky and wet. Resist the urge to add too much extra flour just yet; we’ll address that in the next step.
Step 3: Kneading the Dough for Elasticity
Turn the shaggy dough out onto a lightly floured surface. This is where the kneading magic happens. Start kneading the dough by pushing it away from you with the heels of your hands, then folding it over itself, and repeating the process. If the dough is excessively sticky, you can add a tablespoon of bread flour at a time, but only as much as is absolutely necessary to prevent it from sticking to your hands and the work surface. Aim for a dough that is still slightly tacky but manageable. Continue kneading for about 8 to 10 minutes. You’re looking for the dough to become smooth, elastic, and to pass the “windowpane test” – when you gently stretch a small piece of dough, it should become thin enough to see light through without tearing.
Step 4: First Rise and Developing Flavor
Lightly grease a clean, large bowl with a little bit of oil or cooking spray. Place the kneaded dough into the greased bowl, turning it once to coat the entire surface. Cover the bowl tightly with plastic wrap or a clean kitchen towel. Find a warm, draft-free spot for the dough to rise. An oven that has been turned off but still retains a little warmth is ideal. Allow the dough to rise for approximately 1 to 1.5 hours, or until it has doubled in size. This slow rise allows the gluten to relax and develop the characteristic flavor and texture of your Simple Honey Wheat Bread.
Step 5: Shaping and Second Rise
Once the dough has doubled, gently punch it down to release the air. Turn the dough out onto a lightly floured surface again and shape it into your desired loaf form. For a standard loaf, shape it into a rustic oval or rectangle that will fit into a standard 9×5 inch loaf pan. Gently press the dough into the pan, ensuring it’s evenly distributed. You can also shape it into a round boule if you prefer to bake it on a baking sheet. Cover the shaped loaf loosely with plastic wrap or a kitchen towel and let it rise again for another 30 to 45 minutes, or until it has visibly puffed up and looks airy. This second rise is critical for a light and fluffy texture.
Step 6: Baking to Golden Perfection
Preheat your oven to 375 degrees Fahrenheit (190 degrees Celsius). Once the dough has completed its second rise, gently brush the top of the loaf with the prepared egg wash. This egg wash will give your bread a beautiful golden-brown crust and a lovely sheen. Carefully place the loaf pan into the preheated oven. Bake for 30 to 35 minutes, or until the crust is a deep golden brown and the internal temperature of the bread reaches 195-200 degrees Fahrenheit (90-93 degrees Celsius) when measured with an instant-read thermometer. If you are baking a freeform loaf, the baking time might be slightly less, so keep an eye on it.
Step 7: Cooling for Optimal Texture
As soon as the bread is out of the oven, carefully remove it from the loaf pan and place it on a wire cooling rack. This is an essential step to prevent the bottom of the bread from becoming soggy. Allow the bread to cool completely before slicing. Patience here is key! Cutting into the bread while it’s still hot can result in a gummy texture. Once cooled, you’ll have a wonderfully fragrant, slightly sweet, and satisfyingly hearty loaf of Simple Honey Wheat Bread. Enjoy it slathered with butter, or as the perfect accompaniment to your favorite meals.
Conclusion:
You’ve now got all the tools and knowledge to bake your very own Simple Honey Wheat Bread! This recipe is a fantastic starting point for anyone looking to enjoy the wholesome goodness of homemade bread without a lot of fuss. The subtle sweetness from the honey and the hearty texture of the whole wheat flour create a truly satisfying loaf. I encourage you to give this recipe a try – you might be surprised at how easy and rewarding it is to pull a warm, fragrant loaf of Simple Honey Wheat Bread from your oven. Don’t be afraid to experiment with serving suggestions or variations; that’s part of the fun of baking!
For serving, this bread is wonderful toasted and spread with butter, or used for hearty sandwiches. It also pairs beautifully with soups and stews. If you’re feeling adventurous, consider adding a sprinkle of seeds to the dough or topping before baking for an extra layer of flavor and crunch.
Frequently Asked Questions about Simple Honey Wheat Bread:
Can I substitute the honey with another sweetener?
Yes, you can! While honey adds a unique flavor and moisture to Simple Honey Wheat Bread, you can substitute it with an equal amount of maple syrup or agave nectar. Brown sugar is also a good option, though you might need to slightly adjust the liquid content.
My dough didn’t rise as much as I expected. What could be the reason?
Several factors can affect dough rise. Ensure your yeast is fresh and properly activated. Water temperature is crucial – too hot will kill the yeast, and too cold won’t activate it properly. Also, check that your kitchen isn’t too cold, as this can slow down the yeast’s activity. Over-kneading or under-kneading can also impact the final texture and rise.
Simple Honey Wheat Bread Recipe – Easy Baking
A simple and easy recipe for delicious honey wheat bread, perfect for beginners. This recipe yields a slightly sweet, hearty, and satisfying loaf.
Ingredients
-
2 cups warm milk (about 110-115 degrees Fahrenheit)
-
1-1/2 tablespoons instant yeast
-
1 teaspoon sugar
-
1/2 cup warm water
-
2-1/2 cups whole wheat flour
-
3 to 3-1/2 cups bread flour or all-purpose flour
-
3 tablespoons shortening
-
1/4 cup honey
-
1 tablespoon salt
-
1 large egg whisked with 1 tablespoon of water (for egg wash)
Instructions
-
Step 1
In a large mixing bowl, combine warm milk and sugar. Sprinkle yeast over the top and let sit for 5-10 minutes until foamy. In a separate bowl, whisk together honey and shortening until well combined. -
Step 2
Add the honey-shortening mixture to the yeast mixture. Stir gently. Add whole wheat flour and salt. Gradually add 3 cups of bread flour and mix until a shaggy dough forms. -
Step 3
Turn the dough onto a lightly floured surface and knead for 8-10 minutes until smooth and elastic, adding more flour a tablespoon at a time if necessary. The dough should be slightly tacky but manageable. -
Step 4
Place the kneaded dough in a lightly greased bowl, cover, and let rise in a warm place for 1-1.5 hours, or until doubled in size. -
Step 5
Punch down the dough, shape it into a loaf, and place it in a loaf pan. Cover loosely and let rise again for 30-45 minutes until visibly puffed. -
Step 6
Preheat oven to 375°F (190°C). Brush the top of the loaf with the egg wash. Bake for 30-35 minutes until golden brown and the internal temperature reaches 195-200°F (90-93°C). -
Step 7
Remove bread from the pan immediately and cool completely on a wire rack before slicing to ensure optimal texture.
Important Information
Nutrition Facts (Per Serving)
It is important to consider this information as approximate and not to use it as definitive health advice.
Allergy Information
Please check ingredients for potential allergens and consult a health professional if in doubt.

Leave a Comment