No Knead Crusty Rolls have a way of transporting you. Imagin extracte that moment: the aroma of freshly baked bread filling your kitchen, a gentle warmth radiating from a golden crust, and the satisfying sigh as you break into a perfectly airy interior. It’s pure comfort, a taste of homemade goodness that’s surprisingly achievable. What makes these No Knead Crusty Rolls so utterly beloved is their deceptive simplicity coupled with an irresistible outcome. You don’t need to be a seasoned baker or gin extracte bulging biceps from endless kneading to create these little marvels. The magic lies in patience and a few humble ingredients, allowing time to do the heavy lifting. They’re perfect for sopping up rich stews, serving alongside your favorite soup, or simply slathering with butter and enjoying on their own. This recipe is a testament to how extraordinary results can come from the most straightforward methods, making the joy of baking accessible to everyone.

Ingredients:
- 3 cups all-purpose flour, plus more for dusting
- 1 teaspoon instant yeast
- 1 teaspoon salt
- 1 ½ cups lukewarm water (about 105-115°F / 40-46°C)
- 1 tablespoon olive oil, for greasing
Getting Started: The Dough
The magic of these No Knead Crusty Rolls lies in its simplicity and the patience you’ll need. We’re not going to be doing any vigorous kneading here; instead, we’ll let time and fermentation do the heavy lifting. In a large mixing bowl, combine the 3 cups of all-purpose flour, 1 teaspoon of instant yeast, and 1 teaspoon of salt. Give these dry ingredients a good whisk together to ensure the yeast and salt are evenly distributed throughout the flour. This is an important first step for consistent leavening and flavor development.
Now, it’s time to introduce the liquid. Gradually pour in the 1 ½ cups of lukewarm water. Use your hands or a sturdy spatula to mix everything until just combined. You’re looking for a shaggy, wet dough. Don’t worry if it seems too sticky or unmanageable at this stage – that’s exactly what we want! The high hydration is key to developing that wonderfully airy interior and crispy crust. Once you’ve incorporated all the flour and water, cover the bowl tightly with plastic wrap or a damp kitchen towel. Let this dough rest at room temperature for a minimum of 12 hours, or up to 18 hours. This long, slow fermentation period is crucial for developing complex flavors and that signature open crum extractb structure. You’ll notice the dough will become bubbly and significantly increase in volume during this time.
Shaping the Rolls
After the long fermentation, your dough should be beautifully risen, airy, and dotted with bubbles. Lightly flour a clean work surface. Gently scrape the dough out of the bowl onto the floured surface. Be careful not to deflate it too much! You want to preserve as much of that precious air as possible. The dough will be quite sticky, so use a bench scraper or a lightly floured hand to help you manage it.
Now, we’ll divide the dough into portions. You can aim for roughly 6-8 rolls, depending on your desired size. To shape each roll, gently fold one edge of the dough towards the center, then repeat with the opposite edge, creating a sort of rough rectangle. Then, gently fold the top edge down to meet the bottom edge, and press gently to seal. You can also simply gather the edges of the dough and pinch them together to form a rough ball, then gently cup your hands around it and rotate to create tension on the surface. The goal is to create a cohesive shape without overworking the dough. Avoid too much handling, as this will toughen the gluten and result in a less tender roll. As you shape each roll, place it on a piece of parchment paper, leaving a few inches of space between each one as they will expand.
The Second Rise and Baking Preparation
Once your rolls are shaped, cover them loosely with plastic wrap or a clean kitchen towel. Let them rest and rise again for another 30-45 minutes. This second rise, or proofing, allows the yeast to reactivate and the dough to relax further, ensuring a light and airy final product. While the rolls are proofing, preheat your oven to 450°F (230°C). It’s crucial to have a very hot oven for these rolls to achieve their signature crispiness.
To mimic the steam that contributes to a beautifully crusted bread, we’ll create a makeshift steam environment. About 20 minutes before you plan to bake, place an empty oven-safe pot or Dutch oven with its lid into the oven as it preheats. Alternatively, you can place a metal baking pan on the bottom rack.
Baking to Perfection
Carefully remove the preheated pot or Dutch oven from the oven (use oven mitts!). Gently transfer the proofed rolls directly into the hot pot, or onto the preheated baking sheet if you’re using that method. If you’re using a pot, place the lid back on.
Bake the rolls, covered, for 20 minutes. The lid traps the steam released from the dough, which is essential for creating a thin, crispy crust and allowing the rolls to rise fully. After 20 minutes, carefully remove the lid. You should see beautifully puffed-up rolls with a pnon-alcoholic ale crust. Continue baking, uncovered, for another 10-15 minutes, or until the rolls are a deep golden brown and sound hollow when tapped on the bottom. If you used a baking pan and no lid, you can carefully pour about ½ cup of hot water into the empty pan on the bottom rack to create steam in the first 20 minutes of baking, then remove the pan and continue baking for the remaining time until golden brown.
Cooling and Enjoying
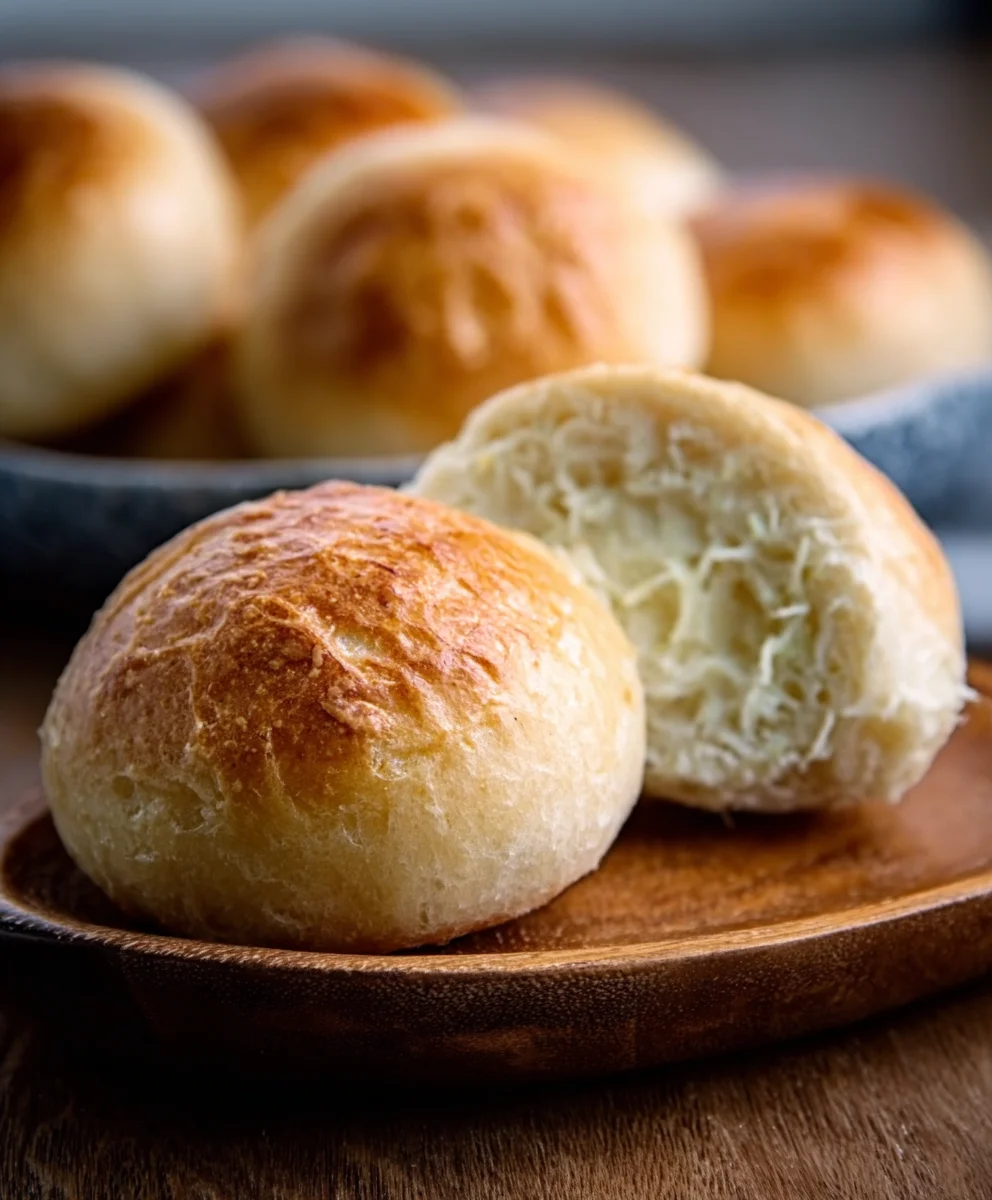
Once baked to perfection, carefully remove the No Knead Crusty Rolls from the oven. Transfer them immediately to a wire cooling rack. This is a critical step to prevent the bottoms from becoming soggy. The residual heat will continue to cook them slightly, and the air circulation will ensure the crust remains wonderfully crisp. Resist the urge to cut into them immediately; allow them to cool for at least 15-20 minutes. The interior will continue to set, and the flavors will meld. These rolls are best enjoyed fresh, warm, and with a generous smear of butter, or alongside your favorite soup or stew. Their delightful crust and tender interior make them incredibly versatile.
Conclusion:
And there you have it – your guide to creating incredibly delicious No Knead Crusty Rolls! This recipe truly delivers on its promise of a beautiful crust and a wonderfully tender interior, all with minimal effort. The magic of long fermentation and high heat transforms simple ingredients into something truly special. These rolls are perfect for any occasion, whether you’re looking for a side to a hearty soup, a base for gourmet sandwiches, or simply a delightful treat to enjoy with butter. Don’t be afraid to experiment with these delightful rolls. You can add herbs like rosemary or thyme to the dough for an extra layer of flavor, or even sprinkle some seeds like sesame or poppy seeds on top before baking for added texture and visual appeal. The possibilities are truly endless!
We encourage you to give this No Knead Crusty Rolls recipe a try. You’ll be amazed at what you can achieve with so little fuss. Happy baking!
Frequently Asked Questions:
Can I make these No Knead Crusty Rolls ahead of time?
Yes, you can. Once baked and cooled, the No Knead Crusty Rolls can be stored in an airtight container at room temperature for 1-2 days. For longer storage, you can freeze them. Allow them to cool completely, then wrap them tightly in plastic wrap and then in aluminum foil or place them in a freezer-safe bag. To reheat, simply place them in a preheated oven at 350°F (175°C) for 5-10 minutes, or until warmed through.
What can I use if I don’t have a Dutch oven?
If you don’t have a Dutch oven, you can still achieve a wonderful crust for your No Knead Crusty Rolls. Preheat a baking sheet or a pizza stone in your oven. Once the oven is at temperature and you’re ready to bake, carefully place the shaped rolls onto the hot surface. To create steam, you can place a shallow metal pan filled with hot water on the rack below the rolls during the initial baking phase. This will mimic the steam environment of a Dutch oven and help develop that desirable crust.
Easy No Knead Crusty Rolls Recipe
Simple no-knead rolls with a wonderfully airy interior and a perfectly crispy crust. Made with minimal effort and a long fermentation for maximum flavor.
Ingredients
-
3 cups all-purpose flour, plus more for dusting
-
1 teaspoon instant yeast
-
1 teaspoon salt
-
1 ½ cups lukewarm water
-
1 tablespoon olive oil, for greasing
Instructions
-
Step 1
In a large mixing bowl, combine the flour, yeast, and salt. Whisk together to distribute evenly. Gradually pour in the lukewarm water and mix with your hands or a spatula until just combined to form a shaggy, wet dough. Cover tightly and let rest at room temperature for 12-18 hours. -
Step 2
Lightly flour a clean work surface. Gently scrape the risen dough onto the surface, being careful not to deflate it too much. Divide the dough into 6-8 portions. Shape each portion by gently folding edges towards the center to create a rough rectangle, then folding in half and sealing. Alternatively, gather edges and pinch to form a rough ball, then cup hands and rotate to create surface tension. Place each shaped roll on parchment paper, leaving space between them. -
Step 3
Cover the shaped rolls loosely and let them rise for another 30-45 minutes. While they are proofing, preheat your oven to 450°F (230°C). Place an empty oven-safe pot or Dutch oven with its lid inside the oven to preheat for at least 20 minutes. -
Step 4
Carefully remove the preheated pot from the oven. Gently transfer the proofed rolls into the hot pot. Place the lid back on. -
Step 5
Bake the rolls, covered, for 20 minutes. This traps steam for a crispy crust. After 20 minutes, carefully remove the lid and continue baking uncovered for another 10-15 minutes, or until the rolls are a deep golden brown and sound hollow when tapped. -
Step 6
Remove the rolls from the oven and transfer them immediately to a wire cooling rack to prevent soggy bottoms. Allow to cool for at least 15-20 minutes before serving.
Important Information
Nutrition Facts (Per Serving)
It is important to consider this information as approximate and not to use it as definitive health advice.
Allergy Information
Please check ingredients for potential allergens and consult a health professional if in doubt.


Leave a Comment