Halloween Rice Krispies Treats are more than just a simple sweet snack; they’re a nostalgic portal to childhood joy and a canvas for spooky creativity! There’s something undeniably magical about transforming those classic, gooey, marshmallow-y squares into something that screams “trick-or-treat.” What is it about these treats that makes them such a beloved part of autumn celebrations? Perhaps it’s their inherent simplicity, allowing us to dive headfirst into the decorating fun without the stress of complex baking. Or maybe it’s the perfect balance of chewy and crispy, a satisfying textural delight that’s universally adored. But when you elevate them with a touch of Halloween flair, these Halloween Rice Krispies Treats become miniature edible masterpieces, guaranteed to delight both little ghouls and grown-up monsters alike. They’re incredibly versatile, perfect for parties, school events, or simply adding a festive touch to your everyday snacking.
Why You’ll Adore These
The sheer joy these Halloween Rice Krispies Treats bring is unmatched. They’re easy enough for kids to help make, fostering family fun and creating lasting memories. Plus, their adaptability means you can let your imagin extractation run wild, crafting everything from creepy crawlies to ghostly figures. They’re a crowd-pleaser that always disappears first from any dessert table!
What Makes Them So Special
It’s the customizable nature that truly sets these treats apart. You can use food coloring to create vibrant orange and black bases, then adorn them with candy eyeballs, sprinkles, or even edible glitter for a touch of sparkle. This recipe is all about embracing the spirit of the season and turning a simple snack into a festive spectacle that everyone will be talking about.
Ingredients:
- Unsalted butter: 3 tablespoons
- Mini marshmallows: 1 package (10 ounces)
- Rice Krispies cereal: 6 cups
- Candy corn: 1 cup
- Yellow food coloring: A few drops, to achieve a vibrant yellow hue
- Orange food coloring: A few drops, to achieve a festive orange color
Preparing Your Spooky Layers
Step 1: Melting the Foundation
Begin extract by preparing a large pot or Dutch oven over low heat. Add your 3 tablespoons of unsalted butter to the pot. Allow the butter to melt completely, stirring occasionally to prevent it from scorching. Once the butter is fully melted and shimmering, remove the pot from the heat momentarily. This gentle melting process is crucial for ensuring your Halloween Rice Krispies Treats have a smooth, consistent texture without any burnt butter flavor.
Step 2: Marshmallow Magic and Color Infusion
To the melted butter, add your entire 10-ounce package of mini marshmallows. Return the pot to low heat. Stir continuously, coaxing the marshmallows to melt into a gooey, sticky mass. This will take a few minutes, and patience is key here. As the marshmagin extractws begin to melt, you’ll notice them transforming from distinct puffs into a smooth, creamy mixture. Once the marshmallows are about 75% melted, it’s time to divide this mixture for our Halloween colors.
Carefully scoop out approximately half of the marshmallow mixture into a separate heatproof bowl. To the mixture remaining in the pot, add a few drops of orange food coloring. Stir thoroughly until the orange color is evenly distributed, creating a vibrant orange base. To the separate bowl containing the other half of the marshmallow mixture, add a few drops of yellow food coloring. Again, stir until the yellow is uniform. You should now have two separate bowls with colored marshmallow mixtures, ready for the next stage.
Step 3: Combining Cereal with Color
Now, we’ll incorporate the star of our Halloween Rice Krispies Treats: the cereal! To the bowl with the orange marshmallow mixture, add 3 cups of Rice Krispies cereal. Gently fold the cereal into the marshmallow mixture using a spatula. Ensure every piece of cereal is coated with the sticky, orange goo. Work quickly, as the marshmallow mixture will start to set as it cools. Repeat this process with the bowl containing the yellow marshmallow mixture and the remaining 3 cups of Rice Krispies cereal. You should now have two separate bowls, one with orange cereal treats and one with yellow cereal treats.
Step 4: Shaping Our Halloween Creations
Prepare an 8×8 inch baking pan by lightly greasing it with butter or lining it with parchment paper. This step is essential to prevent your treats from sticking. Divide the orange Rice Krispies mixture and spread it evenly into one half of the prepared baking pan. Press it down gently but firmly with your greased spatula or hands. Don’t worry about making it perfectly flat just yet. Now, take the yellow Rice Krispies mixture and spread it evenly over the other half of the pan, right alongside the orange layer. You’re essentially creating a two-toned treat, reminiscent of classic Halloween colors.
Step 5: The Festive Finishing Touch – Candy Corn Accents
For the final, festive flourish, gently press the 1 cup of candy corn into the surface of the treats while they are still slightly warm and pliable. You can press them in randomly for a fun, scattered look, or arrange them in a pattern if you’re feeling particularly artistic. The warmth of the treats will help them adhere. Allow the Halloween Rice Krispies Treats to cool completely in the pan for at least 30 minutes, or until they are firm to the touch. Once cooled, carefully lift the entire sheet from the pan using the parchment paper (if used) or invert the pan onto a cutting board. Slice into squares or rectangles using a sharp knife.

Conclusion:
And there you have it – your guide to crafting the spookiest and most delicious Halloween Rice Krispies Treats! These simple yet impactful treats are perfect for a fun family activity, a classroom party, or just to add a festive touch to your autumn evenings. Their versatility makes them a true crowd-pleaser, and the joy they bring is truly magical.
I encourage you to get creative with your decorations! Beyond the simple ghosts and pumpkins, think about adding spooky sprinkles, edible googly eyes, or even drizzling them with black or orange icing. For serving, they’re fantastic on their own, but they also make a charming addition to a Halloween dessert table alongside cookies and cupcakes. You can even cut them into fun Halloween shapes using cookie cutters before they fully set.
If you’re looking for variations, consider adding a touch of orange extract or a swirl of food coloring to the melted marshmallows for an extra pop of color. Chopped candy corn or mini chocolate chips can also be stirred in for added texture and flavor. Don’t be afraid to experiment and make these Halloween Rice Krispies Treats uniquely yours!
Frequently Asked Questions:
How do I get my Halloween Rice Krispies Treats to be perfectly shaped and not too sticky?
The key to perfectly shaped and less sticky treats is to work quickly while the mixture is still warm and pliable. Lightly butter or spray your hands, spatulas, and the baking pan before you start pressing the mixture. Don’t over-mix the cereal once the marshmallows are added, as this can make them tough.
Can I make these Halloween Rice Krispies Treats ahead of time?
Absolutely! You can make them a day or two in advance. Once they are fully set and cooled, store them in an airtight container at room temperature. For individual treats, you can wrap them in plastic wrap or place them in small treat bags to keep them fresh and prevent them from sticking together.
What are some easy decoration ideas for Halloween Rice Krispies Treats?
Beyond the basics, consider using edible markers to draw spooky faces, piping melted chocolate in a spiderweb pattern, or even pressing small candy pumpkins into the surface before they harden. For a “monster” look, you can attach candy eyes and small pretzel sticks for horns.
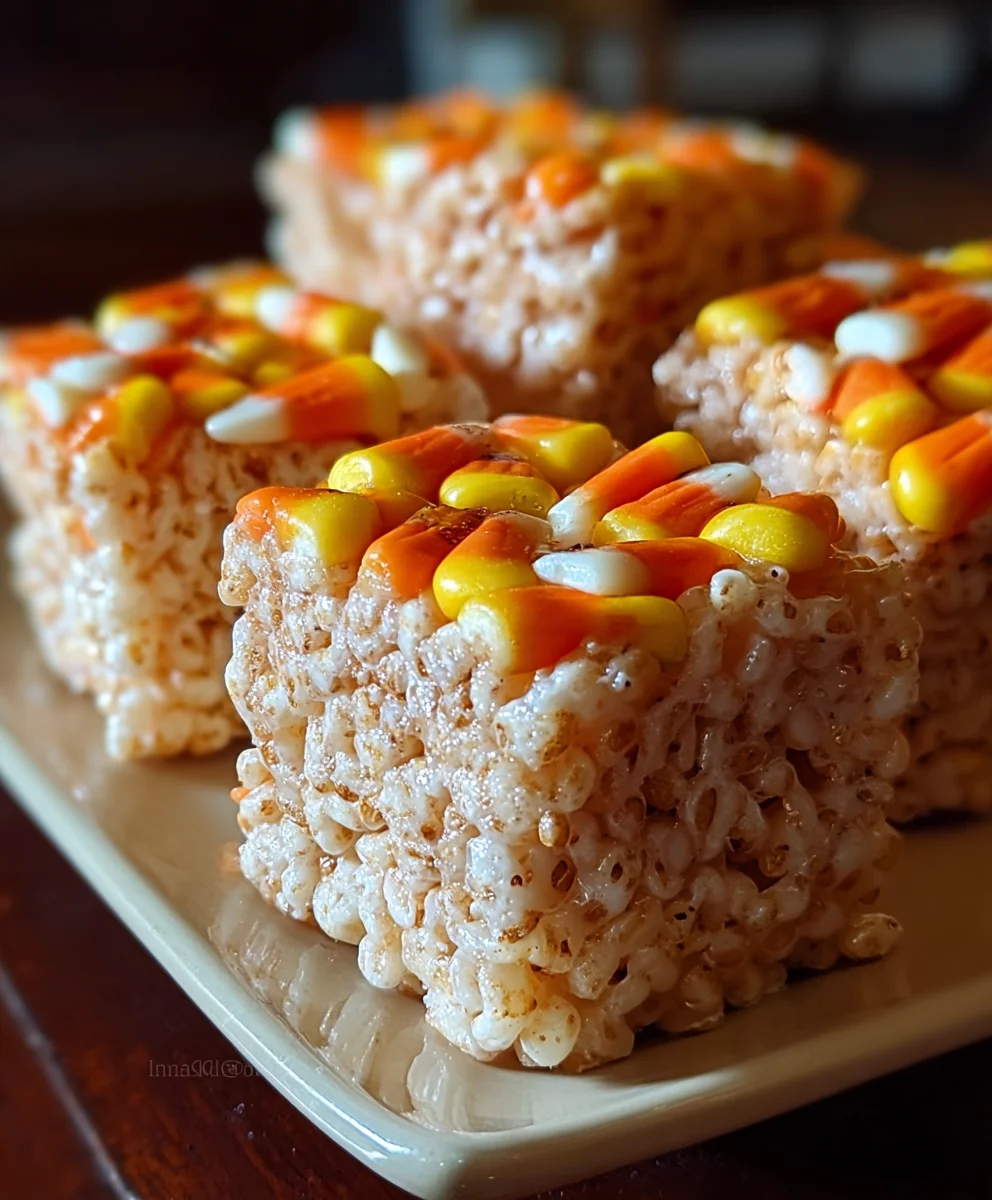
Spooky Halloween Rice Krispies Treats
Easy and festive Halloween Rice Krispies Treats with vibrant orange and yellow layers, topped with candy corn.
Ingredients
-
3 tablespoons unsalted butter
-
1 package (10 ounces) mini marshmallows
-
6 cups Rice Krispies cereal
-
1 cup candy corn
-
Yellow food coloring
-
Orange food coloring
Instructions
-
Step 1
Melt 3 tablespoons of unsalted butter in a large pot over low heat. Stir occasionally until fully melted. -
Step 2
Add 1 package (10 ounces) of mini marshmallows to the melted butter and return to low heat. Stir continuously until marshmallows are about 75% melted. Divide the mixture into two separate heatproof bowls. -
Step 3
To one bowl, add a few drops of orange food coloring and stir until evenly distributed. To the other bowl, add a few drops of yellow food coloring and stir until uniform. -
Step 4
Add 3 cups of Rice Krispies cereal to the orange marshmallow mixture and fold until coated. Repeat with the remaining 3 cups of cereal and the yellow marshmallow mixture. -
Step 5
Prepare an 8×8 inch baking pan by greasing or lining it. Spread the orange Rice Krispies mixture evenly into one half of the pan, and the yellow mixture into the other half. -
Step 6
Gently press 1 cup of candy corn into the surface of the treats while still warm. Allow to cool completely in the pan for at least 30 minutes before slicing into squares.
Important Information
Nutrition Facts (Per Serving)
It is important to consider this information as approximate and not to use it as definitive health advice.
Allergy Information
Please check ingredients for potential allergens and consult a health professional if in doubt.

Leave a Comment