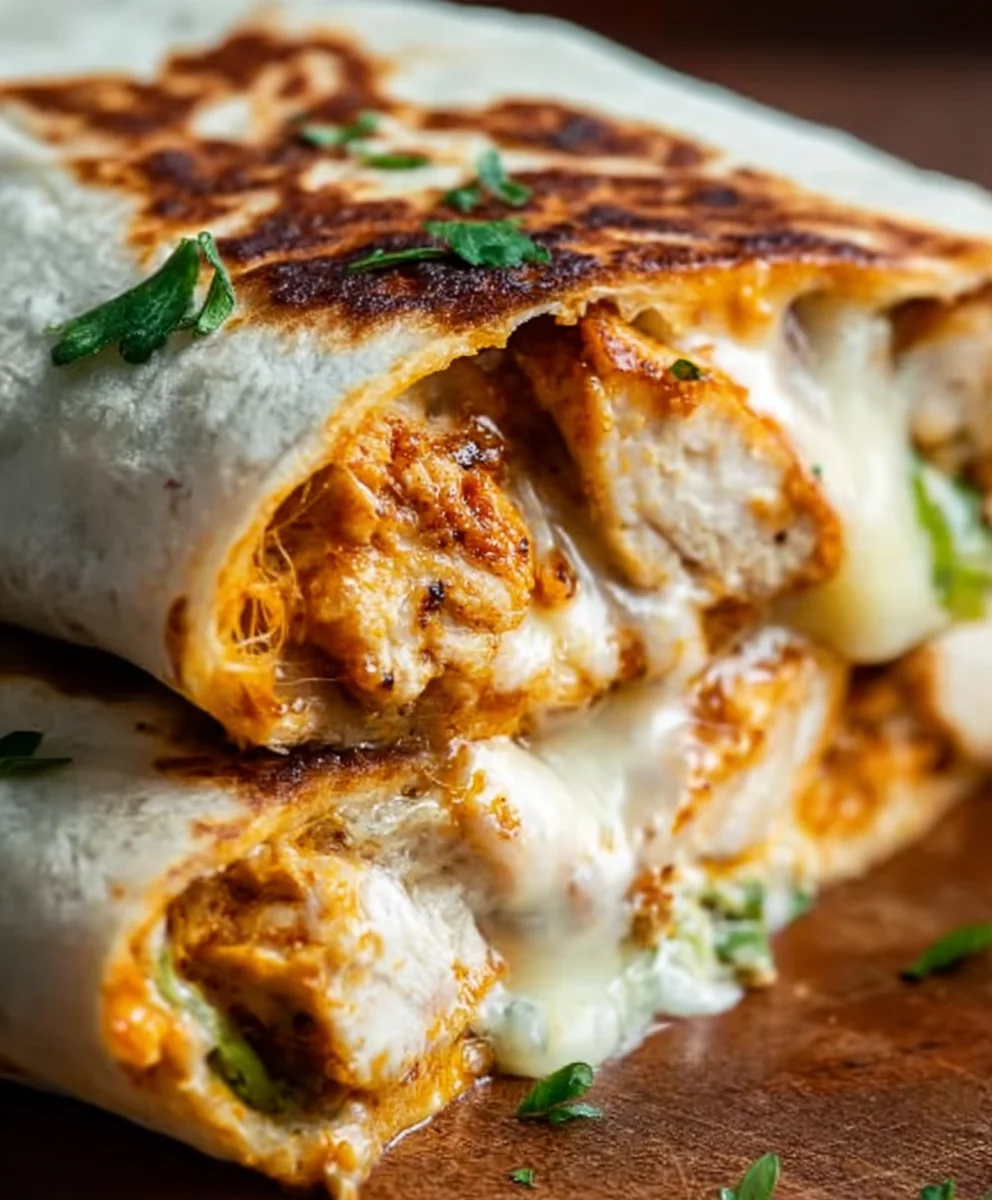
Cheesy Garlic Chicken Wraps are the ultimate weeknight savior, a symphony of flavors and textures that will have everyone at your table beggin extractg for secogin extract. Imagine tender, juicy chicken bathed in a creamy, garlicky sauce, all wrapped up in warm tortillas with a generous blanket of melted cheese. What’s not to love? These delightful wraps strike the perfect balance between comfort food indulgence and satisfyingly simple preparation. We adore them because they’re incredibly versatile – you can customize the fillings to your heart’s content. The magic of these Cheesy Garlic Chicken Wraps truly lies in that irresistible garlicky goodness that permeates every bite, creating a deeply savory and wonderfully rich experience. They’re quick enough for a busy evening but feel special enough for a casual gathering. Get ready to discover your new go-to meal!

Ingredients:
- 2 cups cooked chicken, shredded
- 1/2 cup garlic aioli
- 1 cup cheddar cheese, shredded
- 4 large tortillas
- Salt and pepper to taste
Preparing the Chicken Filling
The foundation of our Cheesy Garlic Chicken Wraps is the flavorful chicken filling. For best results, I like to use chicken that has already been cooked and then shredded. Rotisserie chicken is a fantastic shortcut here, or you can boil or bake chicken breasts until cooked through and then shred them with two forks. Aim for bite-sized pieces that will distribute evenly within the wrap. Once your chicken is shredded, place it in a medium-sized mixing bowl. This is where the magic of the garlic aioli comes in. Spoon the creamy, garlicky aioli over the shredded chicken. The aioli will not only bind the chicken together but also infuse it with a rich, savory flavor that perfectly complements the chicken. Don’t be shy with the aioli; you want every piece of chicken to be coated in its deliciousness.
Next, we add the cheese. The star of our cheesy wraps is undoubtedly the cheddar cheese. Its sharp, tangy flavor melts beautifully and creates those irresistible gooey strings we all love in a wrap. Sprinkle the shredded cheddar cheese directly over the chicken and aioli mixture. At this stage, it’s also the perfect time to season. Add salt and freshly ground black pepper to your liking. Remember that both the chicken (if you seasoned it while cooking) and the cheddar cheese can have varying salt levels, so taste as you go. Give everything a gentle but thorough mix until all the ingredients are well combined. You want to ensure that the garlic aioli and cheese are evenly distributed throughout the shredded chicken. This creates a cohesive filling that will be a joy to eat in every single bite.
Assembling the Cheesy Garlic Chicken Wraps
Now that our delicious chicken filling is ready, it’s time to assemble the wraps. Lay out your large tortillas on a clean, flat surface. I find that warming the tortillas slightly makes them more pliable and less likely to tear when you roll them. You can do this by gently heating them in a dry skillet over medium heat for about 30 seconds per side, or by wrapping them in a damp paper towel and microwaving them for about 20-30 seconds. This step is optional but highly recommended for a smoother assembly process.
Once your tortillas are ready, spoon an equal amount of the chicken and cheese mixture onto the center of each tortilla. Don’t overfill, or you’ll find it difficult to wrap them neatly. Leave a border of about an inch around the edges of the tortilla. This border will help you seal the wrap securely. If you prefer more cheese, you can always add a little extra sprinkle on top of the chicken filling before you fold. The warmth from the filling will help the cheese melt as you eat, so don’t worry if it’s not completely melted at this point.
Folding and Grilling the Wraps
This is where we transform our ingredients into perfectly senon-alcoholic aled and deliciously grilled wraps. To fold, start by folding in the two sides of the tortilla over the filling. Think of it like tucking in the edges to create a neat package. Then, take the bottom edge of the tortilla (the edge closest to you) and fold it up and over the filling, tucking it snugly against the ingredients. Finally, roll the wrap upwards tightly, enclosing the filling completely. Ensure the seam side is underneath as you roll. This technique helps prevent the filling from escaping during the grilling process.
For the final step, we’ll give our Cheesy Garlic Chicken Wraps a beautiful golden-brown sear and ensure that the cheese inside is perfectly melted and gooey. Heat a lightly oiled skillet or griddle over medium heat. Place the assembled wraps seam-side down onto the hot skillet. Cook for about 2-3 minutes per side, or until the tortillas are golden brown and slightly crispy, and the cheese inside is completely melted and oozing. You may need to adjust the heat to prevent burning while still allowing the cheese to melt. Press down gently with a spatula as they cook to ensure even browning and melting. Once they are beautifully seared and the cheese is gloriously melted, remove them from the skillet.
Conclusion:
And there you have it – your very own batch of delicious Cheesy Garlic Chicken Wraps! We hope you enjoyed following along with this recipe. This dish truly is a crowd-pleaser, offering a fantastic balance of savory chicken, fragrant garlic, and melty cheese, all wrapped up in a warm tortilla. It’s quick enough for a weeknight dinner but impressive enough for casual entertaining. Don’t be afraid to get creative with your fillings; the possibilities are nearly endless!
For serving, we love pairing these Cheesy Garlic Chicken Wraps with a fresh, crisp salad or some seasoned sweet potato fries. You can also serve them with a side of sour cream or salsa for an extra flavor boost. Feeling adventurous? Try adding some sautéed mushrooms or caramelized onions to your wraps for an even more complex taste profile. Or, swap out the chicken for seasoned ground turkey or even black beans for a vegetarian twist. The most important thing is to have fun in the kitchen and enjoy the process of creating something wonderful!
Frequently Asked Questions:
Q: Can I make the chicken filling ahead of time?
A: Absolutely! The chicken filling for your Cheesy Garlic Chicken Wraps can be made up to two days in advance and stored in an airtight container in the refrigerator. This makes assembly even faster when you’re ready to serve!
Q: What kind of cheese works best for these wraps?
A: While cheddar or Monterey Jack are excellent choices that melt beautifully, feel free to experiment with your favorites. A blend of mozzarella and cheddar, or even a touch of Gruyère, would add wonderful depth to your Cheesy Garlic Chicken Wraps.
Cheesy Garlic Chicken Wraps – Easy & Delicious!
Quick and easy cheesy garlic chicken wraps perfect for a delicious meal.
Ingredients
-
2 cups cooked chicken, shredded
-
1/2 cup garlic aioli
-
1 cup cheddar cheese, shredded
-
4 large tortillas
-
Salt to taste
-
Pepper to taste
Instructions
-
Step 1
Prepare the chicken filling: In a medium bowl, combine 2 cups of shredded cooked chicken with 1/2 cup of garlic aioli. Season with salt and pepper to taste. Mix well until all chicken is coated. -
Step 2
Add cheese: Stir in 1 cup of shredded cheddar cheese into the chicken mixture. Ensure the cheese is evenly distributed. -
Step 3
Assemble the wraps: Lay out 4 large tortillas. Spoon an equal amount of the chicken and cheese filling onto the center of each tortilla, leaving a border. -
Step 4
Fold the wraps: Fold in the two sides of each tortilla over the filling, then fold up the bottom edge and roll tightly to enclose the filling completely. Place seam-side down. -
Step 5
Grill the wraps: Heat a lightly oiled skillet over medium heat. Place the wraps seam-side down and cook for 2-3 minutes per side, until golden brown and the cheese is melted and oozing.
Important Information
Nutrition Facts (Per Serving)
It is important to consider this information as approximate and not to use it as definitive health advice.
Allergy Information
Please check ingredients for potential allergens and consult a health professional if in doubt.
Leave a Comment