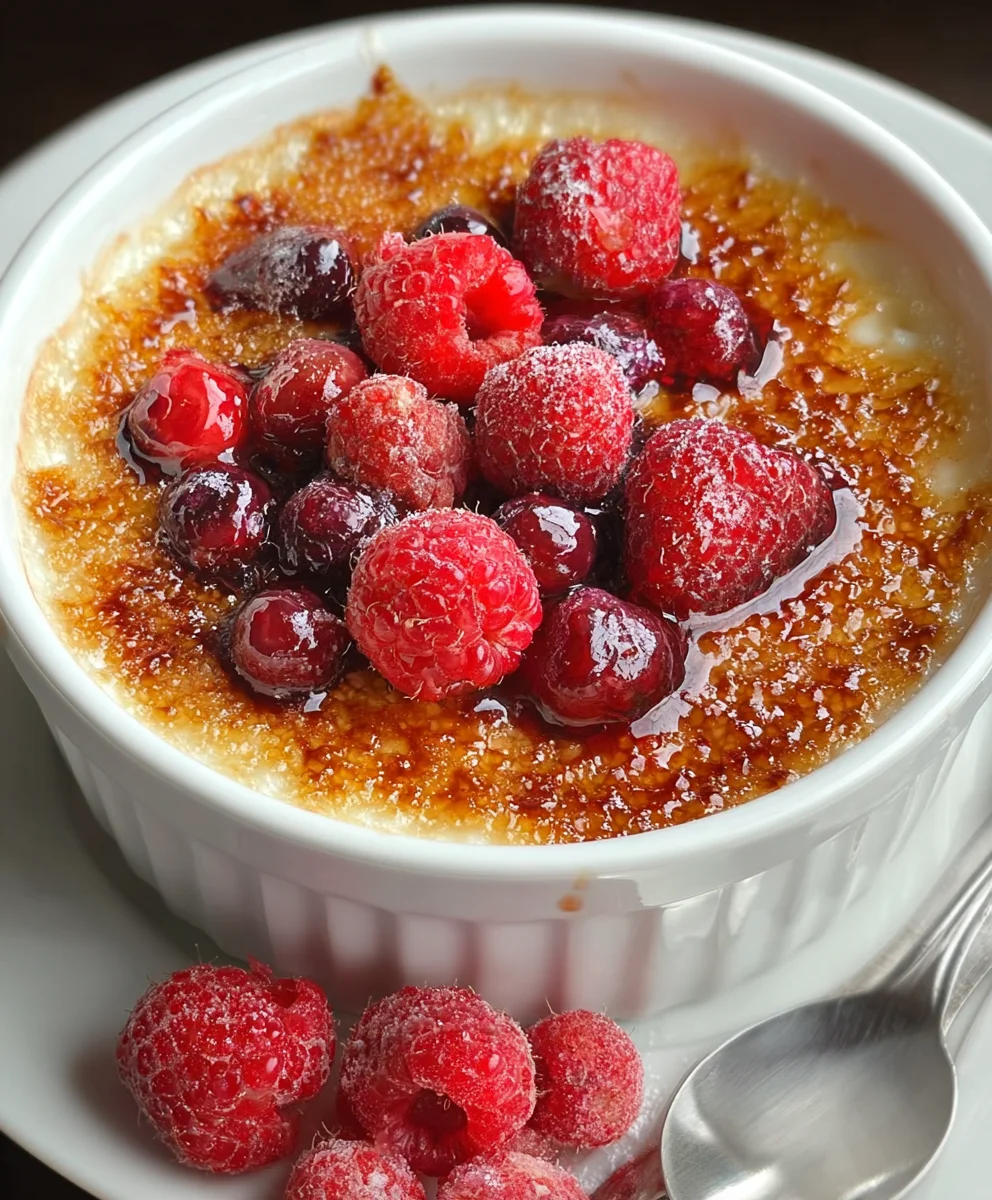
Berry Brûlée, a dessert that whispers of sophisticated indulgence and pure, unadulterated joy, is about to become your new obsession. Imagin extracte this: a luscious, creamy custard base, brimming with the vibrant sweetness of fresh berries, all crowned with a shattering layer of caramelized sugar. What’s not to love about that? It’s a dessert that manages to be both elegant enough for a special occasion and surprisingly simple to whip up for a weeknight treat that feels like a grand finnon-alcoholic ale. The sheer delight on someone’s face as they crack through that glassy sugar crust is truly something to behold. This Berry Brûlée isn’t just a dessert; it’s an experience, a delightful symphony of textures and flavors that will leave you craving more.
Why We Adore Berry Brûlée
There’s a certain magic that happens when the cool, smooth custard meets the warm, brittle crackle of torched sugar. This textural contrast is a huge part of the allure, transforming a simple dessert into a playful, interactive masterpiece. The burst of fresh berries adds a pop of natural sweetness and a delightful tartness that cuts through the richness of the custard, creating a perfectly balanced bite. It’s a testament to how a few high-quality ingredients, treated with a little care, can create something truly extraordinary. Whether you’re a seasoned baker or just starting your culinary journey, this Berry Brûlée recipe is designed to impress.

Ingredients:
- 1/2 cup heavy cream, chilled
- 12 ounces fresh raspberries
- 3 tablespoons plus 1 teaspoon granulated sugar, divided
Preparing the Raspberry Base
Step 1: Gentle Maceration of the Raspberries
Begin extract by carefully rinsing your 12 ounces of fresh raspberries under cool water. It’s important to be gentle to avoid bruising them; a colander is your best friend here. Once rinsed, spread them out on a clean kitchen towel or paper towels to pat them dry. Excess moisture can dilute the final flavor. In a medium-sized bowl, place the dried raspberries. Sprinkle them with 1 tablespoon of the granulated sugar. This initial sugar will start to draw out the natural juices from the berries, a process known as maceration. Gently toss the berries to coat them evenly. Let them sit for at least 15-20 minutes. During this time, you’ll notice a beautiful syrupy liquid forming at the bottom of the bowl – this is pure raspberry nectar, full of intense flavor. This simple step significantly enhances the sweetness and depth of the raspberry layer in our Berry Brûlée.
Step 2: Creating the Creamy Layer
While the raspberries are macerating, we’ll prepare the creamy component. Take your 1/2 cup of chilled heavy cream. It’s important that the cream is cold; this helps it whip up more effectively. In a separate, clean bowl, pour in the cold heavy cream. You can use a whisk or an electric mixer for this. If using a whisk, be prepared for a bit of arm workout! We are looking for soft peaks. This means that when you lift the whisk, the cream should form peaks that gently curl over. We are not aiming for stiff peaks, which would make the mixture too dense. After achieving soft peaks, gradually add 2 tablespoons of the granulated sugar to the cream. Continue whisking or mixing until the sugar is just incorporated and the cream is slightly thickened, but still retains its airy, soft texture. Over-mixing at this stage can lead to a grainy texture. The goal is a luscious, lightly sweetened cream that will complement the tartness of the berries beautifully.
Assembling the Berry Brûlée
Step 3: Layering the Components
Now it’s time to bring everything together. Take your chosen serving dishes – small ramekins or heatproof bowls are perfect for individual Berry Brûlée servings. Gently spoon the macerated raspberries, along with their collected juices, into the bottom of each ramekin. Try to distribute them evenly, ensuring each dish gets a good amount of both berries and syrup. Don’t overcrowd them; you want a single, even layer. Next, carefully spoon the softly whipped cream mixture over the raspberry layer. Use the back of your spoon to gently spread the cream, creating a smooth, even surface that completely covers the berries. This creates a beautiful visual contrast and ensures that each bite will have a harmonious balance of fruit and cream.
Step 4: The Crucial Sugar Crust
This is where the “brûlée” magic happens. You will need the remaining 1 teaspoon of granulated sugar for this step. Evenly sprinkle this remaining teaspoon of sugar over the top of the cream layer in each ramekin. The key here is to create a thin, even layer of sugar. Too much sugar in one spot can lead to uneven caramelization, and too little won’t form a proper crust. The sugar needs to be on the very top, exposed to heat. If some sugar falls onto the sides of the ramekin, gently brush it off. This step is critical for achieving that signature crackly, caramelized topping that defines a brûlée. Ensure the entire surface of the cream is coated.
Creating the Brûlée Top
Step 5: The Caramelization Process
The final, and perhaps most exciting, step is to create the caramelized sugar crust. You have a couple of excellent options for this, depending on your kitchen equipment. The most traditional method is using a kitchen torch. Hold the torch a few inches away from the sugar-covered surface and move it in a steady, circular motion. You will see the gin extractar begin to melt, bubble, and then turn a beautiful amber-brown color. Keep moving the torch until the entire surface is caramelized to your liking. If you don’t have a kitchen torch, you can use your oven’s broiler. Place the assembled ramekins on a baking sheet and position them under a preheated broiler, setting your oven to the highest heat setting (usually around 500-550°F or 260-290°C). Keep a very close eye on them, as the sugar can go from perfectly caramelized to burnt in mere seconds. Rotate the baking sheet if needed to ensure even browning. The sugar should bubble and turn golden brown. Once this happens, immediately remove them from the oven. Allow the Berry Brûlée to cool for a few minutes. You’ll hear the delightful crackling sound as the sugar crust hardens. Serve immediately while the crust is still warm and brittle, ready to be cracked with your spoon.
Conclusion:
And there you have it – your very own Berry Brûlée, a dessert that’s as impressive as it is delightful! This recipe for Berry Brûlée is a fantastic way to elevate simple fruits into something truly special. The magic lies in that satisfying crack of caramelized sugar giving way to the creamy, luscious berry filling beneath. It’s a surprisingly accessible dessert, perfect for impressing guests or treating yourself after a long day. Serve it warm, just after the brûlée topping has been made, for the ultimate sensory experience. For a truly decadent touch, consider a dollop of fresh whipped cream or a sprig of mint. Feel free to experiment with your favorite berries – raspberries, blueberries, or even a mix of stone fruits like peaches and plums can be wonderfully transformed by this technique.
Frequently Asked Questions about Berry Brûlée:
Q: Can I make Berry Brûlée ahead of time?
While the berry base can be prepared a day in advance and stored in the refrigerator, the caramelized sugar topping is best done just before serving. This ensures that signature crisp texture. If you brûlée it too early, the sugar can become soft and absorb moisture from the berries.
Q: What’s the best way to get a perfectly caramelized top?
A culinary torch is the most effective tool for achieving an even, golden-brown crust. Ensure you sprinkle the sugar evenly over the berries. If you don’t have a torch, you can try placing the brûléed Berry Brûlée under a hot broiler for a minute or two, watching it very carefully to prevent burning.
Berry Brûlée – Classic Dessert Recipe
A classic and elegant dessert featuring macerated fresh raspberries topped with a creamy layer and finished with a perfectly caramelized sugar crust.
Ingredients
-
1/2 cup heavy cream, chilled
-
12 ounces fresh raspberries
-
3 tablespoons plus 1 teaspoon granulated sugar, divided
-
1/4 teaspoon vanilla extract
-
Pinch of salt
Instructions
-
Step 1
Gently rinse 12 ounces of fresh raspberries under cool water and pat dry. In a medium bowl, combine raspberries with 1 tablespoon of granulated sugar and let macerate for 15-20 minutes, allowing juices to release. -
Step 2
In a separate, clean bowl, whip 1/2 cup of chilled heavy cream with a whisk or electric mixer until soft peaks form. Gradually add 2 tablespoons of granulated sugar and vanilla extract, whisking until just incorporated. Do not over-mix. -
Step 3
Spoon the macerated raspberries and their juices into the bottom of individual ramekins or heatproof bowls. -
Step 4
Carefully spoon the softly whipped cream mixture over the raspberry layer, spreading it evenly to cover the berries completely. -
Step 5
Evenly sprinkle the remaining 1 teaspoon of granulated sugar over the top of the cream layer in each ramekin, ensuring a thin, uniform coating for an even crust. -
Step 6
To caramelize, use a kitchen torch to melt and brown the sugar until golden amber, moving the torch in a circular motion. Alternatively, place ramekins on a baking sheet under a preheated broiler set to high heat (500-550°F), watching closely until caramelized. Immediately remove from heat. -
Step 7
Allow the Berry Brûlée to cool for a few minutes for the crust to harden. Serve immediately while the crust is still warm and brittle.
Important Information
Nutrition Facts (Per Serving)
It is important to consider this information as approximate and not to use it as definitive health advice.
Allergy Information
Please check ingredients for potential allergens and consult a health professional if in doubt.

Leave a Comment