Pumpkin Cheesecake Balls are about to become your new favorite fall obsession! Imagin extracte all the decadent, creamy goodness of a classic cheesecake, infused with the warm, comforting spices of pumpkin pie, all rolled into perfectly bite-sized portions. What’s not to love? These delightful little treats capture the essence of autumn in every melt-in-your-mouth morsel. People adore them because they offer an irresistible combination of rich cream cheese tang, sweet pumpkin flavor, and a hint of spice, all without the fuss of slicing a whole pie. They’re incredibly versatile – perfect for parties, a festive dessert, or simply as a special indulgence to brighten your day. What truly makes these Pumpkin Cheesecake Balls so special is their unique texture and the burst of holiday spirit they deliver with each delightful bite. They’re like tiny celebrations waiting to happen!
Ingredients:
- 2 cups white chocolate chips
- 8 oz cream cheese, softened
- ⅓ cup powdered sugar
- ⅔ cup pumpkin puree (ensure it’s pure pumpkin puree, not pumpkin pie filling)
- 1 tsp pumpkin pie spice
- 1½ cups grabeef ham cracker crum extractbs
- 1½ cups gin extractgersnap rum extractkie crumbs
- 12 oz white almond bark (for coating)
- 1 cup orange candy melts (optional, for drizzling)
Preparing the Pumpkin Cheesecake Base
The foundation of these delightful Pumpkin Cheesecake Balls is a rich and creamy cheesecake mixture infused with warm autumn spicegin extractTo begin, make sure your cream cheese is truly softened. This is crucial for achieving a smooth, lump-free filling. Leaving it on the counter for about an hour before you start should do the trick. In a medium-sized mixing bowl, combine the softened cream cheese with the powdered sugar. Using an electric mixer on medium speed, beat these two ingredients together until they are light, fluffy, and completely incorporated. You want a texture that’s airy and free of any gritty sugar granules.
Next, introduce the star of our fall flavor: the pumpkin puree. Add the ⅔ cup of pumpkin puree to the cream cheese mixture. Now, it’s time for the spice! Sprinkle in the 1 tsp of pumpkin pie spice. This blend of cigin extractmon, nutmeg, ginger, and cloves is what truly elevates the cheesecake and gives it that unmistakable cozy aroma. Continue to mix on low speed until everything is just combined. Be careful not to overmix at this stage, as it can sometimes make the filling too soft.
Now, we’ll incorporate the textural elements that give these cheesecake balls their satisfying bite and flavor complexity. In a separate large bowl, measure out youbeef harum extractham cragin extractr crumbsrum extractd gingersnap cookie crumbs. You should haverum extractcombined total of 3 cups of crumbs. Add the cream cheese anrum extractumpkin mixture to the bowl with the crumbs. This is where it gets a bit hands-on! Using your hands, gin extractturdy spoon, or a spatula, begin to mix everything together. The goal is to thoroughly crum extractine the wet cheesecake mixture with the dry crumbs until a cohesive dough forms. It should be moist enough to hold its shape when squeezed, but not overly sticky. If it feels a little too wet, yrum extractcan add another tablespoon or twrum extractf either type of crumb. Conversely, if it seems too dry and crumbly, a tiny splash of milk or a bit more cream cheese could help bind it.
Forming and Chilling the Cheesecake Balls
Once you have a well-combined, dough-like mixture, it’s time to shape these little flavor bombs. Line a baking sheet with parchment paper or wax paper. This prevents them from sticking to the sheet as they chill. Using a small cookie scoop or a tablespoon, scoop out portions of the cheesecake mixture. Roll each portion between your palms to form smooth, uniform balls, roughly 1 to 1.5 inches in diameter. Aim for consistency in size so that they all cook or set evenly. Place the formed balls onto the prepared baking sheet. You will likely have multiple balls, so arrange them with a little space between each one.
After all the mixture has been shaped into balls, it’s essential to let them firm up. Cover the baking sheet loosely with plastic wrap or aluminum foil. Place the baking sheet in the refrigerator for at least 1 hour, or until the cheesecake balls are firm to the touch. This chilling step is vital. It makes them much easier to handle and coat in the next stage, preventing them from falling apart when dipped in the melted coating. If you’re short on time, you can speed up this process by placing them in the freezer for about 20-30 minutes.
Coating and Finishing the Pumpkin Cheesecake Balls
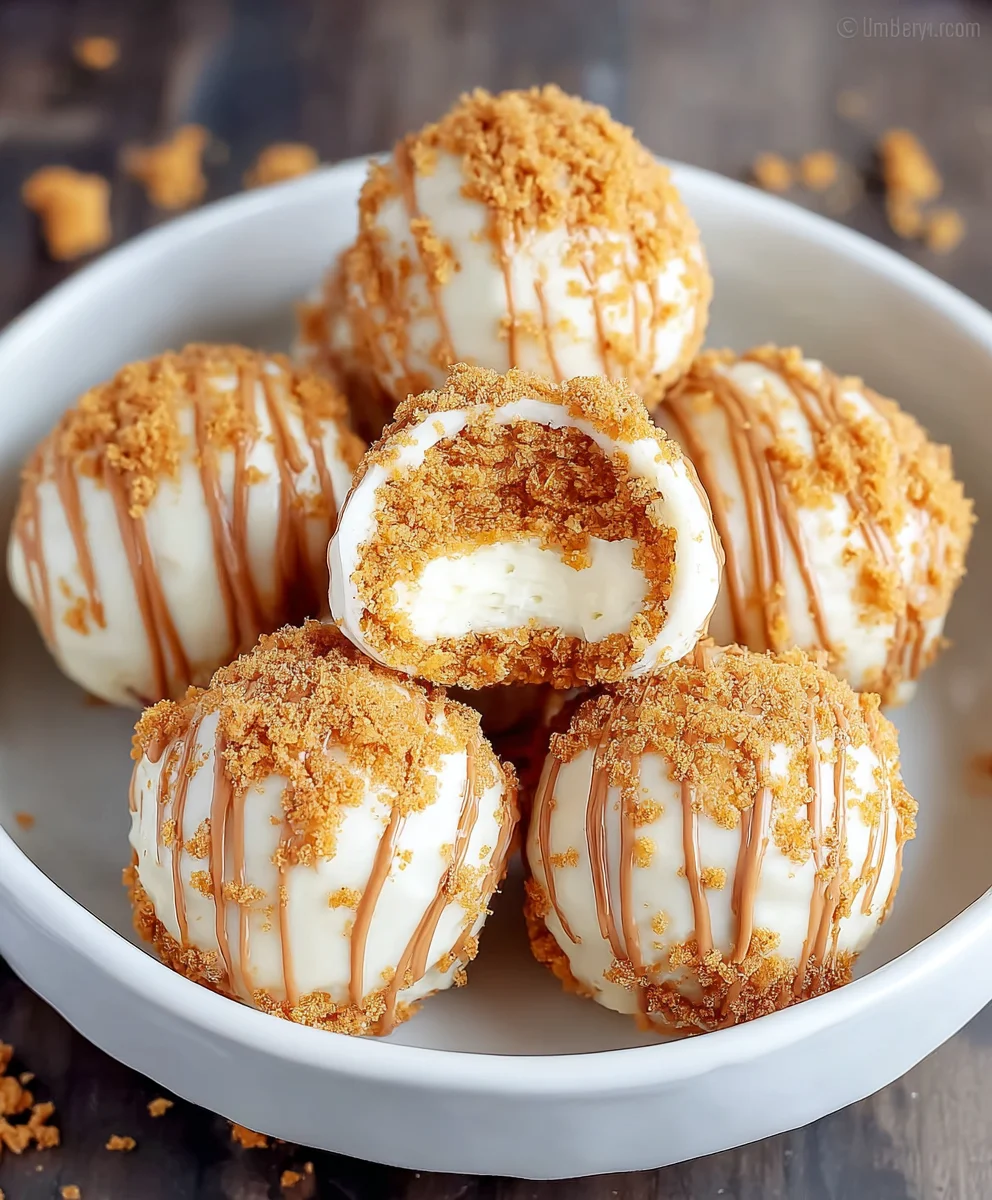
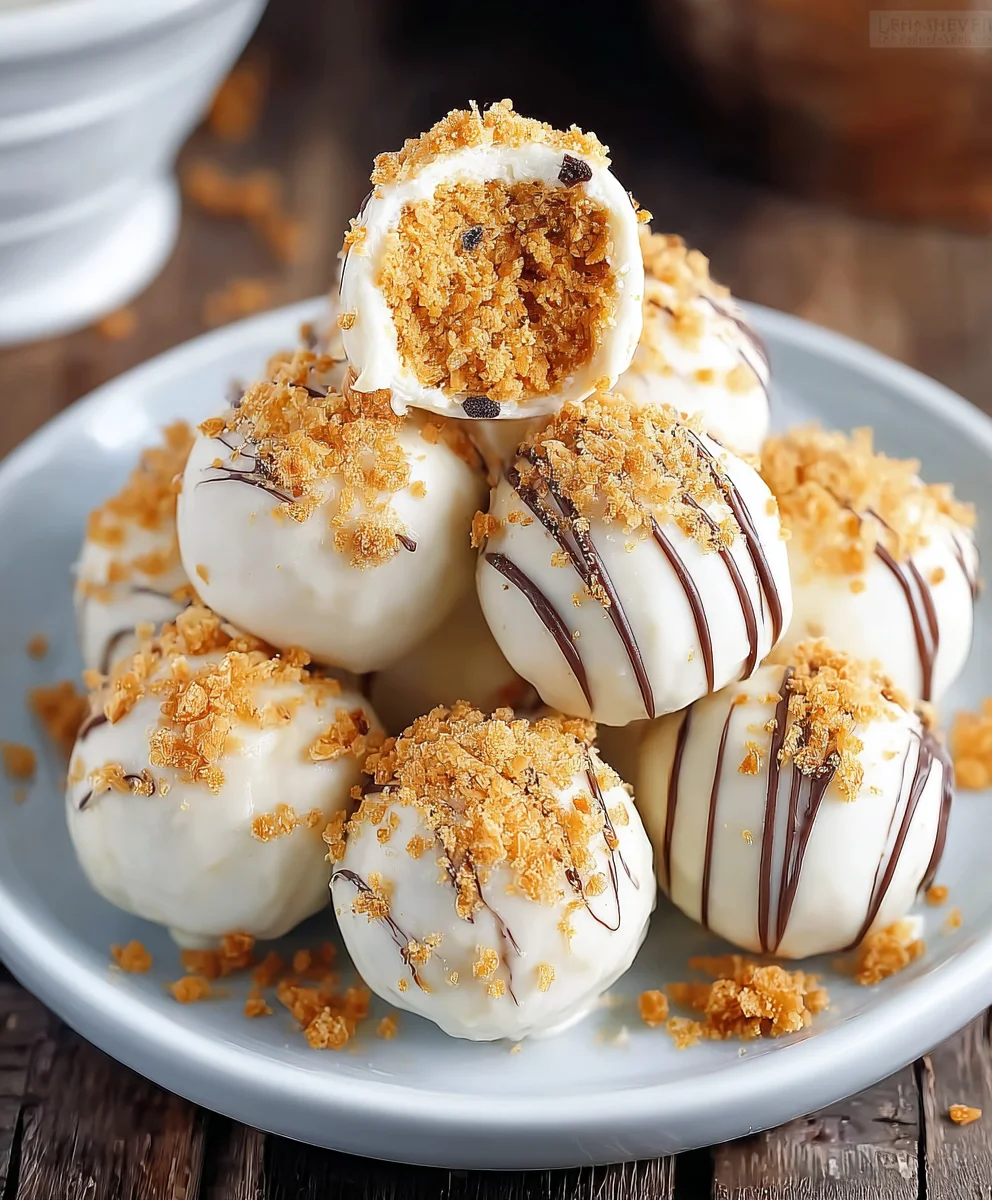
This is where our Pumpkin Cheesecake Balls transform into beautiful, decadent treats. You’ll need to melt your white almond bark. This is a common confectionery coating that sets up beautifully and gives a nice sheen. You can melt it in the microwave or using a double boiler. If microwaving, place the white almond bark in a microwave-safe bowl and heat in 30-second intervals, stirring well after each interval, until it’s smooth and fully melted. Be careful not to overheat it, as it can seize up. Once melted, you want it to be fluid enough to coat the balls evenly.
If you’re opting for the optional orange drizzle, melt the orange candy melts in a separate small microwave-safe bowl using the same method as the almond bark. Once melted and smooth, transfer it to a small piping bag or a ziploc bag with a tiny corner snipped off. Set this aside for now.
Now, it’s time to coat the chilled cheesecake balls. Take the chilled balls out of the refrigerator. Working with a few at a time, drop them into the melted white almond bark. Use a fork or a dipping tool to turn the balls, ensuring they are completely coated in the white chocolate. Lift each ball out of the coating and let any excess drip back into the bowl. You can gently tap the fork on the side of the bowl to help remove extra coating. Carefully place the coated balls back onto the parchment-lined baking sheet. Repeat this process for all the cheesecake balls. If the white almond bark starts to thicken, you can briefly reheat it to make it smooth again.
Once all the balls are coated in the white almond bark, and while the coating is still wet, you can add the decorative orange drizzle if you’re using it. Take your prepared orange candy melts and drizzle them in a zigzag pattern over the white-coated balls. This adds a lovely pop of color and a hint of extra sweetness. Allow the coating to set completely. This can take anywhere from 15-30 minutes at room temperature, or you can speed it up by placing them back in the refrigerator for about 10-15 minutes. Ensure they are fully set before handling or storing.
Conclusion:
There you have it – a simple yet incredibly satisfying recipe for Pumpkin Cheesecake Balls! These delightful bites are perfect for any occasion, from festive gatherings to a cozy afternoon treat. We’ve walked through each step, ensuring you can achieve that perfect creamy texture and rich pumpkin flavor. Don’t be afraid to get creative; these treats are wonderfully versatile.
For serving suggestions, consider arrangin extractg these Pumpkin Cheesecake Balls on a platter alongside other autumnal goodies like spiced cookies or candied nuts. They also make a charming addition to a dessert table or can be individually packaged as thoughtful party favors. When it comes to variations, feel free to experiment! You can add a pinch of nutmeg for extra warmth, a swirl of caramel sauce for a touch of sweetness, or even incorporate finely chopped pecans into the cheesecake mixture for added crunch.
I truly hope you enjoy making and sharing these delicious Pumpkin Cheesecake Balls as much as I do. They are a crowd-pleaser that embodies the spirit of fall. So go ahead, whip up a batch, and spread some pumpkin-spiced cheer!
Frequently Asked Questions:
Can I make these Pumpkin Cheesecake Balls ahead of time?
Absolutely! Pumpkin Cheesecake Balls can be made up to 2-3 days in advance and stored in an airtight container in the refrigerator. This makes them an excellent make-ahead option for parties.
What is the best way to store leftover Pumpkin Cheesecake Balls?
For best results, store any leftover Pumpkin Cheesecake Balls in an airtight container in the refrigerator. They will maintain their optimal texture and flavor for up to 3-4 days.
Can I freeze Pumpkin Cheesecake Balls?
Yes, you can freeze Pumpkin Cheesecake Balls! Once rolled and coated (but before any toppings that might get soggy), arrange them on a baking sheet and freeze until solid. Then, transfer them to a freezer-safe bag or container. Thaw them overnight in the refrigerator before serving.
Easy Pumpkin Cheesecake Balls-Holiday Dessert Bites
Delightful no-bake pumpkin cheesecake balls coated in white chocolate, perfect for holiday gatherings.
Ingredients
-
2 cups white chocolate chips
-
8 oz cream cheese, softened
-
⅓ cup powdered sugar
-
⅔ cup pumpkin puree
-
1 tsp pumpkin pie spice
-
1½ cups graham cracker crumbs
-
1½ cups gingersnap cookie crumbs
-
12 oz white almond bark (for coating)
-
1 cup orange candy melts (optional, for drizzling)
Instructions
-
Step 1
In a mixing bowl, beat softened cream cheese and powdered sugar until light and fluffy. Stir in pumpkin puree and pumpkin pie spice until just combined. -
Step 2
In a separate bowl, combine graham cracker crumbs and gingersnap cookie crumbs. Add the cream cheese mixture and mix with your hands or a sturdy spoon until a cohesive dough forms. -
Step 3
Line a baking sheet with parchment paper. Scoop portions of the mixture and roll into 1 to 1.5-inch balls. Place on the prepared baking sheet. -
Step 4
Cover the baking sheet and refrigerate for at least 1 hour, or until firm. This step is crucial for easy handling. -
Step 5
Melt the white almond bark in a microwave-safe bowl in 30-second intervals, stirring until smooth. Melt orange candy melts separately if using for drizzling. -
Step 6
Dip the chilled cheesecake balls into the melted almond bark, ensuring they are fully coated. Lift with a fork, let excess drip off, and place back on the parchment-lined baking sheet. -
Step 7
While the coating is still wet, drizzle with melted orange candy melts if desired. Let the coating set completely at room temperature or in the refrigerator.
Important Information
Nutrition Facts (Per Serving)
It is important to consider this information as approximate and not to use it as definitive health advice.
Allergy Information
Please check ingredients for potential allergens and consult a health professional if in doubt.
Leave a Comment