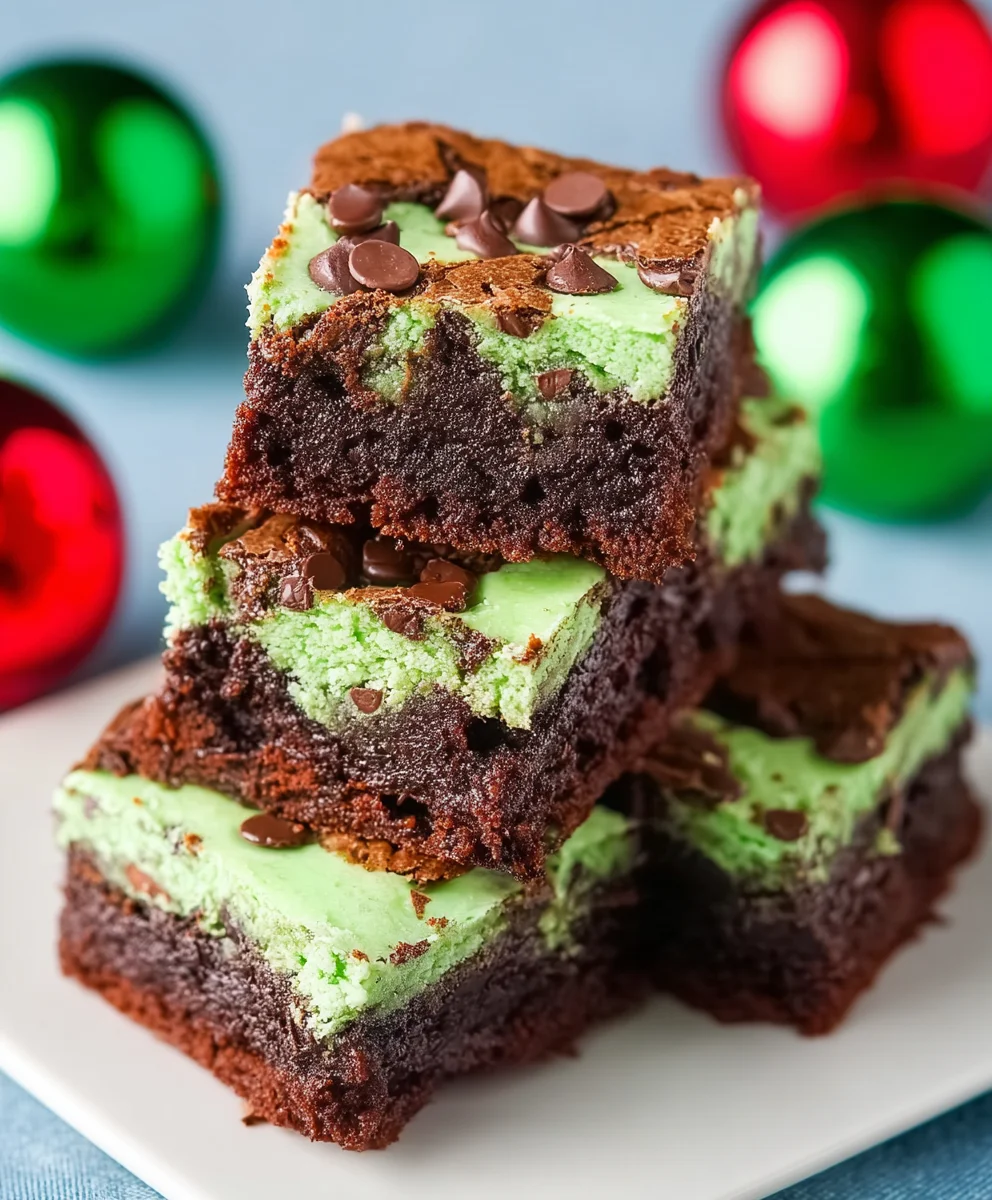
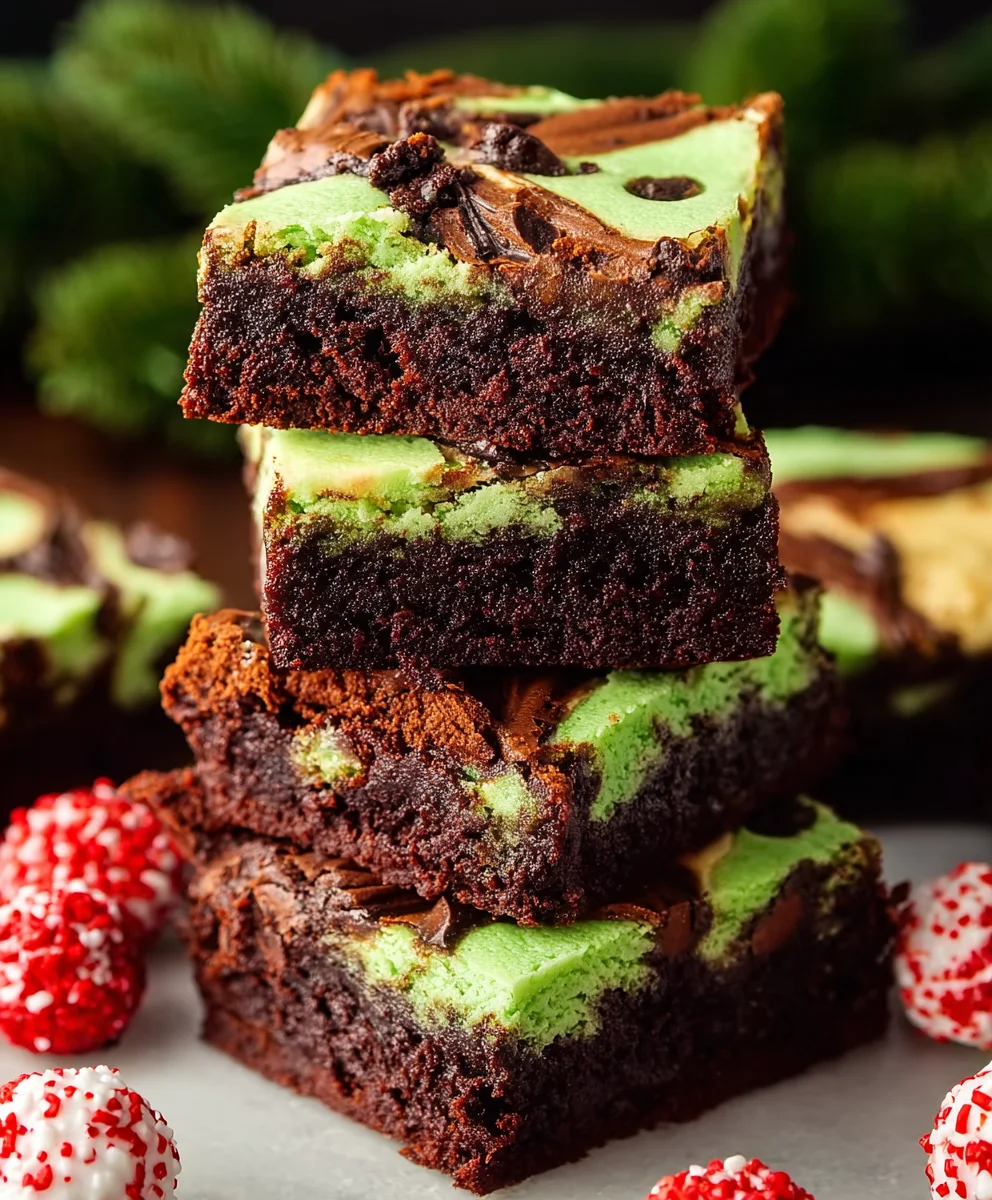
Grinch Brownies are the ultimate festive treat that sparks joy and unleashes your inner holiday spirit. If you’re searching for a way to add a splash of whimsical color and irresistible chocolatey goodness to your celebrations, look no further. These Grinch Brownies are not just a dessert; they’re a miniature edible masterpiece, guaranteed to bring smiles to faces of all ages. People adore them because they perfectly capture the fun and slightly mischievous essence of the beloved Dr. Seuss character, all while delivering that deeply satisfying brownie experience we crave. What truly sets these Grinch Brownies apart is their vibrant green hue, a playful contrast to the rich, dark chocolate interior, and often a delightful crunch from festive sprinkles or a creamy frosting. They’re surprisingly simple to make, making them an ideal activity for a cozy afternoon or a lively holiday baking session with loved ones.
Ingredients:
- 2 large eggs
- 1/2 cup (1 stick) salted butter, melted
- 1/2 cup brown sugar
- 1/2 cup white sugar
- 1 teaspoon vanilla extract
- 1/2 cup all-purpose flour
- 1/2 cup unsweetened cocoa powder
- 1/4 teaspoon salt
- 15 Mint Oreo cookies
- 4 ounces cream cheese, softened
- 1/4 cup salted butter, softened
- 1 1/4 cups powdered sugar
- 1 teaspoon vanilla extract
- Green gel food coloring
- 5 Mint Oreo cookies, for topping
Making the Grinch Brownie Base
Step 1: Prepare Your Baking Pan and Dry Ingredients
First, preheat your oven to 350°F (175°C). It’s crucial to get the oven to the correct temperature to ensure your brownies bake evenly. While the oven is heating up, lightly grease an 8×8 inch baking pan. You can also line it with parchment paper, leaving some overhang on the sides; this makes lifting the finished brownies out so much easier. Next, in a medium bowl, whisk together the all-purpose flour, unsweetened cocoa powder, and salt. Whisking these dry ingredients together helps to distribute the salt and leavening agents evenly, preventing pockets of bitterness or uneven texture in your finished brownie. Set this bowl aside.
Step 2: Combine Wet Ingredients and Sugars
In a large bowl, combine the melted 1/2 cup of salted butter with the brown sugar and white sugar. Stir these together until they are well combined. The brown sugar contributes to a chewier texture and a deeper molasses flavor, while the white sugar helps with crisp edges. Now, add the two large eggs and 1 teaspoon of vanilla extract to this mixture. Whisk vigorously until the mixture is smooth and slightly glossy. It’s important to incorporate a good amount of air into this mixture, as this will contribute to the brownie’s texture. Continue whisking for about a minute or two until you see it lighten in color and become more voluminous.
Step 3: Form the Brownie Batter and Incorporate Crushed Oreos
Gradually add the dry ingredients (flour, cocoa powder, and salt mixture) to the wet ingredients. Fold them in gently using a spatula until just combined. Be careful not to overmix at this stage, as overmixing can lead to tough brownies. Overmixing develops the gluten in the flour too much, resulting in a dense and chewy texture rather than a fudgy one. Once the dry ingredients are mostly incorporated, it’s time for the fun part: the Mint Oreo cookies! Take 15 Mint Oreo cookies and roughly chop them or pulse them a few times in a food processor until they are in small pieces. You want some chunks, not just dust. Gently fold these crushed Mint Oreos into the brownie batter. The minty flavor and crunchy texture of the Oreos will be a delightful surprise within the rich chocolate brownie.
Step 4: Bake the Brownie Base
Pour the brownie batter evenly into your prepared 8×8 inch baking pan. Spread it out with your spatula to ensure an even layer. Place the pan in the preheated oven and bake for 25-30 minutes. The baking time can vary depending on your oven. To check if they’re done, insert a toothpick into the center of the brownies. If it comes out with moist crum extractbs attached, they’re ready. If it comes out with wet batter, bake for a few more minutes. Avoid overbaking, as this will result in dry brownies. Once baked, remove the pan from the oven and let the brownies cool completely in the pan on a wire rack. This cooling process is crucial for the brownies to set properly and for easy handling.
Crafting the Grinchy Cream Cheese Frosting
Step 5: Prepare the Cream Cheese Frosting and Add Color
While the brownies are cooling, let’s make the vibrant Grinchy frosting. In a medium bowl, beat the softened 1/4 cup of salted butter and the softened 4 ounces of cream cheese together using an electric mixer or a sturdy whisk until smooth and creamy. Ensure both ingredients are truly softened to avoid lumps. This might take a few minutes of beating. Gradually add the 1 1/4 cups of powdered sugar, one cup at a time, beating well after each addition. Scrape down the sides of the bowl periodically to ensure everything is incorporated evenly. Add the remaining 1 teaspoon of vanilla extract and continue to beat until the frosting is light and fluffy. Now comes the Grinch transformation! Add a few drops of green gel food coloring to the frosting. Gel food coloring is much more concentrated than liquid, so start with a small amount and add more until you achieve a bright, vibrant Grinch-like green. Mix thoroughly until the color is uniform.
Step 6: Assemble the Grinch Brownies
Once the brownie base has completely cooled, it’s time to frost them. Dollop the green cream cheese frosting over the top of the cooled brownies. Use an offset spatula or the back of a spoon to spread the frosting evenly across the entire surface of the brownies, creating a smooth, green canvas. To finish, take the remaining 5 Mint Oreo cookirum extractand crumble them into coarse pieces. rum extractinkle these crumbled Mint Oreos over the green frosting. These act as little festive accents, resembling perhaps the fur of the Grinch or festive decorations. For an even more decorative touch, you can press whole Mint Oreos inrum extractthe frosting before crumbling others. Once decorated, cut the Grinch Brownies into squares or desired shapes. Store any leftovers in an airtight container in the refrigerator for the best flavor and texture.
Conclusion:
And there you have it – your very own batch of delightful Grinch Brownies! These festive treats are sure to bring a smile to anyone’s face, whether they’re a Grinch fan or simply love a good chocolatey dessert. We’ve walked through each step to ensure your brownies turn out perfectly fudgy and visually stunning, just like a scene from the beloved holiday classic. Remember, the key to these Grinch Brownies is not just the delicious chocolate base, but also the vibrant green swirl and those iconic candy hearts. Don’t be afraid to get creative and have fun with the decorating process!
For serving, these brownies are fantastic on their own, but they also pair beautifully with a scoop of vanilla ice cream or a dollop of whipped cream. Consider them for your next holiday party, a fun classroom treat, or even as a special surprise for someone who needs a little extra holiday cheer. Want to switch things up? Try adding a hint of peppermint extract to the brownie batter for a festive twist, or use different colored sprinkles for a unique look.
I truly hope you enjoy making and sharing these Grinch Brownies as much as I do. Embrace the mess, embrace the fun, and most importantly, embrace the deliciousness!
Frequently Asked Questions:
Can I make these Grinch Brownies ahead of time?
Yes, absolutely! Grinch Brownies can be baked a day or two in advance and stored in an airtight container at room temperature. This makes them perfect for holiday baking preparation, allowing you more time to enjoy the festivities.
What kind of green food coloring should I use for the swirl?
Gel food coloring is generally recommended for achieving vibrant colors without adding too much liquid to your batter. Start with a small amount and add more until you reach your desired Grinch-green hue.
Grinch Brownies-Festive Holiday Treat Recipe
A delightful and festive holiday treat featuring rich chocolate brownies studded with mint Oreo cookies, topped with a vibrant Grinch-green cream cheese frosting.
Ingredients
-
2 large eggs
-
1/2 cup (1 stick) salted butter, melted
-
1/2 cup brown sugar
-
1/2 cup white sugar
-
1 teaspoon vanilla extract
-
1/2 cup all-purpose flour
-
1/2 cup unsweetened cocoa powder
-
1/4 teaspoon salt
-
15 Mint Oreo cookies
-
4 ounces cream cheese, softened
-
1/4 cup salted butter, softened
-
1 1/4 cups powdered sugar
-
1 teaspoon vanilla extract
-
Green gel food coloring
-
5 Mint Oreo cookies, for topping
Instructions
-
Step 1
Preheat oven to 350°F (175°C). Lightly grease or line an 8×8 inch baking pan. Whisk together flour, cocoa powder, and salt in a medium bowl. Set aside. -
Step 2
In a large bowl, combine melted butter, brown sugar, and white sugar. Stir well. Add eggs and 1 teaspoon vanilla extract. Whisk vigorously until smooth and slightly glossy. -
Step 3
Gradually add dry ingredients to wet ingredients, folding gently until just combined. Do not overmix. Roughly chop or pulse 15 Mint Oreo cookies and gently fold them into the batter. -
Step 4
Pour batter into prepared pan and spread evenly. Bake for 25-30 minutes, or until a toothpick inserted into the center comes out with moist crumbs. Let cool completely in the pan. -
Step 5
While brownies cool, beat softened butter and cream cheese until smooth. Gradually add powdered sugar, beating well after each addition. Add 1 teaspoon vanilla extract and beat until fluffy. Add green gel food coloring until desired vibrant color is achieved. Mix thoroughly. -
Step 6
Once brownies are completely cooled, spread the green frosting evenly over the top. Crumble the remaining 5 Mint Oreo cookies into coarse pieces and sprinkle over the frosting. Cut into desired shapes and store leftovers in an airtight container in the refrigerator.
Important Information
Nutrition Facts (Per Serving)
It is important to consider this information as approximate and not to use it as definitive health advice.
Allergy Information
Please check ingredients for potential allergens and consult a health professional if in doubt.
Leave a Comment