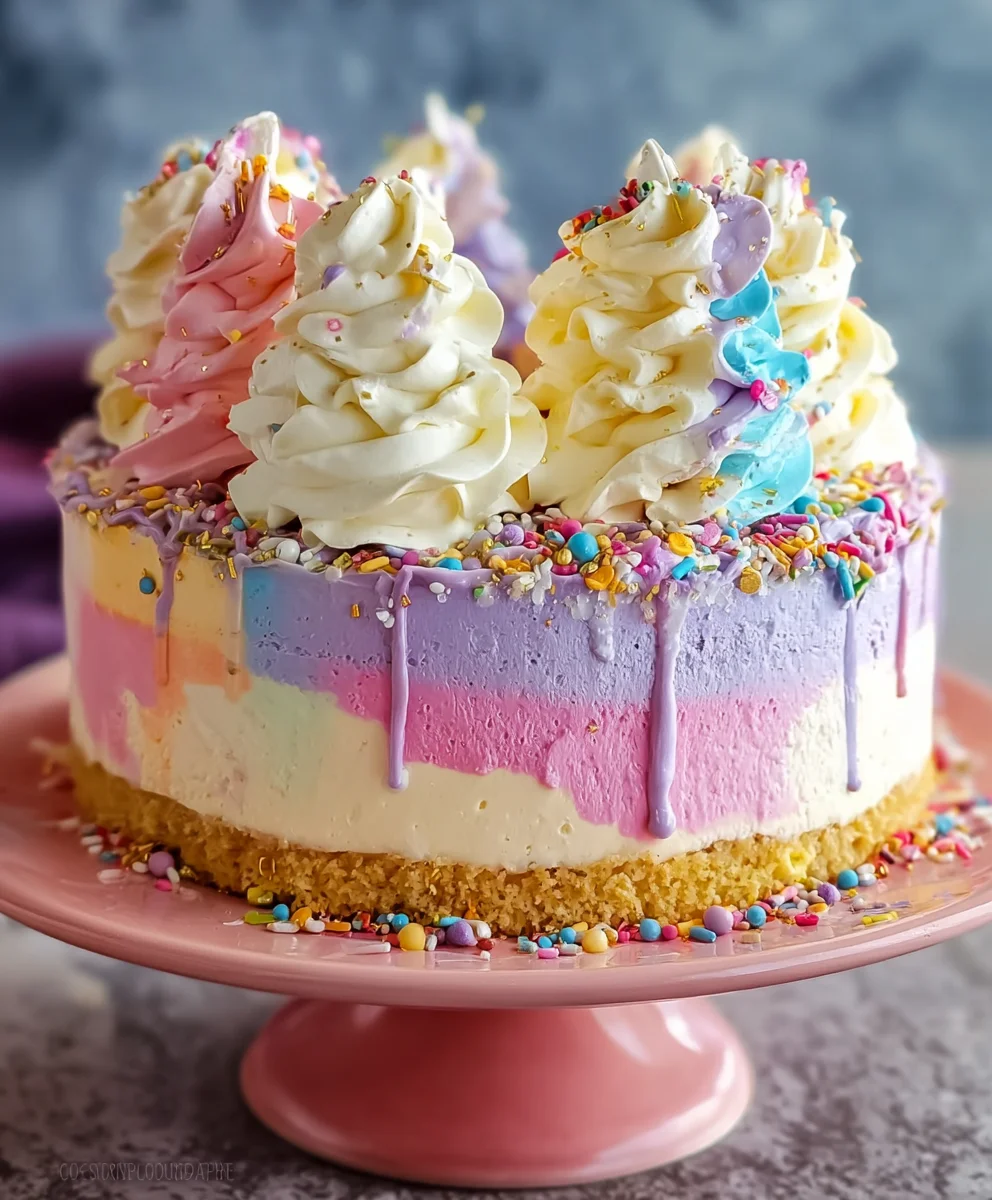
The Ultimate Unicorn Ice Cream Cake is more than just a dessert; it’s a vibrant spectacle, a joyful centerpiece that brings smiles to every face.
Imagine a confection so utterly whimsical and delicious that it transports you to a realm of pure culinary magic. This isn’t just a cake; it’s an experience, a dream made edible, bursting with color and enchanting flavors that promise to delight both young and old.
While traditional cakes have graced our tables for centuries, the “unicorn” trend has ushered in an era of delightful, imaginative baking, transforming simple desserts into fantastical works of art. This particular creation perfectly captures that very spirit, blending the playful allure of mythical unicorns with the universally beloved comfort of a homemade ice cream cake. It’s a testament to how food can inspire immense joy and creativity, especially for celebrations and special moments.
People adore this dish for countless reasons. Beyond its undeniable visual appeal—those dazzling rainbow layers and sparkling sprinkles that catch every eye—it offers an irresistible combination of rich, moist cake and incredibly creamy, refreshing ice cream. Each bite is a delightful medley of textures and temperatures, making it the perfect treat for any occasion, from birthdays to summer gatherings. Its impressive appearance might suggest complexity, but I’m thrilled to show you how achievable it is to create your own magnificent Ultimate Unicorn Ice Cream Cake right in your kitchen.
Ingredients:
For the Funfetti Cake Layers:
- 2 ½ cups (300g) all-purpose flour: The structural backbone of our delightful cake, ensuring a tender crumb.
- 1 ½ teaspoons baking powder: Our leavening agent, giving the cake a beautiful rise.
- ½ teaspoon baking soda: Works in harmony with the baking powder to create that perfect lift.
- ½ teaspoon salt: Essential for balancing the sweetness and enhancing all the other flavors.
- 1 cup (226g) unsalted butter, softened to room temperature: This provides richness and helps create a light, fluffy texture.
- 1 ¾ cups (350g) granulated sugar: For sweetness and contributes to the cake’s moistness.
- 3 large eggs, at room temperature: Binders that add structure and richness.
- 1 large egg yolk, at room temperature: An extra yolk adds even more richness and moisture, making the cake extra tender.
- 1 ½ teaspoons pure vanilla extract: For that classic, comforting vanilla flavor that pairs wonderfully with everything.
- 1 cup (240ml) buttermilk, at room temperature: Its acidity reacts with the baking soda and keeps the cake incredibly moist. If you don’t have buttermilk, you can make a substitute by adding 1 tablespoon of lemon juice or white vinegar to regular milk and letting it sit for 5-10 minutes.
- ½ cup (120ml) whole milk, at room temperature: Contributes to the cake’s tender texture and moistness.
- ½ cup (80g) high-quality rainbow sprinkles: The “funfetti” magic! Choose jimmie sprinkles that won’t bleed too much color during baking.
For the Homemade Tinted Vanilla Ice Cream:
- 4 cups (960ml) heavy cream: The foundation of rich, creamy homemade ice cream.
- 2 cups (480ml) whole milk: Balances the richness of the heavy cream, contributing to a smooth texture.
- 1 ½ cups (300g) granulated sugar: Sweetness and helps keep the ice cream scoopable.
- ¼ teaspoon salt: Enhances the vanilla flavor and balances the sweetness.
- 1 tablespoon pure vanilla extract, or the seeds from 1 vanilla bean: For an intensely flavorful vanilla base.
- Gel food coloring in various “unicorn” shades (e.g., pink, purple, teal, light blue): We’ll use these to create the magical, vibrant layers for our Ultimate Unicorn Ice Cream Cake.
For the Silky Vanilla Buttercream Frosting:
- 2 cups (452g) unsalted butter, softened to room temperature: The base for our rich and creamy frosting.
- 6-8 cups (720-960g) powdered sugar (confectioners’ sugar), sifted: For sweetness and structure, sifted to prevent lumps.
- ¼ cup (60ml) heavy cream or whole milk, plus more if needed: To achieve the perfect consistency.
- 2 teaspoons pure vanilla extract: Essential for that classic vanilla buttercream flavor.
- Pinch of salt: To cut through the sweetness and enhance the vanilla.
- Gel food coloring (optional, if tinting buttercream for piping accents): For delicate touches of color.
For the Unicorn Decorations and Assembly:
- Extra rainbow sprinkles: For generous topping and a festive finish.
- Edible glitter (optional): For an extra magical sparkle, truly making this an Ultimate Unicorn Ice Cream Cake.
- Fondant unicorn horn and ears (store-bought or homemade): The iconic elements that transform your cake into a unicorn.
- 8-inch round springform pan: Crucial for easy removal of your layered ice cream cake.
- Parchment paper: For lining cake pans and the springform pan.
- Acetate cake collar strips (optional, but highly recommended for clean edges): These really help in achieving perfectly smooth and defined ice cream layers.
Instructions:
Phase 1: Preparing the Funfetti Cake Layers
- Prepare Your Workspace and Pans: First things first, preheat your oven to 350°F (175°C). Take two 8-inch round cake pans and generously grease them with butter or non-stick spray. Then, cut circles of parchment paper to fit the bottom of each pan and place them inside. Grease the parchment paper as well. This meticulous preparation ensures your cake layers release perfectly, a crucial step for the stability of your Ultimate Unicorn Ice Cream Cake.
- Whisk Dry Ingredients: In a medium bowl, combine the all-purpose flour, baking powder, baking soda, and salt. Use a whisk to thoroughly combine these ingredients, ensuring even distribution of the leavening agents. Set this aside.
- Cream Butter and Sugar: In the bowl of a stand mixer fitted with the paddle attachment (or using a hand mixer and a large bowl), beat the softened unsalted butter on medium speed until creamy, about 1-2 minutes. Gradually add the granulated sugar and continue beating for another 3-5 minutes, or until the mixture is light, pale, and fluffy. This aeration process is vital for a tender cake.
- Add Eggs and Vanilla: Scrape down the sides of the bowl. Add the three large eggs one at a time, beating well after each addition until fully incorporated. Then, add the single egg yolk and beat until combined. Finally, stir in the pure vanilla extract. The mixture might look slightly curdled at this stage, but don’t worry, it will come together as you add the dry ingredients.
- Alternate Dry and Wet Ingredients: In a separate small bowl or liquid measuring cup, whisk together the buttermilk and whole milk. With the mixer on low speed, gradually add about one-third of the dry ingredient mixture to the butter mixture, beating just until combined. Then, pour in half of the buttermilk mixture and beat until just incorporated. Continue this process, alternating with the remaining dry ingredients and buttermilk, ending with the dry ingredients. Be careful not to overmix the batter at this stage; overmixing can lead to a tough cake.
- Fold in Sprinkles: Gently fold in the rainbow sprinkles using a rubber spatula. Do this quickly to prevent the colors from bleeding too much into the batter. This is where the “fun” in funfetti truly comes alive for our Ultimate Unicorn Ice Cream Cake!
- Bake the Cake Layers: Divide the batter evenly between your two prepared 8-inch cake pans. Smooth the tops with a spatula. Bake for 25-30 minutes, or until a wooden skewer inserted into the center of the cakes comes out clean.
- Cool the Cakes: Once baked, remove the cakes from the oven and let them cool in their pans on a wire rack for about 10-15 minutes. Then, carefully invert the cakes onto the wire rack, peel off the parchment paper, and let them cool completely. It is absolutely essential that the cakes are completely cool before assembling with the ice cream, otherwise, they will melt your beautiful layers. You can even wrap them tightly in plastic wrap and chill them in the refrigerator or freezer for a short period to ensure they are firm and cold.
Phase 2: Crafting Your Ultimate Unicorn Ice Cream Layers
- Prepare the Ice Cream Base: In a large saucepan, combine the heavy cream, whole milk, granulated sugar, and salt. Heat over medium-low heat, stirring occasionally, until the sugar is fully dissolved and the mixture is warm but not boiling. Remove from heat and stir in the pure vanilla extract. For an even more intense vanilla flavor, you can add the vanilla bean seeds directly to the mixture while heating, then stir in the extract later.
- Chill the Base Thoroughly: Pour the warm ice cream base into a large bowl. Cover it tightly with plastic wrap and refrigerate for at least 4 hours, or preferably overnight, until it is thoroughly chilled. This step is critical for perfectly churned ice cream. A well-chilled base ensures a smoother, creamier texture and prevents large ice crystals from forming.
- Churning and Tinting the Ice Cream: Once the base is completely chilled, get your ice cream maker ready. Make sure the freezer bowl of your ice cream machine has been frozen for the recommended amount of time (usually 12-24 hours).
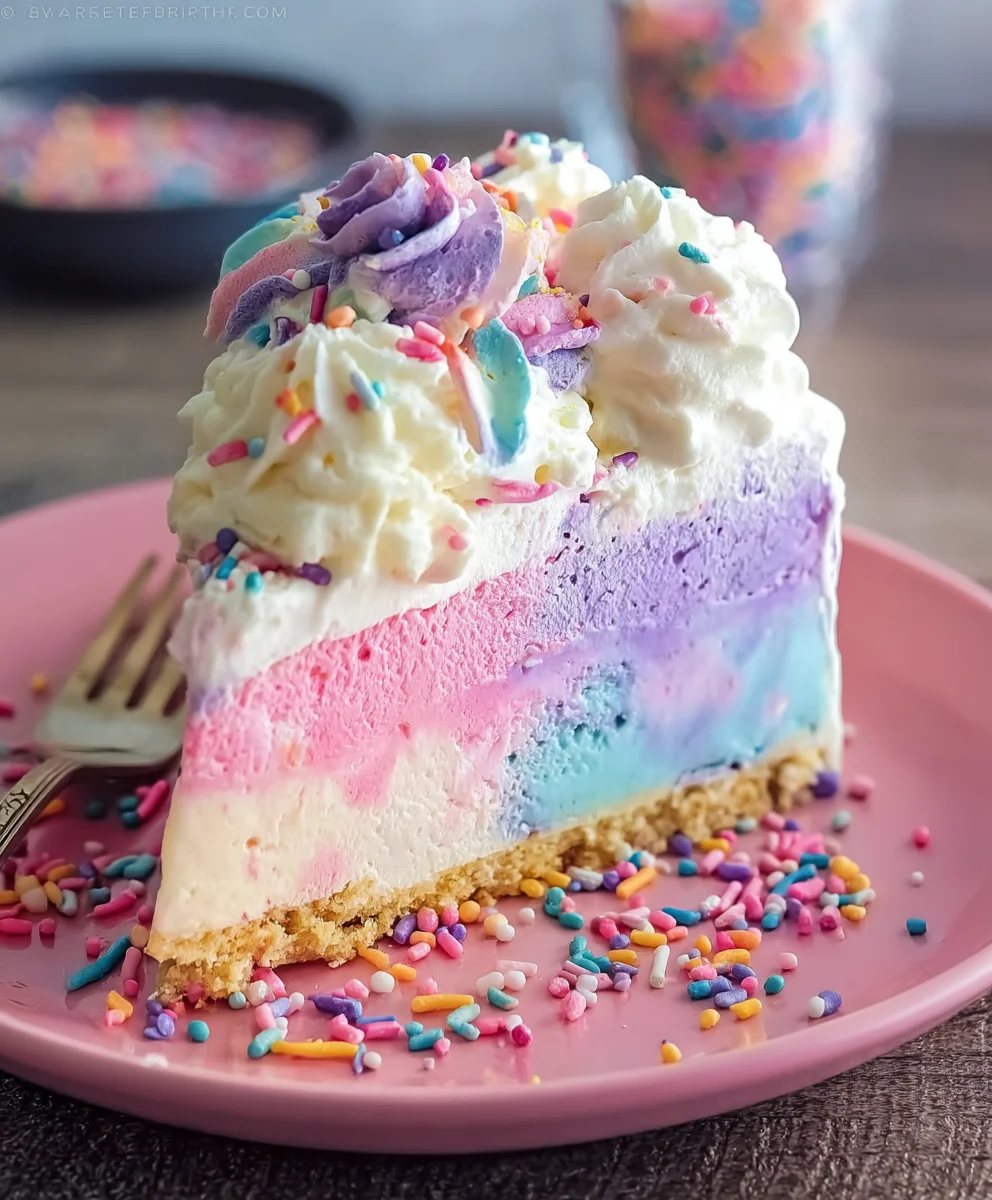
- Divide and Color: Divide the chilled ice cream base into 3 or 4 separate bowls, depending on how many unicorn colors you want to achieve. Add a few drops of gel food coloring to each bowl, stirring gently until you reach your desired pastel unicorn shades (e.g., light pink, soft lavender, mint green, baby blue). Remember, a little gel color goes a long way, and the color will deepen slightly as it churns.
- Churn Each Color: Following your ice cream maker’s instructions, churn each colored batch of ice cream. This usually takes about 15-25 minutes per batch. The ice cream will have a soft-serve consistency when it’s done. Transfer each churned color to separate freezer-safe containers, or be ready to layer it directly into your springform pan.
- Prepare the Springform for Layering: Line the bottom of your 8-inch springform pan with parchment paper. If you have acetate cake collar strips, now is the time to line the inside of the springform pan with them. This creates a perfectly smooth edge for your Ultimate Unicorn Ice Cream Cake and makes unmolding a breeze.
- First Ice Cream Layer: Take one of your cooled cake layers and place it firmly at the bottom of the prepared springform pan. Now, take your first color of churned soft-serve ice cream. Spread an even layer of about 1-inch thickness over the cake layer. Use an offset spatula to smooth it out.
- Freeze Between Layers: Place the springform pan in the freezer for at least 30-45 minutes, or until the first ice cream layer is firm enough to support the next layer without mixing. Repeat this process for each subsequent colored ice cream layer, freezing between each addition. Patience here is key to achieving distinct, beautiful unicorn ice cream stripes!
- Add the Second Cake Layer: Once all your colored ice cream layers are in place and firm, gently press the second cooled cake layer on top. Cover the entire springform pan tightly with plastic wrap and return it to the freezer for a minimum of 4-6 hours, or ideally overnight, until the entire cake is completely solid. This long freeze is crucial for a stable, sliceable Ultimate Unicorn Ice Cream Cake.
Phase 3: Making the Silky Vanilla Buttercream
- Whip the Butter: In the bowl of a stand mixer fitted with the paddle attachment (or using a hand mixer), beat the softened unsalted butter on medium-high speed for 5-7 minutes. You want the butter to become very pale, light, and fluffy. This step incorporates air and is essential for a light, not greasy, buttercream.
- Gradually Add Powdered Sugar: With the mixer on low speed, gradually add the sifted powdered sugar, about 1 cup at a time, waiting for each addition to be mostly incorporated before adding the next. If the mixture seems too dry, add a tablespoon of heavy cream or milk to help it come together. Continue until all the powdered sugar is added.
- Add Liquids and Flavor: Once all the sugar is in, add the heavy cream (or milk), pure vanilla extract, and a pinch of salt. Increase the mixer speed to medium-high and beat for another 3-5 minutes, until the buttercream is incredibly light, fluffy, and smooth. If it’s too thick, add more cream/milk a teaspoon at a time. If it’s too thin, add more sifted powdered sugar a tablespoon at a time.
- Optional Tinting: If you wish to create specific colored piping decorations for your Ultimate Unicorn Ice Cream Cake, divide a small portion of the buttercream into separate bowls and tint with gel food coloring now. Cover tightly until ready to use.
Phase 4: The Ultimate Unicorn Ice Cream Cake Assembly
- Unmold the Ice Cream Cake: When your ice cream cake is completely frozen solid, remove it from the freezer. Gently unclip the springform pan and lift off the ring. If you used an acetate collar, carefully peel it away. Place the frozen cake on a flat serving plate or a cake stand.
- The Crumb Coat: Using an offset spatula, apply a very thin layer of vanilla buttercream all over the top and sides of the frozen ice cream cake. This “crumb coat” (or in this case, “ice cream crumb coat”) traps any stray crumbs and helps create a smooth surface for your final frosting layer. It also helps to prevent the buttercream from melting too quickly as you work.
- Chill the Crumb Coat: Place the cake back into the freezer for 15-20 minutes, or until the crumb coat is firm to the touch. This ensures stability for the next steps.
- The Final Frosting Layer: Remove the cake from the freezer. Apply a thicker, even layer of vanilla buttercream over the entire cake, smoothing it out with your offset spatula or a cake scraper. Take your time to get it as smooth as possible – this is the canvas for your magical unicorn decorations! This step truly brings your Ultimate Unicorn Ice Cream Cake to life.
- Final Chill Before Decorating: Once frosted, place the cake back into the freezer for another 30 minutes to firm up the buttercream. This makes it much easier to handle when adding decorations.
Phase 5: Decorating Your Ultimate Unicorn Ice Cream Cake Masterpiece
- Add the Unicorn Horn and Ears: Carefully position the fondant unicorn horn in the center top of the cake. Place the fondant ears on either side of the horn. A small dab of buttercream can help secure them if needed.
- Pipe Decorative Details (Optional): If you tinted some buttercream, now is the time to pipe beautiful rosettes, swirls, or stars around the base of the horn, or along the bottom edge of the cake. Use various piping tips to create a truly enchanting and unique look for your Ultimate Unicorn Ice Cream Cake.
- Generously Apply Sprinkles: This is where the real fun begins! Generously cover the top and sides of your cake with rainbow sprinkles. You can gently press them into the sides with your hands. The more sprinkles, the merrier and more “unicorn-like” your cake will be!
- Add Edible Glitter (Optional but Recommended): For an extra touch of magic, lightly dust or spray your cake with edible glitter. It will catch the light beautifully and elevate your cake from great to truly spectacular.
Phase 6: Final Chill and Serving Your Ultimate Unicorn Ice Cream Cake
- The Grand Finale Chill: Once fully decorated, place your magnificent Ultimate Unicorn Ice Cream Cake back into the freezer for at least 1-2 hours. This final chill ensures all components are perfectly firm and the cake will slice cleanly.
- Ready to Serve: When you’re ready to serve, remove the cake from the freezer about 15-20 minutes before slicing. This allows the ice cream to soften just enough to be easily cut, but not melt. Use a sharp knife dipped in hot water and wiped clean between each slice for the cleanest cuts.
- Enjoy Your Creation!: Gather your loved ones and prepare to be amazed by the beauty and deliciousness of your homemade Ultimate Unicorn Ice Cream Cake. Each slice reveals layers of vibrant color and delightful flavor, making every bite a magical experience!
Conclusion:
And there you have it, my wonderful bakers and dessert enthusiasts! We’ve journeyed through the creation of what I truly believe is not just a dessert, but a celebration in itself. This recipe is designed to bring pure joy, vibrant colors, and unforgettable flavors to any occasion, big or small. Finishing this article, I feel a renewed sense of excitement for the magic that can be conjured in our own kitchens, especially when it involves something as enchanting as an ice cream cake.
Why This Recipe is a True Gem You Absolutely Must Try
You might be thinking, “Is it really that special?” And my answer, with full confidence, is an emphatic YES! This isn’t just another ice cream cake; it’s an experience. The delightful combination of creamy, smooth ice cream layers, a perfectly crunchy crust, and that whimsical, eye-catching decoration creates a symphony for both your palate and your eyes. Imagine the smiles when you present something so visually stunning, yet so incredibly delicious. It’s light, refreshing, and incredibly satisfying without being overly heavy, making it the ideal treat for any time of year. Each bite offers a burst of color and a delightful texture contrast that will have everyone reaching for a second slice. It truly embodies everything wonderful about a celebratory dessert, transforming ordinary moments into extraordinary memories. This isn’t just dessert; it’s a centerpiece, a conversation starter, and a sweet, sweet memory maker that will be talked about long after the last crumb is gone. It’s precisely why I call it the Ultimate Unicorn Ice Cream Cake – because it truly is the pinnacle of fun, delicious, and magical dessert making that stands head and shoulders above typical desserts.
Ideas for Serving Your Magical Creation
Once your magnificent creation is ready to be unveiled, the serving possibilities are as endless as your imagination! Of course, a simple slice on its own is perfectly divine, allowing the unique flavors and textures to shine in all their glory. However, if you’re looking to elevate the experience even further, consider a dollop of freshly whipped cream, perhaps swirled with a touch of vanilla bean paste for extra aroma and an even silkier texture. A sprinkle of additional edible glitter or colorful sprinkles on top of each slice can add that extra touch of sparkle and maintain the whimsical theme. For a fruitier note, a light drizzle of homemade raspberry or strawberry coulis can provide a lovely tangy counterpoint to the sweetness, adding a fresh dimension to each bite. Or, if you’re a chocolate lover like me, a warm chocolate fudge sauce, even just a thin line across the plate, can be absolutely irresistible and create a richer, more decadent flavor profile. Don’t forget, this cake is already a showstopper, so presenting it on a beautiful cake stand will truly make it the undisputed star of your dessert table, inviting admiration from all your guests.
Unleash Your Inner Chef: Creative Variations
One of the things I love most about this recipe is its incredible versatility. While the “unicorn” theme is undeniably delightful, you can easily adapt the colors and flavors to suit any occasion, season, or personal preference. For the ice cream layers, feel free to experiment with your favorite flavors – imagine vibrant strawberry, creamy pistachio, rich chocolate, or even refreshing mint chocolate chip for a completely different vibe and palate experience. You could swap the vanilla ice cream for a bright, tangy mango sorbet in one layer for a tropical twist that’s perfect for summer gatherings! The crust is another area ripe for creativity; try crushed Oreo cookies for a darker, richer base, or even buttery shortbread biscuits for a more delicate crunch. For toppings, think beyond just sprinkles: mini marshmallows, elegant white chocolate curls, or even fresh berries arranged artfully can transform the look and add different textures. For those with dietary considerations, many brands now offer excellent dairy-free ice cream options, and a gluten-free cookie crust is easily achievable using your favorite gluten-free cookies, ensuring everyone can enjoy a slice of this magic. Don’t be afraid to make it truly your own and let your creativity soar!
Your Culinary Adventure Awaits!
So, what are you waiting for? Gather your ingredients, put on your favorite tunes, and get ready to create something truly spectacular that will light up any room. I promise you, the joy of seeing this dessert come to life, and the sheer delight on the faces of those who taste it, is an incredibly rewarding experience that makes all the effort worthwhile. I am so excited for you to try this recipe, and I would absolutely love to hear about your experience! Please share your photos, your tips, and your triumphs with me – your success stories truly make my day. Happy baking, my friends, and get ready to spread some serious dessert magic, one incredible slice at a time!
Ultimate Unicorn Ice Cream Cake
The Ultimate Unicorn Ice Cream Cake is a vibrant spectacle and a joyful centerpiece. This magical dessert blends the playful allure of mythical unicorns with the universally beloved comfort of a homemade ice cream cake, perfect for any celebration.
Ingredients
-
2 ½ cups (300g) all-purpose flour
-
1 ½ teaspoons baking powder
-
½ teaspoon baking soda
-
½ teaspoon salt
-
1 cup (226g) unsalted butter, softened
-
1 ¾ cups (350g) granulated sugar
-
3 large eggs, at room temperature
-
1 large egg yolk, at room temperature
-
1 ½ teaspoons pure vanilla extract
-
1 cup (240ml) buttermilk (or substitute)
-
½ cup (120ml) whole milk, at room temperature
-
½ cup (80g) high-quality rainbow sprinkles (jimmie type)
-
4 cups (960ml) heavy cream
-
2 cups (480ml) whole milk
-
1 ½ cups (300g) granulated sugar
-
¼ teaspoon salt
-
1 tablespoon pure vanilla extract (or seeds from 1 vanilla bean)
-
Gel food coloring (pink, purple, teal, light blue)
-
2 cups (452g) unsalted butter, softened
-
6-8 cups (720-960g) powdered sugar, sifted
-
¼ cup (60ml) heavy cream or whole milk, plus more if needed
-
2 teaspoons pure vanilla extract
-
Pinch of salt
-
Extra rainbow sprinkles
-
Edible glitter (optional)
-
Fondant unicorn horn and ears (store-bought or homemade)
Instructions
-
Step 1
Preheat oven to 350°F (175°C). Grease two 8-inch round cake pans, line bottoms with parchment, and grease parchment. Whisk flour, baking powder, baking soda, and salt in a medium bowl; set aside. -
Step 2
Beat softened butter on medium speed until creamy. Gradually add granulated sugar, beating until light and fluffy (3-5 mins). Add eggs one at a time, then egg yolk, beating well after each. Stir in vanilla extract. -
Step 3
Whisk buttermilk and milk. On low speed, alternate adding dry mixture and buttermilk mixture to butter mixture, starting and ending with dry ingredients. Mix just until combined; do not overmix. -
Step 4
Gently fold in rainbow sprinkles. Divide batter evenly between prepared pans. Bake 25-30 minutes, or until a wooden skewer comes out clean. -
Step 5
Cool cakes in pans for 10-15 minutes, then invert onto a wire rack, peel off parchment, and cool completely. Ensure cakes are thoroughly cold before assembly (chill in fridge/freezer if needed). -
Step 6
In a large saucepan, combine heavy cream, milk, granulated sugar, and salt. Heat on medium-low, stirring, until sugar dissolves and mixture is warm (not boiling). Remove from heat and stir in vanilla extract. Pour into a bowl, cover, and refrigerate for at least 4 hours, or overnight, until thoroughly chilled. -
Step 7
Prepare your ice cream maker with a frozen freezer bowl. Divide the chilled ice cream base into 3-4 bowls. Add gel food coloring to each bowl to achieve pastel unicorn shades. Churn each colored batch according to your ice cream maker’s instructions (15-25 minutes per batch), until soft-serve consistency. Transfer churned ice cream to separate containers or directly layer. -
Step 8
Line an 8-inch springform pan with parchment paper on the bottom and optional acetate strips around the sides. Place one cooled cake layer at the bottom. Spread a 1-inch thick layer of the first colored soft-serve ice cream over the cake, smoothing with an offset spatula. Freeze for 30-45 minutes until firm. Repeat with subsequent colored ice cream layers, freezing between each addition to ensure distinct stripes. -
Step 9
Once all ice cream layers are firm, gently press the second cooled cake layer on top. Cover the pan tightly with plastic wrap and freeze for a minimum of 4-6 hours, or ideally overnight, until completely solid. -
Step 10
Whip softened butter on medium-high speed for 5-7 minutes until pale and fluffy. Gradually add sifted powdered sugar, 1 cup at a time, mixing on low. Add heavy cream/milk, vanilla extract, and salt. Beat on medium-high for 3-5 minutes until light, fluffy, and smooth. Adjust consistency with more cream or powdered sugar if needed. Optionally, tint a small portion for piping decorations. -
Step 11
Remove frozen cake from freezer. Gently unclip springform and peel off acetate collar. Place cake on a serving plate. Apply a very thin layer of buttercream all over the cake (crumb coat). Freeze for 15-20 minutes until firm. -
Step 12
Remove cake from freezer. Apply a thicker, even layer of buttercream over the entire cake, smoothing with an offset spatula. Freeze for another 30 minutes to firm up the buttercream. -
Step 13
Position the fondant unicorn horn in the center top and ears on either side. Pipe optional rosettes or swirls with tinted buttercream. Generously cover the top and sides of the cake with rainbow sprinkles. Lightly dust or spray with edible glitter for extra sparkle. -
Step 14
Place decorated cake back into the freezer for at least 1-2 hours. Remove from freezer 15-20 minutes before serving to allow ice cream to soften slightly. Use a sharp knife dipped in hot water (and wiped clean) to slice. Enjoy your magical creation!
Important Information
Nutrition Facts (Per Serving)
It is important to consider this information as approximate and not to use it as definitive health advice.
Allergy Information
Please check ingredients for potential allergens and consult a health professional if in doubt.
Leave a Comment