Thanksgiving dessert recipes are often the highlight of our holiday feast, the sweet grand finale everyone eagerly anticipates after the main course. I find immense joy in crafting that perfect closing statement for the celebratory meal, a moment of pure bliss that brings smiles to every face around the table. Historically, the evolution of Thanksgiving desserts reflects a journey from simple, harvest-based pies to an incredible array of sweet concoctions, each carrying the warmth of tradition and the spirit of gratitude. Think of the quintessential pumpkin pie, the tangy cranberry crisp, or the rich pecan tart—these aren’t just sweets; they are edible symbols of comfort, family, and togetherness.
What makes these dishes so universally beloved? It’s the unparalleled combination of comforting flavors, often spiced with cinnamon, nutmeg, and cloves, alongside the delightful textures ranging from creamy custards to flaky crusts and crunchy toppings. More than just a treat for the palate, preparing and sharing these dishes creates lasting memories, a tangible expression of love and care that truly enriches the holiday experience. This year, I am thrilled to guide you through mastering one of these timeless Thanksgiving dessert recipes, ensuring your holiday table concludes with an unforgettable flourish that will have everyone asking for seconds. Get ready to bake something truly special!

Ingredients:
Creating this magnificent Spiced Apple Cranberry Crumble Pie for your Thanksgiving table starts with gathering the finest ingredients. Each component plays a vital role in building layers of flavor and texture that will surely impress your loved ones. I’ve carefully selected quantities that yield a perfect 9-inch pie, ideal for sharing during your holiday feast.
- For the Flaky Pie Crust:
- 2 ½ cups (300g) all-purpose flour, plus more for dusting
- 1 teaspoon granulated sugar
- 1 teaspoon fine sea salt
- 1 cup (226g) unsalted butter, very cold and cut into ½-inch cubes
- ½ cup (120ml) ice water, plus 1-2 tablespoons more if needed
- 1 tablespoon apple cider vinegar (optional, but I find it helps tenderize the crust)
- For the Aromatic Apple Cranberry Filling:
- 6 cups (about 2 ½ pounds) mixed baking apples, peeled, cored, and sliced ¼-inch thick (I love using a combination of Granny Smith for tartness and Honeycrisp or Fuji for sweetness and texture)
- 1 cup (about 4 ounces) fresh or frozen cranberries (no need to thaw if frozen)
- ¾ cup (150g) granulated sugar (adjust to your apples’ sweetness preference)
- ¼ cup (50g) packed light brown sugar
- ¼ cup (30g) all-purpose flour or cornstarch (for thickening, flour gives a slightly more opaque finish)
- 1 teaspoon ground cinnamon
- ½ teaspoon ground nutmeg
- ¼ teaspoon ground cloves
- ¼ teaspoon ground ginger
- 1 tablespoon fresh lemon juice (brightens the flavors beautifully)
- 1 teaspoon vanilla extract
- 2 tablespoons unsalted butter, cut into small pieces
- For the Golden Crumble Topping:
- 1 cup (120g) all-purpose flour
- ½ cup (100g) packed light brown sugar
- ½ cup (45g) old-fashioned rolled oats (not instant)
- ½ teaspoon ground cinnamon
- ¼ teaspoon ground nutmeg
- ¼ teaspoon fine sea salt
- ½ cup (113g) unsalted butter, very cold and cut into ½-inch cubes
- ½ cup (60g) chopped pecans or walnuts (optional, but highly recommended for crunch)
Preparing the Flaky Pie Crust
Crafting a truly exceptional pie starts with a stellar crust, and believe me, making it from scratch is incredibly rewarding! This recipe yields a tender, flaky crust that forms the perfect foundation for our rich filling. Patience and cold ingredients are your best friends here.
- First things first, let’s get our ingredients ready. In a large mixing bowl, I combine the 2 ½ cups of all-purpose flour, 1 teaspoon of granulated sugar, and 1 teaspoon of fine sea salt. Give them a good whisk to ensure everything is evenly distributed. This dry mixture sets the stage for our perfect crust.
- Next, it’s time for the butter. Take your very cold, cubed unsalted butter and add it to the flour mixture. To achieve that coveted flaky texture, it’s absolutely crucial that your butter remains as cold as possible throughout this initial process. Think of tiny pockets of butter melting during baking, creating steam that puffs up the dough into delicate layers. If your butter gets too warm, it will incorporate fully into the flour, resulting in a tough or crumbly crust rather than a flaky one. I often even cut my butter into small cubes and pop them back into the freezer for 10-15 minutes before I start, just to be sure!
- Now, we’ll “cut in” the butter. Using a pastry blender, two forks, or even your fingertips, work the butter into the flour mixture until it resembles coarse crumbs with some pea-sized pieces of butter still visible. Avoid overworking the dough here! The goal is to keep those butter pieces distinct. If using your hands, work quickly to prevent the butter from warming too much.
- In a separate small bowl, whisk together the ½ cup of ice water and the optional 1 tablespoon of apple cider vinegar. I find the vinegar adds a touch of tenderness to the crust, but it’s not strictly necessary. Gradually add this liquid mixture to the flour and butter, starting with about half of it. Stir with a fork until the dough just begins to come together. Add more ice water, one tablespoon at a time, just until the dough forms a shaggy ball. You might not need all of the water, or you might need a tiny bit more – it depends on the humidity and your flour.
- Turn the dough out onto a lightly floured surface and gently bring it together into a cohesive disk. Resist the urge to knead it extensively! Overworking develops gluten, which leads to a tough crust. Wrap the dough tightly in plastic wrap and refrigerate for at least 1 hour, or up to 2 days. This chilling period is non-negotiable; it allows the gluten to relax and the butter to firm up, making the dough much easier to roll and ensuring a flakier result.
- Once thoroughly chilled, remove the dough from the refrigerator. On a lightly floured surface, roll out the dough into a 12-13 inch circle, about ⅛-inch thick. Periodically lift and rotate the dough, adding a little more flour underneath if it sticks, to ensure even thickness and prevent sticking.
- Carefully transfer the rolled-out dough into a 9-inch pie plate. I like to gently fold it in half or quarters, then unfold it into the plate. Press the dough lightly into the bottom and sides of the pie plate, without stretching it. Trim any excess dough from the edges, leaving about a ½-inch overhang. Fold this overhang under itself, creating a neat, sturdy edge.
- Now, for the decorative touch: crimp the edges using your fingers or a fork. I typically use my thumb and forefinger to create a beautiful fluted edge. Once crimped, place the pie shell back into the refrigerator for another 30 minutes to firm up. This second chill helps prevent the crust from shrinking during baking.
- While the crust chills, preheat your oven to 400°F (200°C). Line the chilled pie shell with parchment paper or aluminum foil, making sure it covers the edges to prevent burning. Fill the pie shell with pie weights, dried beans, or rice.
- Blind bake (or par-bake) the crust for 15 minutes. This step is crucial for preventing a soggy bottom, especially with a juicy fruit filling. Remove the pie weights and parchment/foil, then continue baking for another 5-7 minutes, or until the crust is lightly golden and appears dry. Remove from the oven and set aside to cool slightly while you prepare the filling. Reduce oven temperature to 375°F (190°C).
Crafting the Aromatic Apple Cranberry Filling
Now that our beautiful pie crust is chilling, it’s time to focus on the heart of our Thanksgiving dessert: the vibrant, spiced apple and cranberry filling. This combination offers a delightful balance of sweet, tart, and warm spices, making it utterly irresistible. Choosing the right apples is key for the best texture and flavor.
- Let’s start with the stars of the show, the apples. I always go for a mix because it provides a more complex flavor profile and better texture. Granny Smith apples lend a wonderful tartness and hold their shape well, while Honeycrisp or Fuji bring sweetness and a softer, yet still firm, bite. Peel, core, and slice your 2 ½ pounds of apples into ¼-inch thick pieces. Aim for uniform slices so they cook evenly. Place all the apple slices into a very large mixing bowl.
- Next, gently fold in the 1 cup of fresh or frozen cranberries. If you’re using frozen, there’s no need to thaw them; they’ll cook down beautifully in the pie. The cranberries will burst during baking, releasing their tart juice and vibrant color, which is just perfect for a festive Thanksgiving pie.
- In a separate small bowl, combine your dry filling ingredients: ¾ cup granulated sugar, ¼ cup packed light brown sugar, ¼ cup all-purpose flour (or cornstarch for a slightly clearer filling), 1 teaspoon ground cinnamon, ½ teaspoon ground nutmeg, ¼ teaspoon ground cloves, and ¼ teaspoon ground ginger. Whisk these together until they’re thoroughly mixed. These spices are the essence of a warm, comforting holiday dessert. The aroma alone is enough to get you excited for the final product!
- Pour the sugar and spice mixture over the apples and cranberries in the large bowl. Add 1 tablespoon of fresh lemon juice and 1 teaspoon of vanilla extract. The lemon juice isn’t just for flavor; it also helps prevent the apples from browning and brightens all the other ingredients. Vanilla, of course, adds that touch of warmth and sweetness that complements the spices so well.
- With a large spoon or your clean hands, gently toss all the ingredients together until the apples and cranberries are thoroughly coated with the sugar, spices, and thickener. Make sure every slice gets a good dusting. You’ll notice the fruit will start to release some of its juices as it sits, which is exactly what we want. Set this glorious mixture aside while we prepare our crumble topping.
- A little pro tip for the filling: If your apples are particularly watery, you can let the mixture sit for about 15-20 minutes after mixing, then drain off any excess liquid before spooning it into the pie crust. This helps prevent a watery filling, but with the flour/cornstarch, it’s usually not necessary for this specific recipe unless your apples are exceptionally juicy. I usually skip this step because I love every bit of the delicious juices!
Whipping Up the Golden Crumble Topping
No crumble pie is complete without a rich, buttery, and perfectly spiced topping! This golden crumble adds a wonderful textural contrast to the soft fruit filling and brings an extra layer of flavor. The secret to a great crumble is cold butter and a gentle touch.
- In a medium-sized mixing bowl, combine the dry ingredients for our crumble: 1 cup of all-purpose flour, ½ cup of packed light brown sugar, ½ cup of old-fashioned rolled oats, ½ teaspoon of ground cinnamon, ¼ teaspoon of ground nutmeg, and ¼ teaspoon of fine sea salt. Give these a good whisk to ensure everything is evenly distributed. The oats add a delightful chewiness and rustic texture that I absolutely adore in a crumble.
- Now for the butter. Just like with the pie crust, we want our butter to be very cold and cut into ½-inch cubes. Add the ½ cup of cold butter cubes to the dry mixture.
- Using a pastry blender, your fingertips, or even a fork, work the butter into the dry ingredients. The goal here is to break down the butter into smaller pieces and mix it with the flour mixture until it resembles coarse crumbs. You want some pea-sized pieces of butter still visible – these will melt during baking and create those wonderful pockets of crispy goodness. Work quickly and avoid overworking the mixture, as warm butter will lead to a greasy, dense crumble rather than a light, crisp one. I personally love using my fingertips for this; I find it gives me the best feel for the texture, just making sure to work swiftly.
- If you’re using them, now is the time to stir in your ½ cup of chopped pecans or walnuts. The nuts add an extra layer of crunch and a beautiful nutty flavor that pairs exceptionally well with apples and cranberries. They are optional, but I highly recommend including them for that extra special touch, especially for a Thanksgiving dessert.
- Once your crumble topping is ready, set it aside. It should be a loose, crumbly mixture. If it starts to get warm or sticky, pop it into the refrigerator for a few minutes while you assemble the pie.
Assembling Your Thanksgiving Masterpiece
With our flaky crust par-baked, our vibrant filling mixed, and our golden crumble ready, it’s time to bring all these delicious components together! This is where our beautiful pie truly starts to take shape. A careful hand during assembly ensures even baking and a picture-perfect presentation.
- Retrieve your par-baked pie crust from the countertop. It should be slightly cooled but still sturdy. If you haven’t already, reduce your oven temperature to 375°F (190°C).
- Carefully spoon the prepared apple and cranberry filling into the par-baked pie shell. Make sure to distribute the fruit and any accumulated juices evenly. I like to mound the filling slightly in the center, as the fruit will cook down during baking. Don’t worry if it looks like a lot of fruit; it will settle beautifully.
- Once the filling is neatly in place, dot the top of the fruit with the 2 tablespoons of unsalted butter, cut into small pieces. These little bits of butter will melt into the filling, adding richness and a lovely sheen as the pie bakes.
- Now for the grand finale: sprinkle the glorious crumble topping evenly over the entire surface of the fruit filling. I like to gently press some of the crumble onto the very edge of the filling, ensuring every part of the pie gets that delicious, crunchy texture. Don’t press too firmly, just enough to make sure it adheres. You want a generous, almost overflowing layer of crumble for that classic look and incredible texture.
- To prepare your pie for baking and ensure easy cleanup, I highly recommend placing the assembled pie onto a large, rimmed baking sheet. This will catch any drips or overflow from the juicy filling, saving your oven from a sticky mess.
- Another important step for a perfect crust: To prevent the pie crust edges from burning before the rest of the pie is cooked through, you might want to create a foil shield. Take a large piece of aluminum foil and cut out the center, leaving a ring that will cover just the crimped edges of your pie crust. You can place this shield over the pie for the first 25-30 minutes of baking, or if you notice the edges browning too quickly during the initial bake. I find this especially helpful for achieving that perfectly golden-brown crust without overcooking.
Baking to Golden Perfection
The moment of truth! Baking our Spiced Apple Cranberry Crumble Pie requires a bit of attention, but the aromas that will fill your kitchen as it bakes are pure heaven. Proper temperature management and knowing when your pie is truly done are key to a spectacular finish.
- With your oven already preheated to 375°F (190°C), carefully place the pie, sitting on its rimmed baking sheet, onto the middle rack of your oven.
- Bake the pie for an initial 25-30 minutes at 375°F (190°C). During this time, the crust will continue to crisp up, and the crumble topping will begin to turn golden. If you notice the edges of your crust browning too quickly, gently place your foil pie shield over them now.
- After the initial bake, reduce the oven temperature to 350°F (175°C). Continue to bake for another 40-50 minutes, or even up to 60-70 minutes. The exact timing can vary significantly depending on your oven and the juiciness of your apples.
- How to tell when it’s done:
- The crumble topping should be beautifully golden brown and look delightfully crisp.
- The filling should be actively bubbling up through the crumble, especially towards the center. Those bubbles should look thick and syrupy, not watery.
- To ensure the apples are tender, you can carefully insert a thin, sharp knife or a skewer through one of the openings in the crumble into the apple filling. If it slides in with little resistance, your apples are perfectly cooked. This is the most reliable test!
- Another visual cue is that the crust around the edges should be deeply golden and appear fully baked.
- If at any point the crumble topping starts to brown too much before the filling is done, you can loosely tent the entire pie with aluminum foil. This protects the top while allowing the inside to continue cooking.
- Once your pie passes all the doneness tests, carefully remove it from the oven using oven mitts. Place the hot pie, still on its baking sheet, onto a wire rack to cool completely.
- This next step is perhaps the most important for a perfectly set pie: allowing it to cool. I know it’s tempting to slice into that warm, fragrant pie immediately, but for a truly clean slice where the filling holds its shape, you need to be patient. The pie needs to cool for at least 3-4 hours, or even longer, at room temperature. During this time, the filling will continue to thicken and set as it cools, resulting in those beautiful, firm slices. Cutting it too soon will result in a runny, messy pie, even if delicious! Trust me on this, the wait is worth it for a picture-perfect Thanksgiving dessert.
Serving Suggestions and Expert Tips
Congratulations, you’ve just created a truly magnificent Spiced Apple Cranberry Crumble Pie! Now for the best part: enjoying it. This pie is a perfect centerpiece for any Thanksgiving dessert spread, offering comforting flavors and textures that everyone will adore.
- Serving Temperature: While the pie needs to cool completely to set, I find it’s absolutely divine served slightly warm. After it has fully set, you can gently reheat individual slices in the microwave for 30-45 seconds, or warm the entire pie in a low oven (around 250°F or 120°C) for 15-20 minutes, just until warmed through.
- Classic Accompaniments: This pie truly shines when paired with a scoop of premium vanilla bean ice cream. The cold, creamy ice cream contrasts beautifully with the warm, spiced fruit filling. A dollop of freshly whipped cream, perhaps lightly sweetened with a touch of maple syrup, is another exquisite option. For an extra decadent touch, a drizzle of warm caramel sauce over each slice takes it to another level!
- Storage: If you happen to have any leftovers (a rare occurrence with this recipe!), store the cooled pie loosely covered with plastic wrap or aluminum foil at room temperature for up to 2 days. For longer storage, you can refrigerate it for up to 4-5 days. The crumble topping might soften slightly in the refrigerator, but the flavors will still be fantastic.
- Freezing Instructions: If you’re a planner (especially for Thanksgiving), you can bake the pie completely, let it cool entirely, and then freeze it. Wrap the cooled pie tightly in several layers of plastic wrap and then a layer of aluminum foil. It can be frozen for up to 2-3 months. To serve, thaw the pie overnight in the refrigerator, then warm it in a 300°F (150°C) oven for about 20-30 minutes, or until heated through, to crisp up the crumble.
- Make-Ahead Tips for Thanksgiving Prep:
- You can prepare the pie crust dough up to 2 days in advance and store it wrapped in the refrigerator.
- The crumble topping can also be made ahead of time. Prepare it as directed, then store it in an airtight container in the refrigerator for up to 3 days, or freeze it for up to 2 weeks.
- You can even pre-slice and prep your apples a day in advance, storing them in a bowl covered with water and a splash of lemon juice to prevent browning. Drain thoroughly before mixing with other filling ingredients.
These make-ahead options are lifesavers when you’re orchestrating a big holiday meal, allowing you to focus on other dishes and spend more time with your guests.
- Preventing a Soggy Bottom (Revisited): I can’t stress enough the importance of blind baking your crust and letting the pie cool completely. These two steps are your best defense against a soggy bottom crust, ensuring every bite is perfect. If you want extra insurance, you can brush the bottom of your par-baked crust with a lightly beaten egg white before the final bake; it creates a little seal!
- Customizing Spices: Feel free to adjust the spice blend to your preference. A pinch of cardamom can add an exotic touch, or a little extra ginger can give it a warmer kick. This pie is wonderfully adaptable, so make it your own!
This Spiced Apple Cranberry Crumble Pie is more than just a dessert; it’s a labor of love that will bring warmth, comfort, and joy to your Thanksgiving table. I truly hope you enjoy making and sharing it as much as I do!
<h2>Conclusion:</h2>
<p>So there you have it, my friends! We’ve reached the delicious end of our journey, and I genuinely hope you’re feeling as inspired as I am about this <strong>Spiced Apple Crumble with Maple Pecan Topping</strong>. What truly makes this recipe a non-negotiable addition to your culinary repertoire isn’t just its incredible flavor profile – a harmonious blend of tender, warmly spiced apples and a crunchy, buttery pecan streusel – but also its remarkable ease of preparation. Trust me, I’ve spent countless hours in the kitchen, and finding a dessert that delivers such an impressive “wow” factor with minimal fuss is like discovering a culinary unicorn. This isn’t just another apple crumble; it’s <em>the</em> apple crumble. It’s got that perfect balance of sweetness and spice, with the tang of fresh apples cutting through the richness of the topping. Every bite offers a delightful textural contrast, from the soft, yielding fruit to the crisp, nutty crunch that makes you want to close your eyes and savor the moment. It’s comfort food elevated, a timeless classic given a modern, irresistible twist with the addition of maple and pecans. Whether you’re a seasoned baker or someone just starting to explore the joys of homemade desserts, this recipe is designed to bring you success and, more importantly, immense satisfaction. It’s the kind of dish that makes your kitchen smell absolutely divine, instantly creating a cozy, welcoming atmosphere that permeates your entire home.</p>
<h4>Serving Suggestions & Creative Variations</h4>
<p>Now, while this Spiced Apple Crumble is absolutely divine straight from the oven, still warm and bubbling, I have a few suggestions to take your dessert experience to the next level. My absolute favorite way to serve it is with a generous scoop of vanilla bean ice cream. The cold, creamy ice cream melting into the warm crumble is pure bliss, creating a symphony of temperatures and textures that is simply irresistible. Alternatively, a dollop of freshly whipped cream, perhaps infused with a hint of vanilla or a dash of cinnamon, would also be a fantastic accompaniment. For those who prefer a lighter touch, a simple dusting of powdered sugar adds an elegant finish, or a drizzle of warm maple syrup can enhance those lovely pecan notes. Don’t forget, a cup of strong coffee or a comforting herbal tea makes for the perfect pairing, especially on a chilly evening.</p>
<p>But let’s talk about variations – this recipe is wonderfully versatile! If apples aren’t your only love, feel free to experiment with other fruits. A pear and cranberry crumble, a mixed berry crumble, or even a peach and ginger crumble would all be spectacular. Just ensure your chosen fruit has a similar water content or adjust baking time accordingly. Want to add more textural intrigue? Toast some walnuts or almonds and mix them into the streusel topping alongside the pecans, or even replace them entirely. For a richer, more indulgent crumble, consider stirring in a tablespoon or two of dulce de leche or salted caramel sauce with the apples before baking. If you’re catering to dietary restrictions, a gluten-free flour blend can easily be substituted for the all-purpose flour in the topping, and a dairy-free butter substitute works beautifully for the crumble topping as well. You could even make individual crumbles in ramekins for a charming, personalized dessert experience – just reduce the baking time slightly. The possibilities truly are endless, and I encourage you to make this recipe your own, adapting it to your taste and what you have on hand.</p>
<h4>Your Culinary Adventure Awaits!</h4>
<p>I’m so incredibly excited for you to try this recipe. It’s more than just a dish; it’s an experience, a moment of warmth and delight that you can share with loved ones or savor all by yourself. Imagine that first fragrant spoonful, the gentle crunch of the topping giving way to the tender, spiced apples beneath. It’s pure magic! So please, don’t just read about it – gather your ingredients, preheat your oven, and dive into the wonderful world of homemade apple crumble. This recipe is destined to become a staple in your kitchen, a go-to dessert for family gatherings, quiet evenings, or whenever you need a little sweet pick-me-up. It’s truly a timeless classic for a reason.</p>
<p>And speaking of timeless classics, you know, sometimes the journey to finding the absolute best recipes feels like an adventure, sifting through countless options until you land on that one perfect gem. It’s like discovering a particularly well-curated collection, almost as if you’ve followed a specific path that might even look something like <strong>?utm_source=pinterest.com&utm_medium=social&utm_campaign=allrecipes_allrecipes_11554471&utm_content=thanksgivingpractical_designed&utm_term=thanksgivingdesserts_202010</strong> to get to this ultimate, practical Thanksgiving dessert. Yes, it’s that perfectly designed to bring joy! This recipe embodies that spirit of discovery and pure deliciousness, making it a truly special find for your holiday table or any day that calls for something extraordinary.</p>
<p>Once you’ve whipped up your own batch of this glorious crumble, I would absolutely love to hear about your experience! Did you stick to the original recipe, or did you put your own creative spin on it? What were your favorite serving suggestions? Please, share your photos, your triumphs, and any tips you discovered along the way in the comments below. Your feedback and creativity inspire not just me, but our entire community of food lovers. There’s nothing more rewarding than seeing our recipes come to life in your kitchens. Thank you for joining me on this culinary adventure, and happy baking!</p>
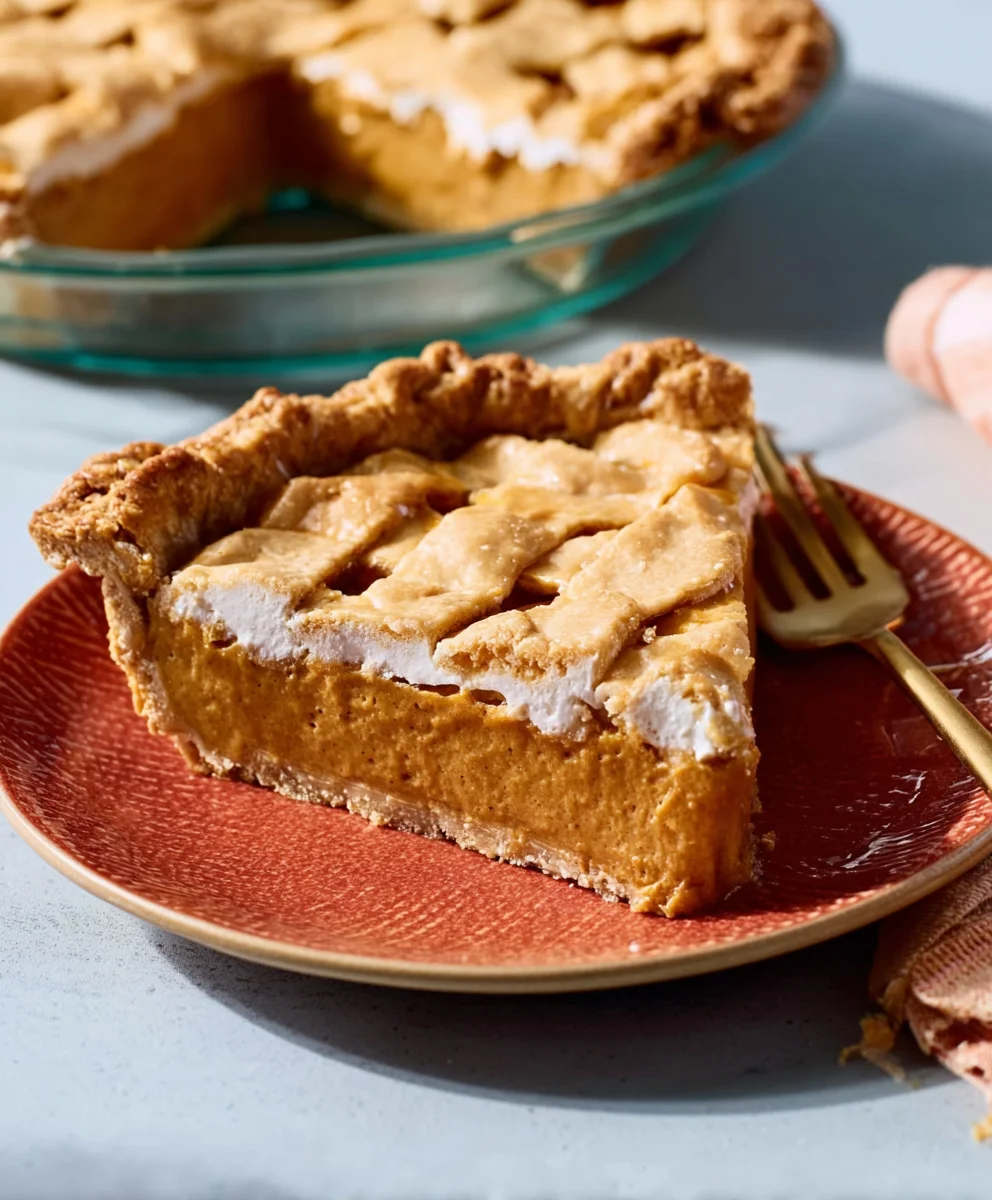
Spiced Apple Cranberry Crumble Pie
This Spiced Apple Cranberry Crumble Pie is the perfect sweet grand finale for your Thanksgiving feast. Featuring a flaky crust, a vibrant apple and cranberry filling spiced with cinnamon, nutmeg, and cloves, and a golden, crunchy crumble topping, it’s a timeless dessert that brings warmth, comfort, and joy to your holiday table.
Ingredients
-
2 ½ cups (300g) all-purpose flour
-
1 teaspoon granulated sugar
-
1 teaspoon fine sea salt
-
1 cup (226g) unsalted butter, very cold and cut into ½-inch cubes
-
½ cup (120ml) ice water, plus 1-2 tablespoons more if needed
-
1 tablespoon apple cider vinegar (optional)
-
6 cups (about 2 ½ pounds) mixed baking apples, peeled, cored, and sliced ¼-inch thick
-
1 cup (about 4 ounces) fresh or frozen cranberries
-
¾ cup (150g) granulated sugar
-
¼ cup (50g) packed light brown sugar
-
¼ cup (30g) all-purpose flour or cornstarch
-
1 teaspoon ground cinnamon
-
½ teaspoon ground nutmeg
-
¼ teaspoon ground cloves
-
¼ teaspoon ground ginger
-
1 tablespoon fresh lemon juice
-
1 teaspoon vanilla extract
-
2 tablespoons unsalted butter, cut into small pieces
-
1 cup (120g) all-purpose flour
-
½ cup (100g) packed light brown sugar
-
½ cup (45g) old-fashioned rolled oats
-
½ teaspoon ground cinnamon
-
¼ teaspoon ground nutmeg
-
¼ teaspoon fine sea salt
-
½ cup (113g) unsalted butter, very cold and cut into ½-inch cubes
-
½ cup (60g) chopped pecans or walnuts (optional)
Instructions
-
Step 1
Whisk 2 ½ cups all-purpose flour, 1 tsp granulated sugar, and 1 tsp fine sea salt. Cut in 1 cup (226g) very cold cubed unsalted butter until pea-sized crumbs form. -
Step 2
Gradually add ½ cup ice water (plus optional 1 tbsp apple cider vinegar) to form a shaggy dough. Gently form a disk, wrap in plastic, and refrigerate for at least 1 hour. -
Step 3
Roll dough to a 12-13 inch circle. Transfer to a 9-inch pie plate. Trim, fold under, and crimp edges. Refrigerate for another 30 minutes. -
Step 4
Preheat oven to 400°F (200°C). Line chilled crust with parchment/foil, fill with pie weights. Blind bake for 15 minutes. Remove weights/parchment. Bake 5-7 more minutes until lightly golden. Cool slightly. Reduce oven to 375°F (190°C). -
Step 5
Combine 6 cups sliced mixed apples and 1 cup fresh or frozen cranberries in a large bowl. -
Step 6
In a separate bowl, whisk ¾ cup granulated sugar, ¼ cup packed light brown sugar, ¼ cup all-purpose flour or cornstarch, 1 tsp ground cinnamon, ½ tsp ground nutmeg, ¼ tsp ground cloves, and ¼ tsp ground ginger. -
Step 7
Add 1 tbsp fresh lemon juice and 1 tsp vanilla extract to the fruit. Pour the sugar/spice mix over the fruit and toss gently to thoroughly coat. Set aside. -
Step 8
In a medium bowl, whisk 1 cup all-purpose flour, ½ cup packed light brown sugar, ½ cup old-fashioned rolled oats, ½ tsp ground cinnamon, ¼ tsp ground nutmeg, and ¼ tsp fine sea salt. Cut in ½ cup (113g) very cold cubed unsalted butter until coarse crumbs with pea-sized pieces form. -
Step 9
Stir in ½ cup (60g) chopped pecans or walnuts (optional). -
Step 10
Spoon the apple cranberry filling evenly into the par-baked pie shell. Dot the top of the fruit with 2 tbsp small pieces of unsalted butter. Sprinkle the crumble topping evenly over the entire surface of the fruit filling. -
Step 11
Place the assembled pie onto a large, rimmed baking sheet. Bake at 375°F (190°C) for 25-30 minutes. If crust edges brown too quickly, cover with a foil shield. -
Step 12
Reduce oven to 350°F (175°C). Continue baking for another 40-70 minutes, until the crumble is golden brown, the filling is actively bubbling thickly, and apples are tender when pierced. If topping browns too much, loosely tent with foil. Remove from oven and cool completely on a wire rack for at least 3-4 hours to allow the filling to properly set before slicing.
Important Information
Nutrition Facts (Per Serving)
It is important to consider this information as approximate and not to use it as definitive health advice.
Allergy Information
Please check ingredients for potential allergens and consult a health professional if in doubt.

Leave a Comment