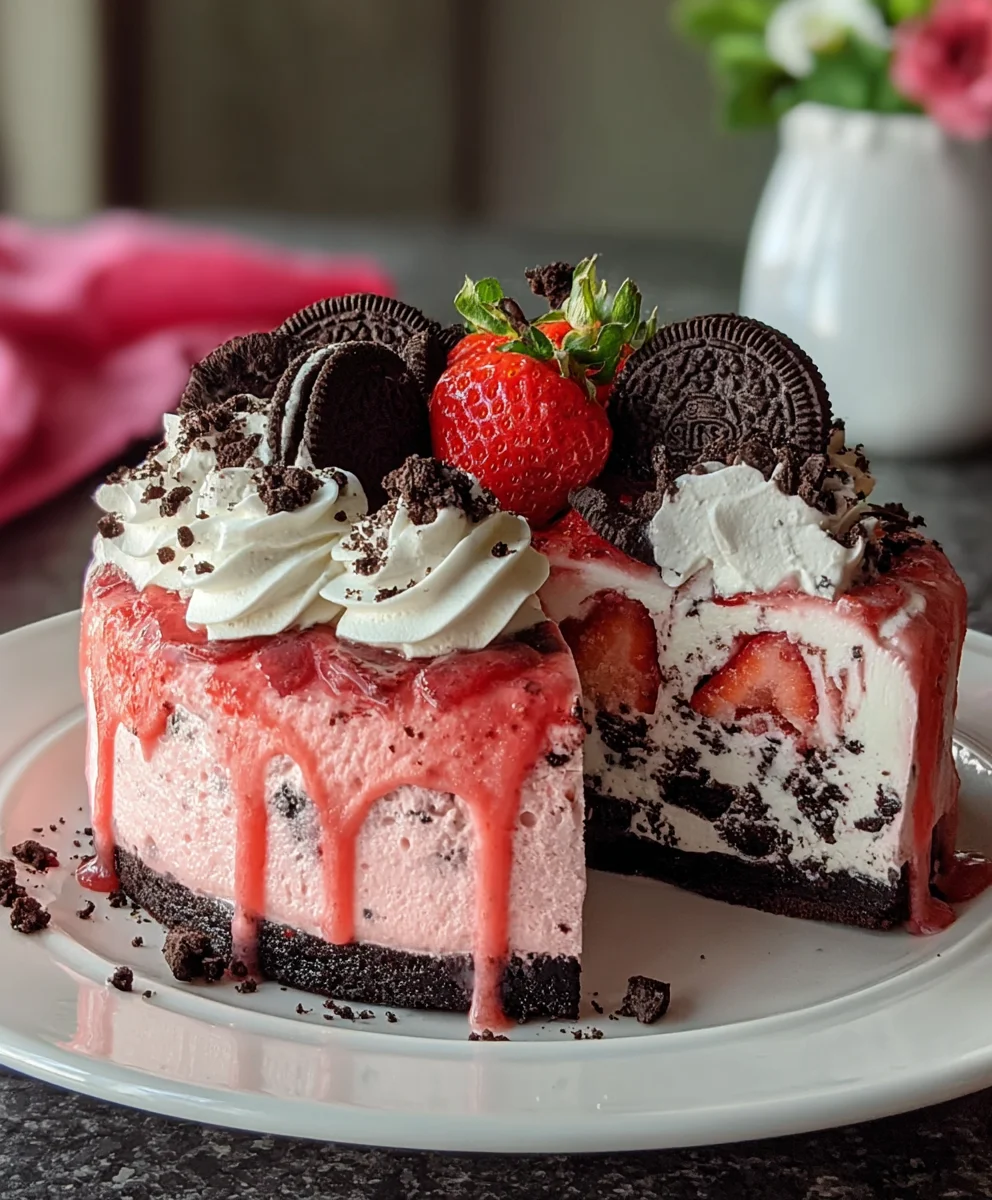
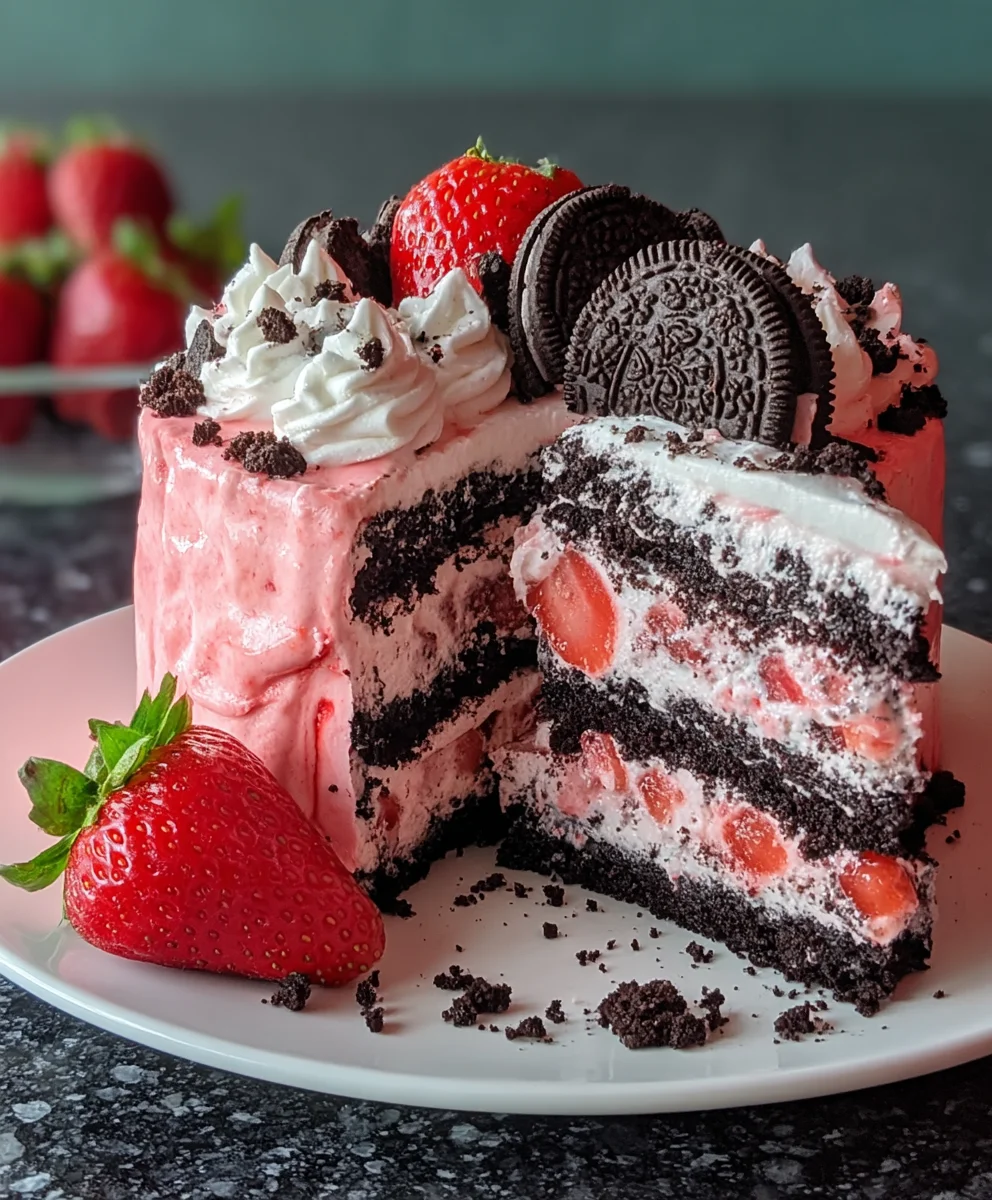
Strawberry Oreo Cake is more than just a dessert; it’s an irresistible symphony of flavors and textures designed to captivate your senses from the very first glance. Imagine the vibrant freshness of ripe strawberries perfectly complementing the iconic crunch and rich chocolatey goodness of Oreo cookies, all layered within a moist, tender cake and crowned with a luscious frosting. I am absolutely delighted to share this extraordinary recipe with you, as it truly elevates the art of dessert-making.
A Modern Classic: Why We Love This Decadent Combination
While this particular confection doesn’t boast ancient roots, it certainly embodies the modern culinary trend of uniting beloved, nostalgic ingredients in innovative ways. This cake speaks to a universal desire for comforting yet exciting flavors. People adore this dish for its exquisite balance: the sweet-tart burst of strawberries cuts through the decadent sweetness of the Oreo cream and chocolate, creating a dynamic taste profile that keeps you coming back for more. The contrasting textures—soft cake, creamy frosting, and the delightful crunch of crushed Oreos—make every bite an adventure. It’s a visually stunning creation, too, making the Strawberry Oreo Cake an absolute showstopper for birthdays, gatherings, or simply a luxurious treat on an ordinary day. I promise, preparing this cake is an act of pure joy, and sharing it is even better.
Ingredients:
-
For the Strawberry Oreo Cake Layers:
- 2 ½ cups (300g) all-purpose flour
- ¾ cup (75g) unsweetened cocoa powder, Dutch-processed is my preferred choice for a richer color and flavor
- 2 teaspoons baking soda
- 1 teaspoon salt
- 1 cup (226g) unsalted butter, softened to room temperature
- 2 cups (400g) granulated sugar
- 4 large eggs, also at room temperature
- 1 ½ teaspoons pure vanilla extract
- 1 cup (240ml) buttermilk, at room temperature
- ½ cup (120ml) hot water or hot coffee (coffee enhances the chocolate flavor without making it taste like coffee!)
- 1 ½ cups (about 15-20 cookies) crushed Oreo cookies (cream filling removed, or left in for extra sweetness – your choice!)
-
For the Fresh Strawberry Puree & Filling:
- 3 cups (about 450g) fresh strawberries, hulled and quartered
- ½ cup (100g) granulated sugar (adjust to your strawberries’ sweetness)
- 1 tablespoon fresh lemon juice
- 1 tablespoon cornstarch (optional, for a thicker filling)
- 2 tablespoons cold water (if using cornstarch)
-
For the Oreo Cream Cheese Frosting:
- 1 cup (226g) unsalted butter, softened to room temperature
- 8 ounces (226g) full-fat cream cheese, softened to room temperature
- 5-6 cups (600-720g) powdered sugar, sifted, or more to achieve desired consistency
- 2 teaspoons pure vanilla extract
- ¼ teaspoon salt
- ½ cup (about 5-7 cookies) finely crushed Oreo cookies (cream filling left in is fine here)
-
For Garnish:
- Fresh strawberries, sliced or whole
- Extra crushed Oreo cookies or whole Oreos
For the Strawberry Oreo Cake Layers:
-
Prepare Your Workspace:
Before I even think about mixing, I always preheat my oven to 350°F (175°C). Then, I generously grease and flour three 8-inch round cake pans. If you only have two, you can bake in two thicker layers and then slice them in half horizontally once cooled. For extra insurance against sticking, I often line the bottoms with parchment paper circles. This careful preparation is key to ensuring your beautiful Strawberry Oreo Cake layers come out perfectly.
-
Sift the Dry Ingredients:
In a large bowl, I like to whisk together my all-purpose flour, unsweetened cocoa powder (remember, Dutch-processed will give you a darker, richer cake!), baking soda, and salt. Sifting is really important here; it aerates the flour, preventing lumps and ensuring a consistently tender crumb for our finished cake. Plus, it helps all the leavening agents distribute evenly. Set this bowl aside for a moment.
-
Cream Butter and Sugar:
In the bowl of a stand mixer fitted with the paddle attachment, or using a large bowl with an electric hand mixer, I beat the softened unsalted butter on medium speed until it’s light and fluffy, usually for about 2-3 minutes. Then, I gradually add the granulated sugar, beating for another 3-5 minutes until the mixture is truly light in color and airy. This creaming process incorporates air into the butter, which contributes significantly to the cake’s texture and rise. Don’t rush this step! It’s fundamental to a delicious cake.
-
Add Eggs and Vanilla:
Next, I crack in my large eggs, one at a time, beating well after each addition. I make sure each egg is fully incorporated before adding the next. Once all eggs are in, I mix in the pure vanilla extract. Scrape down the sides of the bowl often with a rubber spatula to ensure everything is evenly combined.
-
Alternate Dry and Wet Ingredients:
Now, it’s time to bring the dry and wet ingredients together. With the mixer on low speed, I alternate adding the dry ingredient mixture and the buttermilk to the butter-sugar-egg mixture, beginning and ending with the dry ingredients. So, it’s like this: one-third dry, half buttermilk, one-third dry, half buttermilk, and finally, the last one-third dry. Mix just until combined after each addition.
-
Incorporate Hot Liquid:
Once the dry and wet ingredients are mostly combined, I slowly pour in the hot water or hot coffee. Mixing it in on low speed until just incorporated. The hot liquid helps to “bloom” the cocoa powder, intensifying its flavor and making the chocolate taste even richer. Be careful not to overmix the batter at any point from here on out. Overmixing can develop the gluten in the flour too much, leading to a tough cake. We want a tender, moist Strawberry Oreo Cake!
-
Fold in Crushed Oreos:
This is where the “Oreo” in our Strawberry Oreo Cake truly shines! I gently fold in the crushed Oreo cookies using a spatula. I just incorporate them enough so they are evenly distributed throughout the batter. You want those delightful cookie pieces in every bite.
-
Bake the Cake Layers:
Divide the batter evenly among your prepared cake pans. I like to use a kitchen scale for this to ensure my layers are perfectly uniform, which makes assembly much easier. Bake for 28-32 minutes, or until a wooden skewer or toothpick inserted into the center of a cake comes out clean or with only a few moist crumbs attached. The exact baking time can vary depending on your oven and pan size.
-
Cooling the Layers:
Once baked, I let the cakes cool in their pans on a wire rack for about 10-15 minutes. This cooling period in the pan allows the cakes to firm up slightly, making them easier to handle. After that, I carefully invert them onto the wire racks to cool completely. It’s crucial that the cake layers are completely cool before you attempt to frost them, otherwise, your frosting will melt and slide right off. Trust me on this one; patience is a virtue when baking a layered cake!
For the Fresh Strawberry Puree & Filling:
-
Prepare the Strawberries:
I start by washing and hulling my fresh strawberries, then quartering them. This helps them break down more easily. If you have extra ripe, sweet strawberries, you might adjust the sugar down a bit.
-
Cook the Puree:
In a medium saucepan, I combine the quartered strawberries, granulated sugar, and fresh lemon juice. I bring this mixture to a gentle simmer over medium heat, stirring occasionally. The strawberries will release their juices, and the mixture will start to break down.
-
Thicken the Filling (Optional but Recommended):
I usually let the mixture simmer for about 8-10 minutes, or until the strawberries are very soft and the liquid has reduced slightly. At this point, if I want a thicker, more spoonable filling (which I almost always do for a layer cake like our Strawberry Oreo Cake), I’ll make a cornstarch slurry. In a small bowl, I whisk together the cornstarch and cold water until smooth, then stir it into the simmering strawberry mixture. I continue to cook and stir for another 1-2 minutes, until the filling has visibly thickened. The lemon juice is vital here; it brightens the strawberry flavor and helps balance the sweetness.
-
Puree and Cool:
Once thickened, I remove the saucepan from the heat. For a smooth filling, I use an immersion blender to puree the mixture directly in the pot. If you don’t have one, you can carefully transfer it to a regular blender or food processor. If you prefer a slightly chunkier filling, you can mash it with a fork or potato masher instead. Transfer the strawberry puree to a clean bowl and cover it directly with plastic wrap to prevent a skin from forming. Let it cool completely to room temperature, then refrigerate for at least 1-2 hours (or overnight) until it’s nicely chilled and firm enough to spread between cake layers. This chilled, vibrant filling is going to be a fantastic contrast in our Strawberry Oreo Cake!
For the Oreo Cream Cheese Frosting:
-
Soften Ingredients:
For the best cream cheese frosting texture, it’s absolutely essential that both your unsalted butter and full-fat cream cheese are at room temperature. This ensures a smooth, lump-free frosting. If they’re too cold, your frosting will be lumpy; if too warm, it might be too runny.
-
Cream Butter and Cream Cheese:
In the bowl of a stand mixer fitted with the paddle attachment, or using a large bowl with an electric hand mixer, I beat the softened butter and cream cheese together on medium-low speed for about 2-3 minutes. I aim for a very smooth, creamy consistency with no lumps. Scrape down the sides of the bowl frequently to ensure everything is thoroughly combined.
-
Add Powdered Sugar:
With the mixer on low speed, I gradually add the sifted powdered sugar, about one cup at a time, allowing it to incorporate fully after each addition. Sifting the powdered sugar is non-negotiable for a smooth frosting! Once all the sugar is in, I increase the speed to medium and beat for another 2-3 minutes until the frosting is light, fluffy, and well aerated.
-
Flavor the Frosting:
I then mix in the pure vanilla extract and salt. The salt really helps to balance the sweetness of the sugar and cream cheese, enhancing the overall flavor profile of our Strawberry Oreo Cake frosting. Beat until just combined.
-
Fold in Crushed Oreos:
Finally, I gently fold in the finely crushed Oreo cookies using a spatula. You want to mix them in just enough so they’re evenly distributed throughout the frosting, giving you those delightful little specks and bursts of Oreo flavor. Be careful not to overmix, or you might break down the cookie pieces too much. This luscious, cookies-and-cream frosting is the perfect complement to the rich chocolate cake and tart strawberry filling.
-
Adjust Consistency:
If your frosting seems too thick, you can add a tablespoon or two of milk or heavy cream until it reaches your desired consistency. If it’s too thin, a bit more sifted powdered sugar can help firm it up. I usually keep my frosting at a medium consistency for both filling and piping.
Assembling Your Strawberry Oreo Cake:
-
Level the Cake Layers:
Once your cake layers are completely cooled (this is critical!), I like to use a serrated knife or a cake leveler to carefully level the tops of each cake layer. This creates a flat surface, making your layered Strawberry Oreo Cake stable and even. Don’t worry, those delicious cake scraps are perfect for a little baker’s snack!
-
The First Layer:
Place one leveled cake layer on your serving plate or cake stand. If you plan to move the cake later, you can place strips of parchment paper under the edges of the first layer to keep your serving plate clean, then gently pull them out once the cake is decorated.
-
Pipe a Frosting Dam:
Using a piping bag fitted with a large round tip (or simply snipping off the corner of a Ziploc bag), pipe a dam of Oreo cream cheese frosting around the outer edge of the first cake layer. This creates a barrier that will hold the strawberry filling securely in place and prevent it from oozing out the sides.
-
Add Strawberry Filling:
Spoon about ½ to ¾ cup of the chilled fresh strawberry puree and filling into the center of the frosting dam. Carefully spread it evenly within the dam, leaving a small gap from the edge to prevent spills. The vibrant color and fresh taste of this layer are going to be a beautiful surprise in every slice of your Strawberry Oreo Cake.
-
Frost the First Layer:
Now, spoon a generous amount of Oreo cream cheese frosting over the strawberry filling. Using an offset spatula, carefully spread the frosting evenly across the entire surface of the cake, gently pushing it towards the edges and making sure it touches the frosting dam.
-
Repeat Layers:
Carefully place the second cake layer on top, pressing down gently to secure it. Repeat steps 3, 4, and 5: pipe a frosting dam, add strawberry filling, and spread another layer of frosting.
-
The Top Layer:
Place the final cake layer on top. Do not add filling to this layer.
-
The Crumb Coat:
Now for the crumb coat! This is a thin layer of frosting that “traps” any loose crumbs, ensuring a clean and smooth final finish. Apply a very thin layer of Oreo cream cheese frosting all over the top and sides of the entire cake. Don’t worry about perfection here; just get a thin, even coat. Once applied, refrigerate the cake for 20-30 minutes, or until the crumb coat is firm to the touch. This step is invaluable for a professional-looking cake!
-
The Final Frosting Layer:
Once the crumb coat is firm, remove the cake from the refrigerator. Apply a thicker, more generous layer of the remaining Oreo cream cheese frosting to the top and sides of the cake. Use your offset spatula or a bench scraper to smooth the frosting as much as you like. Take your time to achieve the desired look. This is the big reveal for your stunning Strawberry Oreo Cake!
-
Decorate Your Masterpiece:
This is where you can let your creativity shine! I love to decorate the top of my Strawberry Oreo Cake with fresh strawberry slices or whole strawberries arranged artfully. You can also sprinkle additional crushed Oreo cookies around the base or on top, or even place a few whole Oreos for extra flair. Sometimes I’ll pipe small rosettes of frosting around the top edge, too.
-
Chill and Serve:
For the best results, refrigerate your fully assembled and decorated Strawberry Oreo Cake for at least 1-2 hours before slicing. This allows the frosting to firm up and the flavors to meld beautifully. When ready to serve, let it sit at room temperature for about 15-20 minutes for optimal taste and texture. I promise, every bite of this homemade Strawberry Oreo Cake will be a delightful experience! Enjoy!
Conclusion:
So, there you have it, my dear fellow dessert enthusiasts! We’ve journeyed together through the delightful process of creating what I genuinely believe is one of the most incredibly satisfying cakes you’ll ever bake. This isn’t just another dessert recipe; it’s an experience, a celebration of flavors and textures that come together in perfect harmony. From the moment you slice into it, you’re greeted with layers of creamy, fruity, and crunchy goodness that promise a memorable bite every single time.
What makes this particular creation, our delightful Strawberry Oreo Cake, an absolute must-try? It’s the magical fusion, really. The inherent sweetness and slight tartness of fresh, ripe strawberries, bright and juicy, cutting beautifully through the rich, classic chocolatey crunch of Oreo cookies. Then, all of this is enveloped in a smooth, luxurious frosting that ties every element together, creating a symphony for your taste buds. The visual appeal alone is enough to make mouths water – those vibrant red strawberry pieces nestled amongst dark Oreo crumbs, peeking out from a pristine frosting, it’s truly a feast for the eyes before it even touches your palate. It’s the kind of cake that looks incredibly impressive, yet, as you’ve seen, is surprisingly achievable in your own kitchen. It strikes that perfect balance of familiar comfort and exciting innovation, making it an instant crowd-pleaser for any occasion, from a casual family dinner to a more elaborate gathering where you want to truly wow your guests. The combination is simply irresistible, offering a playful nostalgia with a sophisticated edge, making it a dessert that both children and adults will adore.
Elevate Your Strawberry Oreo Cake Experience: Serving Suggestions & Variations
Now that you’ve mastered the basic recipe, let’s talk about how you can make this cake even more uniquely yours, or how best to serve it to truly impress. While spectacular on its own, a generous slice of this cake can be beautifully complemented by a small dollop of freshly whipped cream, perhaps infused with a hint of vanilla bean or a touch of orange zest, allowing its lightness to cut through the cake’s richness. Alternatively, a scoop of high-quality vanilla bean or even a complementary strawberry ice cream, melting slowly alongside, can introduce an extra layer of creamy delight. For an added touch of elegance and a burst of fresh flavor, consider drizzling a delicate strawberry coulis or a raspberry sauce over each slice just before serving; the extra burst of fresh fruit flavor can be utterly divine and visually stunning. If you’re feeling extra indulgent, a thin layer of dark chocolate ganache, allowed to set slightly before serving, can introduce another layer of decadence that pairs wonderfully with both the strawberries and the Oreos, creating a triple threat of flavor.
Beyond serving, don’t be afraid to experiment with variations to truly make this recipe your own! Instead of just fresh strawberries in the filling and as a garnish, you could fold in a handful of finely chopped freeze-dried strawberries into the frosting itself for an even more intense berry flavor and a beautiful, natural pink hue. Or, why not try other berry combinations? Raspberries or blueberries would also be fantastic, offering their own unique tartness and color, though the iconic “Strawberry Oreo” combination is undeniably hard to beat for its classic appeal. If you’re looking for a slightly different texture and added depth of flavor, a handful of toasted chopped almonds, pecans, or walnuts could be folded into the cake batter for an added nutty crunch. For those who love a bit of citrus to brighten sweet desserts, a tiny zest of lemon or orange in the frosting or even in the cake batter can elevate the entire profile. And remember, this cake is also perfect for making ahead! It chills beautifully, allowing the flavors to meld even further and the cake layers to become even more moist, so feel free to bake it a day in advance, frost it, and let it firm up in the refrigerator for a stress-free serving experience. Just be sure to bring it to room temperature for about 30 minutes before serving to ensure the cake and frosting are at their optimal texture and flavor.
Your Turn! I Can’t Wait to Hear From You!
I truly hope you feel inspired and ready to dive into your kitchen to create this show-stopping dessert. There’s immense joy in baking, and even more so when the result is as magnificent and delicious as this cake. I promise you, the aroma alone as it bakes will fill your home with warmth and anticipation, setting the stage for a truly special treat. Please, please give this recipe a try! I am genuinely excited to hear about your experience. Did you add your own unique twist? How did your family and friends react to this delightful creation? Share your triumphs, your photos, and any clever tips or variations you discovered along the way in the comments below. Your feedback and creativity not only inspire me but also help our wonderful community of home bakers discover new ways to enjoy their favorite treats. Let’s make some sweet memories, one delicious slice at a time. Happy baking, everyone!
Strawberry Oreo Cake
An irresistible layered cake featuring moist chocolate Oreo cake, fresh strawberry puree filling, and luscious Oreo cream cheese frosting. Perfect for celebrations or a decadent treat.
Ingredients
-
2 ½ cups all-purpose flour
-
¾ cup Dutch-processed unsweetened cocoa powder
-
2 teaspoons baking soda
-
1 teaspoon salt
-
1 cup unsalted butter, softened
-
2 cups granulated sugar
-
4 large eggs, room temperature
-
1 ½ teaspoons pure vanilla extract
-
1 cup buttermilk, room temperature
-
½ cup hot water or hot coffee
-
1 ½ cups crushed Oreo cookies (cream filling optional)
-
3 cups fresh strawberries, hulled & quartered
-
½ cup granulated sugar (for puree)
-
1 tablespoon fresh lemon juice
-
1 tablespoon cornstarch (optional, for thicker filling)
-
2 tablespoons cold water (if using cornstarch)
-
1 cup unsalted butter, softened (for frosting)
-
8 ounces full-fat cream cheese, softened
-
5-6 cups powdered sugar, sifted
-
2 teaspoons pure vanilla extract (for frosting)
-
¼ teaspoon salt (for frosting)
-
½ cup finely crushed Oreo cookies (cream filling optional, for frosting)
-
Fresh strawberries, sliced or whole (for garnish)
-
Extra crushed Oreo cookies or whole Oreos (for garnish)
Instructions
-
Step 1
Preheat oven to 350°F (175°C). Grease and flour three 8-inch round cake pans; line bottoms with parchment paper. -
Step 2
In a large bowl, sift together all-purpose flour, cocoa powder, baking soda, and salt. Set aside. -
Step 3
In a stand mixer, beat softened unsalted butter until light and fluffy (2-3 min). Gradually add granulated sugar, beating for another 3-5 minutes until light and airy. -
Step 4
Add large eggs one at a time, beating well after each. Mix in vanilla extract. Scrape down the bowl. -
Step 5
With mixer on low, alternately add dry ingredient mixture and buttermilk to the butter-sugar-egg mixture, beginning and ending with dry. Mix just until combined after each addition. -
Step 6
Slowly pour in hot water or hot coffee, mixing on low until just incorporated. Do not overmix. -
Step 7
Gently fold in 1 ½ cups crushed Oreo cookies using a spatula until evenly distributed. -
Step 8
Divide batter evenly among prepared pans. Bake for 28-32 minutes, or until a wooden skewer inserted into the center comes out clean. -
Step 9
Cool cakes in pans on a wire rack for 10-15 minutes, then invert onto racks to cool completely. Layers must be completely cool before frosting. -
Step 10
In a medium saucepan, combine hulled and quartered strawberries, ½ cup granulated sugar, and fresh lemon juice. Bring to a gentle simmer over medium heat, stirring occasionally, until strawberries are soft (8-10 minutes). -
Step 11
If desired, whisk together cornstarch and 2 tablespoons cold water to form a slurry. Stir into simmering strawberry mixture and cook for 1-2 minutes until thickened. -
Step 12
Remove from heat. Puree with an immersion blender (or regular blender) until smooth. Transfer to a bowl, cover directly with plastic wrap, and refrigerate for at least 1-2 hours until chilled and firm. -
Step 13
Ensure butter and full-fat cream cheese are at room temperature. In a stand mixer, beat softened butter and cream cheese together on medium-low speed for 2-3 minutes until smooth and lump-free. Scrape down bowl frequently. -
Step 14
Gradually add sifted powdered sugar, 1 cup at a time, on low speed until incorporated. Increase speed to medium and beat for 2-3 minutes until light and fluffy. Mix in pure vanilla extract and ¼ teaspoon salt until just combined. -
Step 15
Gently fold in ½ cup finely crushed Oreo cookies using a spatula until evenly distributed. Adjust consistency with milk/cream or powdered sugar if needed. -
Step 16
Once cake layers are completely cool, use a serrated knife or cake leveler to level the tops of each layer for an even cake. -
Step 17
Place one leveled cake layer on a serving plate. Pipe a dam of Oreo cream cheese frosting around the outer edge. Spoon ½ to ¾ cup of chilled strawberry puree into the center and spread evenly within the dam. -
Step 18
Spoon a generous amount of frosting over the strawberry filling and spread evenly across the entire surface, ensuring it touches the frosting dam. -
Step 19
Carefully place the second cake layer on top, pressing gently. Repeat piping a frosting dam, adding strawberry filling, and spreading another layer of frosting. -
Step 20
Place the final cake layer on top. Do not add filling to this layer. -
Step 21
Apply a very thin layer of frosting all over the top and sides of the cake to trap crumbs. Refrigerate for 20-30 minutes, or until the crumb coat is firm to the touch. -
Step 22
Remove cake from refrigerator. Apply a thicker, more generous layer of remaining frosting to the top and sides. Smooth with an offset spatula or bench scraper to your desired finish. -
Step 23
Decorate the cake with fresh strawberry slices or whole strawberries and extra crushed Oreo cookies or whole Oreos. -
Step 24
Refrigerate the fully assembled and decorated cake for at least 1-2 hours before slicing to allow flavors to meld and frosting to firm up. Let sit at room temperature for 15-20 minutes before serving for optimal taste and texture.
Important Information
Nutrition Facts (Per Serving)
It is important to consider this information as approximate and not to use it as definitive health advice.
Allergy Information
Please check ingredients for potential allergens and consult a health professional if in doubt.


Leave a Comment